# Welcome

<figure><picture><source srcset="/files/iPzt3fm2PEBroWZmEzZF" media="(prefers-color-scheme: dark)"><img src="https://3883897532-files.gitbook.io/~/files/v0/b/gitbook-x-prod.appspot.com/o/spaces%2F0mRE72CK4C3BU2yX3xxe%2Fuploads%2FMQXJtfo9mISjwrIMsQ21%2F%5BPNG%5D%20Speedy%20Staking%20-%20dark.png?alt=media&amp;token=d115231b-69cc-4a94-9f7a-5f48229ef52e" alt=""></picture><figcaption></figcaption></figure>

<figure><picture><source srcset="/files/ZqBgPaKj5tsal4laMtDl" media="(prefers-color-scheme: dark)"><img src="https://3883897532-files.gitbook.io/~/files/v0/b/gitbook-x-prod.appspot.com/o/spaces%2F0mRE72CK4C3BU2yX3xxe%2Fuploads%2FdROzxLhhokExjxoqFeDH%2FVSP%20staking%20rewards2.png?alt=media&amp;token=89d20eae-8654-4b87-83b1-f3c361254f09" alt=""></picture><figcaption></figcaption></figure>

Welcome to Speedy Staking's Knowledge Base - for all your staking tutorials and information.

If you still have questions about staking or want to ask something else, you can join our Telegram group, email us, join the live chat on our website, or send us a DM on Twitter!

* [Website (Livechat)](https://speedystaking.io)
* [Email Us](mailto:info@speedystaking.io)
* [Twitter](https://twitter.com/speedystaking)
* [Telegram Group](https://https://t.me/speedystaking)
* [Staking Rewards profile](https://www.stakingrewards.com/provider/speedy-staking)


# Staking - The Basics

## **What Is Staking?**

In a Proof–of–Stake (PoS) blockchain, users can “stake“ their coins to gain a share in the Network’s’ rewards. These rewards usually come from a portion of the Network’s’ transaction fees and new coins created with each new block. Through staking, users can earn interest on their holdings and help secure the network. Staking is a more energy–efficient way to secure a blockchain network than the energy-intensive mining process used in a Proof–of–Work blockchain (PoW).

## **How Can I Stake?**

Decentralised staking (which Speedy Staking offers through their validator services) requires you to use a wallet that can interact with the Network you want to stake on and tokens of the Network. It may need you to stake a minimum amount, and you must pay transaction fees to stake and unstake. It is crucial never to stake all your tokens because you won’t have enough to unstake later. Networks usually require a certain amount of time to pass before your tokens are unstaked; this can vary from 14 hours on some to 28 days on others. It’s essential to remember this before you start staking and unstaking. Rewards are usually not earned during this unstaking period. We will always include this information in our network-specific 101s in our Knowledge Base.

## **Is It Safe?**

Unlike CEXs (Central EXchanges) and other platforms, Speedy Staking only offers decentralised validator services. We will never take custody or control over your tokens when you stake on our nodes, and you will always decide what and when to stake and unstake. We believe it’s fundamental that users have self-custody over their tokens, as these tokens belong to them and nobody else. And we must remember the famous crypto saying, “Not Your Keys, Not Your Crypto”.

Some networks will have slashing active, where validators (and, with them, stakers) can have their stake (or tokens) slashed if they don’t behave properly, and you can consequently lose tokens. Insurance for validators against this is possible and common for networks where slashing is active. Speedy Staking isn’t currently active as a validator on networks where slashing is active.

The last aspect has to do with self-custody. Because of the decentralised nature of self-custody, there is usually no way to retrieve access to a wallet other than the private key (or seedphrase). Should you lose this, you will have NO access to your tokens. The same goes for when someone else obtains access to your private key; they will have FULL control over your wallet. A private key cannot be changed, so you must create a new wallet once exposed. It is essential to keep your private key safely stored away, not to share it with others and to know what transactions you sign for.

## **Why Should I Stake With Speedy Staking?**

Speedy Staking consists of a highly skilled and educated team with years of experience in blockchain and DevOps. Our validator nodes are run with over-spec hardware using 100% renewable energy, and we help support Gold Standard projects. We provide 24/7 support in our Telegram group and support the staking community with helpful information and guides. We actively participate in blockchain events and help support small projects by partnering and sponsoring. Staking Rewards also independently [verified us with an - AA - rating](https://www.stakingrewards.com/provider/speedy-staking)!


# The Basics

<figure><img src="https://3883897532-files.gitbook.io/~/files/v0/b/gitbook-x-prod.appspot.com/o/spaces%2F0mRE72CK4C3BU2yX3xxe%2Fuploads%2FXctpxautoPnOuMZvRbjN%2Fgitbook-casper.png?alt=media&amp;token=62eec387-2b01-46e5-b3f1-b8d39c5ea4d9" alt=""><figcaption></figcaption></figure>

## **Introduction**

Casper is a proof-of-stake blockchain network optimised for enterprise and developer adoption. The Casper Network is the first live blockchain built off the Correct-by-Construction (CBC) Casper specification, allowing the network to create sustainable new markets and unlock value by tokenising nearly any asset without compromising performance or security. Activity on Casper is governed by CSPR, the network’s native token, through the soon-to-be-launched [governance portal](https://members-staging.casper.network/validator-selection-tool/10). Casper launched its mainnet on March 31st, 2021.

&#x20;

**Casper Labs**

*“Casper Labs is a Swiss-based AG that started working on the Casper blockchain codebase in October 2018 and facilitated the Casper Testnet throughout 2020 and 2021 until the mainnet launch. While the engineers at Casper Labs contribute new features to the codebase for the Casper blockchain, Casper Labs is also a fully staffed enterprise consultancy business providing support and services for its enterprise clients building on Casper.”*

&#x20;

**Casper Association**

*“The Casper Association is the not-for-profit, Switzerland-domiciled organisation responsible for overseeing the network and supporting its organic evolution and continued decentralisation. The Association membership comprises the independent validators which run nodes on the Casper Network.”*&#x20;

## **Tokenomics**

Casper started with a Genesis supply of 10,000,000,000 (or 10 billion) tokens. There is currently 8% inflation annually, which means the total supply grows by the same percentage. This number is subject to change in the future. The inflation is solely used to reward validators & delegators. Transaction fees go to the validator that proposed the block, and these fees are not shared with delegators. The current total supply hovers around 12 billion CSPR.

### **Token Sale**

Casper’s token sale was held on CoinList from March 23rd, 2021, till March 28th, 2021, with an extra community sale on April 7th, 2021. All public and validator sale tokens have been released and are circulating.

### **Staking**

There are 100 active validators(producing blocks and earning rewards) at any given time, but there are plans to increase this number in the future (to possibly 200 or 250). Network-wide APY depends on how much CSPR out of the total supply is staked; 100% of the total supply staked would mean 8% APY, and it usually hovers around \~10% APY. Your first staking rewards will show up after \~4 hours. Unstaking takes 7-8 ERAs or 14-16 hours, during which you will NOT earn rewards.

&#x20;

### **Safety/Security**

When staking CSPR with a validator, your tokens will stay in your custody. This means you can, at any point, undelegate, even when a validator goes offline or becomes inactive. The worst thing that would happen is that you wouldn’t receive any new rewards, so choosing the proper validator is essential. There is no slashing active on Casper.

&#x20;

### **Things to consider when selecting a validator:**

* **Commission** – How much commission does the validator charge? The higher this number, the fewer rewards you earn.
* **Node Uptime** – Is the uptime of their node as close to 100% as possible? Uptime can impact your rewards.
* **Trust** – Is it a transparent validator? Do I know who they are? Do I know what they stand for? Are they verified independently? It’s crucial that the validator is around for the long term and is committed to reliability and security. You don’t want a node to go offline and not notice it; you’ll be earning 0 rewards!
* **Contact** – How easily can you reach the validator? Do they have a support group? In case you need help with anything staking-related, you want to be able to reach the validator easily.
* **Communication** – Do they communicate issues, important updates and changes on time?
* **Extras** – What else do they offer? Do they support projects in the Casper Ecosystem through partnerships and sponsorships? Do they provide educational material such as tutorials? Do they organise events and giveaways? Extras can be the difference between a good and a great validator.

## **Useful Links**

### **Explorers**

[CSPR.live](http://cspr.live/) | [scansper.com](https://speedystaking.io/docs/casper-network/scansper.com) | [div3.in](http://div3.in/) | [Casperstats](http://casperstats.io/)

&#x20;

### **Wallets**

[Ledger](https://docs.casperlabs.io/workflow/users/ledger-setup/) – Hardware wallet; must be used with, for example, CSPR.live or CasperHolders. Full Ledger Live support will follow.

[Casper Wallet](http://casperwallet.io/) – Official Casper wallet; can be used with CSPR.live or stand-alone, available on Brave/Chrome/Edge/Firefox/Safari and on Android and iOS.

[CasperDash](https://casperdash.io/) – Decentralised wallet offered as a browser extension for Chromium-based browsers (such as Chrome, Brave and Edge) & as an app for Android and iOS

[Torus Wallet](http://casper.tor.us/) – Wallet that supports social logins

[Burrito Wallet](https://burritowallet.com/en) – Mobile wallet originally marketed in the Korean market

&#x20;

### **Validators**

[Overview](http://cspr.live/validators) – overview of all active validators on CSPR.live

Speedy Staking – [Node 1](https://cspr.live/validator/0111b3519efa63942e57a9470f55b62d9c4a59ff44df7c65eaefbd1489b7a93a5b) | [Node 2](https://cspr.live/validator/01541af7c1a41912be691fd76849b59c6ea3af38bdcff4db8cad633be4294cc38d)

&#x20;

### **Official Casper resources**

[Casper Network](https://casper.network/) | [CasperLabs](https://casperlabs.io/) | [Casper Twitter](https://twitter.com/Casper_Network) | [CasperLabs Twitter](https://twitter.com/Casper_Labs) |  [Casper Documentation](https://docs.casperlabs.io/) | [Casper Governance Portal](https://members-staging.casper.network/) | [Casper Telegram](http://t.me/casperblockchain) | [Casper Announcements Telegram](https://t.me/casperofficialann) | [Casper Staking Telegram](https://t.me/casperblockchainstaking) | [Casper Discord](http://discord.gg/casperblockchain) | [Casper Youtube](https://www.youtube.com/c/CasperNetwork) | [Casper Ecosystem](https://casperecosystem.io/) | [Casper GitHub](https://github.com/casper-network)

&#x20;

### **Casper Language groups**

[India](https://t.me/casperblockchainindia) | [Spain](https://t.me/casperblockchainspanish) | [Russia](https://t.me/casperblockchainrussia) | [Poland](https://t.me/casperblockchainpoland) | [Turkey](https://t.me/casperblockchainturkey) | [France](https://t.me/casperblockchainfrench) | [Vietnam](https://t.me/casperblockchainvietnam) | [South Korea](https://t.me/casperblockchainkorea) | [The Netherlands](https://t.me/casperblockchainnetherlands) | [Italy](https://t.me/casperblockchainitaly) | [Germany](https://t.me/casperblockchaindeutsch) | [China](https://t.me/casperblockchainchinese)


# Casper Wallet

<figure><img src="https://3883897532-files.gitbook.io/~/files/v0/b/gitbook-x-prod.appspot.com/o/spaces%2F0mRE72CK4C3BU2yX3xxe%2Fuploads%2F2q0obtkBCjzVTW6XqVmb%2Fgitbook-cw.png?alt=media&amp;token=81bba089-68eb-49e0-aea1-33d5bad77f71" alt=""><figcaption></figcaption></figure>

* [Official Website](https://casperwallet.io)
* Download on [Chrome](https://chrome.google.com/webstore/detail/casper-wallet/abkahkcbhngaebpcgfmhkoioedceoigp) | [Firefox](https://addons.mozilla.org/en-US/firefox/addon/casper-wallet/) | [Safari](https://apps.apple.com/us/app/casper-wallet/id6446363274)
* Download on [iOS](https://apps.apple.com/app/apple-store/id6446363274?pt=125226123\&ct=Website\&mt=8) | [Android](https://play.google.com/store/apps/details?id=io.casperwallet.app\&hl=en\&gl=US)
* [Official guides](https://www.casperwallet.io/user-guide)
* [Twitter](https://twitter.com/Casper_Wallet)
* [Telegram group](https://t.me/CSPRhub)


# Casper Wallet - Full Guide

## **Part 1 – Install Casper Wallet And Setup Wallet**

<figure><img src="https://3883897532-files.gitbook.io/~/files/v0/b/gitbook-x-prod.appspot.com/o/spaces%2F0mRE72CK4C3BU2yX3xxe%2Fuploads%2FklDsUAmBThhetCEkOjmu%2FStep1.png?alt=media&amp;token=0bf0f507-5f75-4767-9b84-dd4547ad482e" alt=""><figcaption></figcaption></figure>

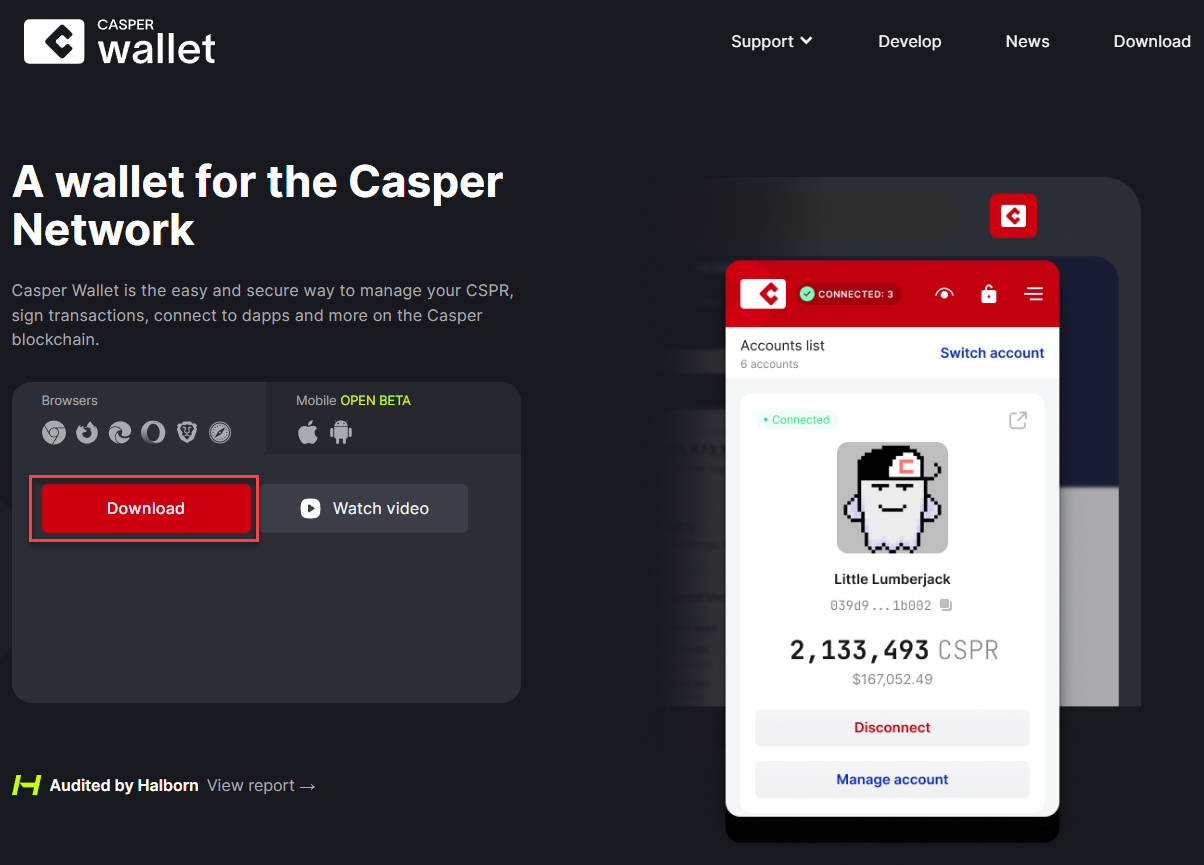
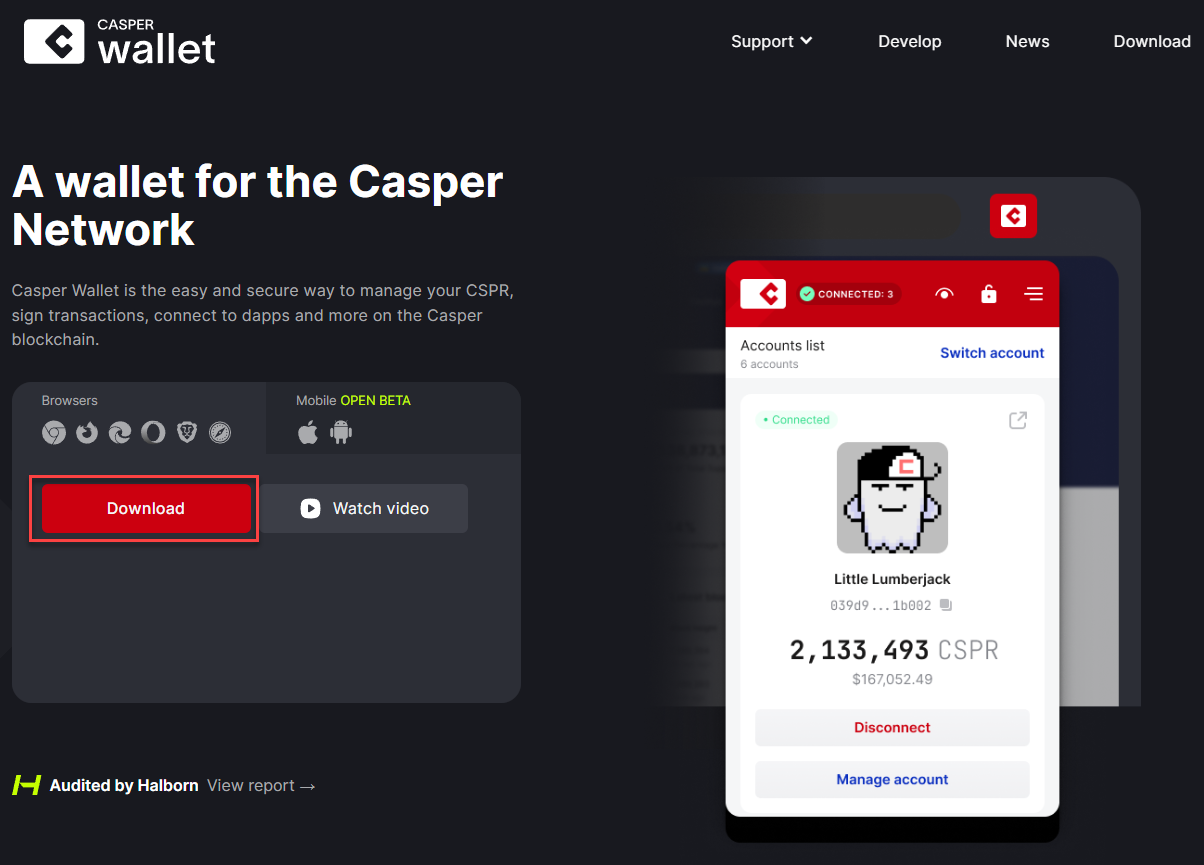
**Step 1:** Navigate to the [Casper Wallet website](https://casperwallet.io) and click '**Download**'.

<figure><img src="https://3883897532-files.gitbook.io/~/files/v0/b/gitbook-x-prod.appspot.com/o/spaces%2F0mRE72CK4C3BU2yX3xxe%2Fuploads%2FaR7aROProNqPPtNHe7j8%2FStep2.png?alt=media&amp;token=87e798e6-9dd3-4e11-9992-2c493bd1c5fa" alt=""><figcaption></figcaption></figure>

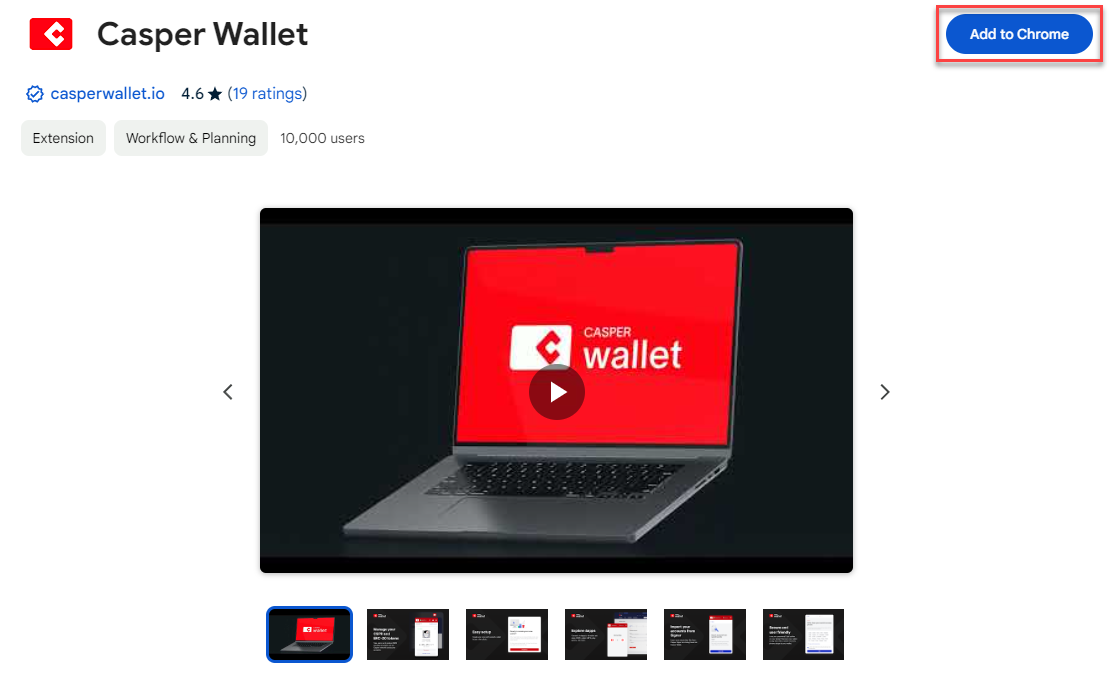
**Step 2:** This will bring you to the Chrome Store (or equivalent on other browsers); click '**Add to Chrome**' (or equivalent on other browsers).

<figure><img src="https://3883897532-files.gitbook.io/~/files/v0/b/gitbook-x-prod.appspot.com/o/spaces%2F0mRE72CK4C3BU2yX3xxe%2Fuploads%2FvuxT7MT7zf7ajZLZ89dr%2FStep3.png?alt=media&amp;token=1d684465-9de1-4a2e-b215-5ab93f797302" alt=""><figcaption></figcaption></figure>

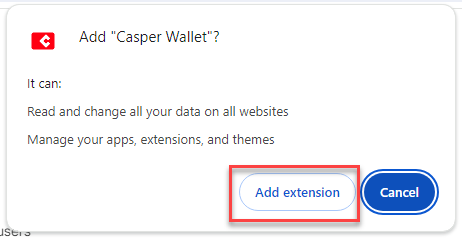
**Step 3:** Click on '**Add extension**'.

<figure><img src="https://3883897532-files.gitbook.io/~/files/v0/b/gitbook-x-prod.appspot.com/o/spaces%2F0mRE72CK4C3BU2yX3xxe%2Fuploads%2FzIM364lXZc2VSeNnqWZP%2FStep4.png?alt=media&amp;token=742e5ab8-2a3e-401c-bddd-8f09be4c9d11" alt=""><figcaption></figcaption></figure>

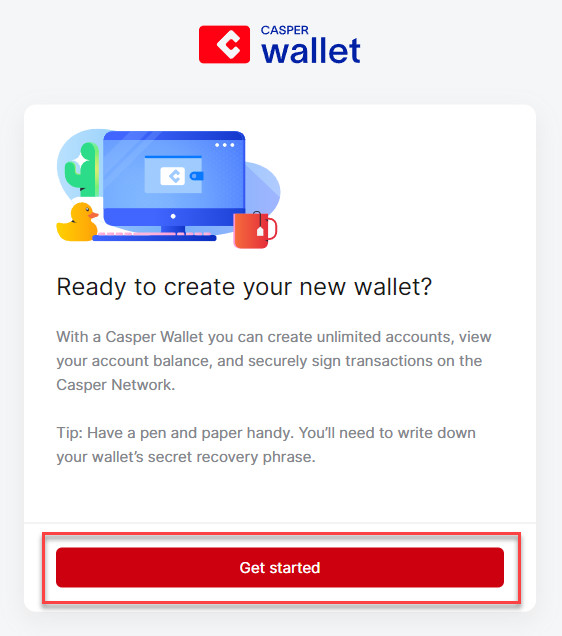
**Step 4:** After adding the Casper Wallet extension, it will open a new tab in your browser for the setup; click '**Get started**'.

<figure><img src="https://3883897532-files.gitbook.io/~/files/v0/b/gitbook-x-prod.appspot.com/o/spaces%2F0mRE72CK4C3BU2yX3xxe%2Fuploads%2FrcEn9Be8ogiByoOI6Eo6%2FStep5.png?alt=media&amp;token=4fbf3ccf-b906-4d89-8c9d-97bf22444e6a" alt=""><figcaption></figcaption></figure>

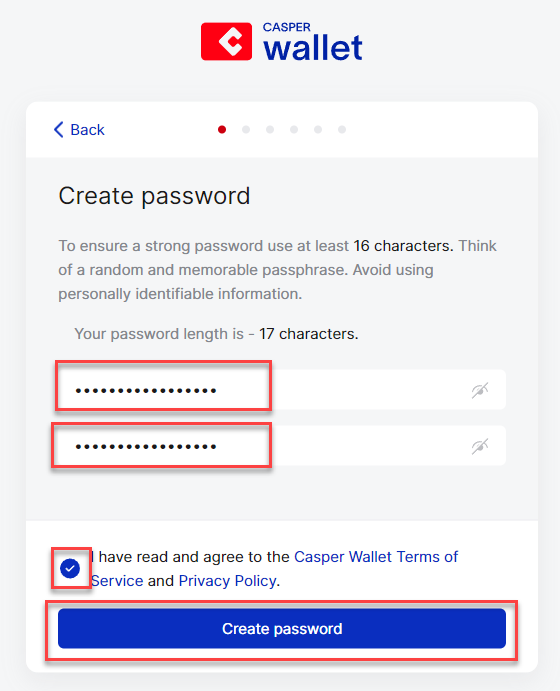
**Step 5:** Think of a secure password, fill it in twice, mark the checkbox, and click '**Create password**'.

<figure><img src="https://3883897532-files.gitbook.io/~/files/v0/b/gitbook-x-prod.appspot.com/o/spaces%2F0mRE72CK4C3BU2yX3xxe%2Fuploads%2FRsYdTzzQOc4QXkILon8p%2FStep6.png?alt=media&amp;token=c13d888b-95d8-4528-847c-e6f11ae29e27" alt=""><figcaption></figcaption></figure>

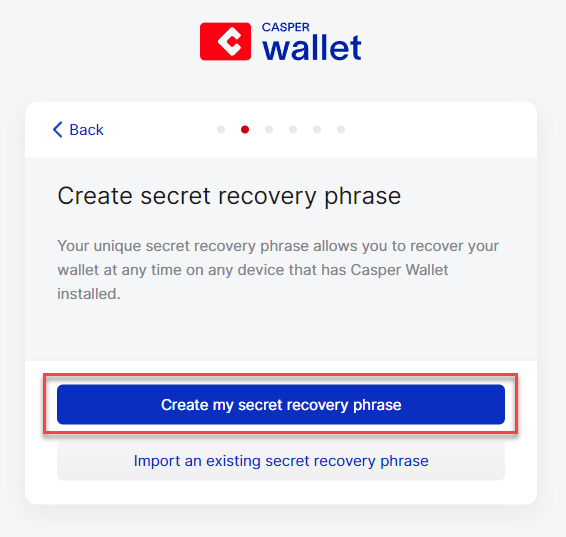
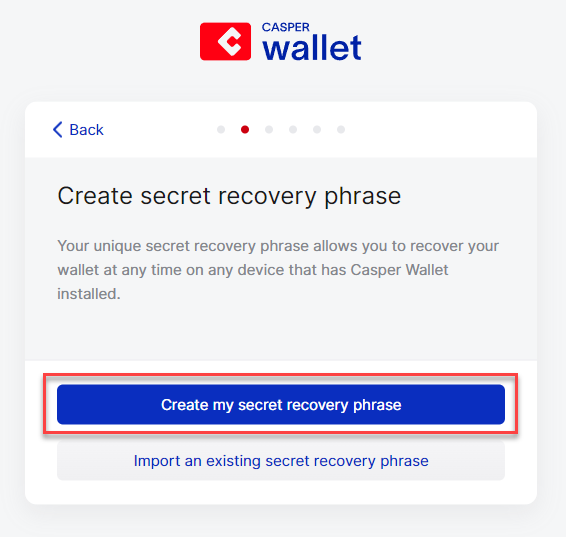
**Step 6:** Click on '**Create my secret recovery phrase**'.

<figure><img src="https://3883897532-files.gitbook.io/~/files/v0/b/gitbook-x-prod.appspot.com/o/spaces%2F0mRE72CK4C3BU2yX3xxe%2Fuploads%2FXiUSdIAep1gmmQLc1kgY%2FStep7.png?alt=media&amp;token=d2a6f682-2c5d-4294-bf98-5664e789a253" alt=""><figcaption></figcaption></figure>

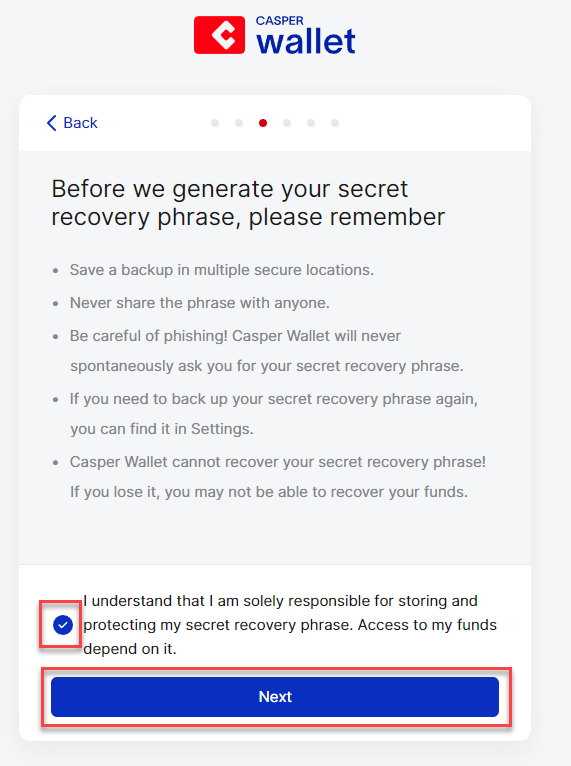
**Step 7:** Mark the checkbox and click on '**Next**'.

<figure><img src="https://3883897532-files.gitbook.io/~/files/v0/b/gitbook-x-prod.appspot.com/o/spaces%2F0mRE72CK4C3BU2yX3xxe%2Fuploads%2Ffmu0fbSEDNSD5i6p0flv%2FStep8.png?alt=media&amp;token=f823139f-edac-4bd9-aad1-4bfb54f830c6" alt=""><figcaption></figcaption></figure>

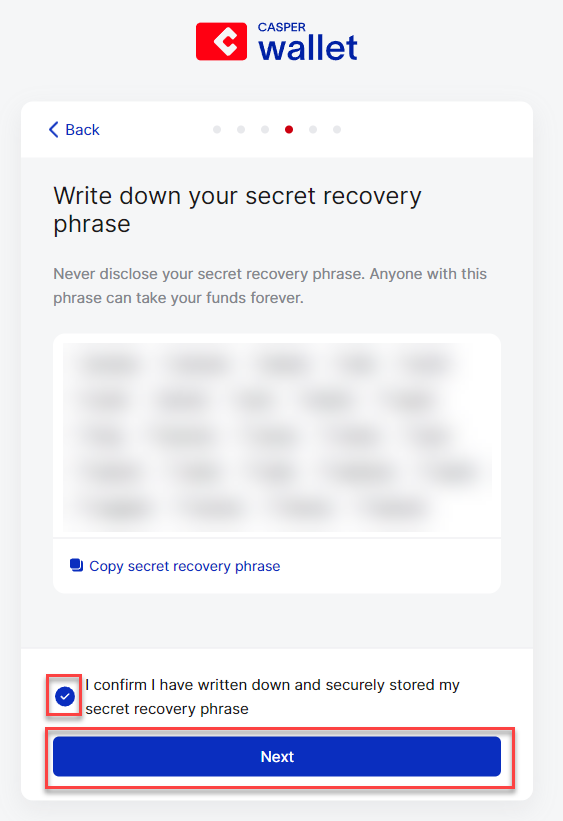
**Step 8:** Save your secret recovery phrase somewhere safe, mark the checkbox and click '**Next**'.

<figure><img src="https://3883897532-files.gitbook.io/~/files/v0/b/gitbook-x-prod.appspot.com/o/spaces%2F0mRE72CK4C3BU2yX3xxe%2Fuploads%2FFOxGKraJCL7UWaJDa922%2FStep9.png?alt=media&amp;token=35639ae5-70be-431e-9ba4-0879818f52dc" alt=""><figcaption></figcaption></figure>

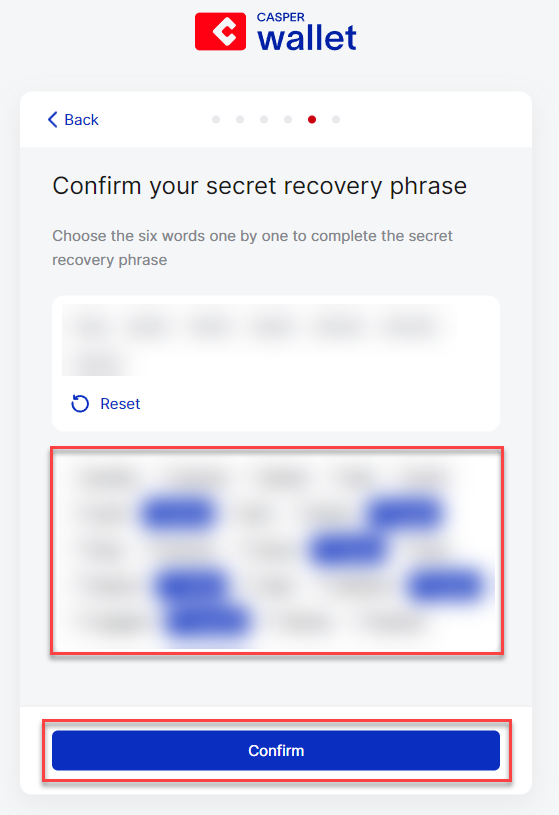
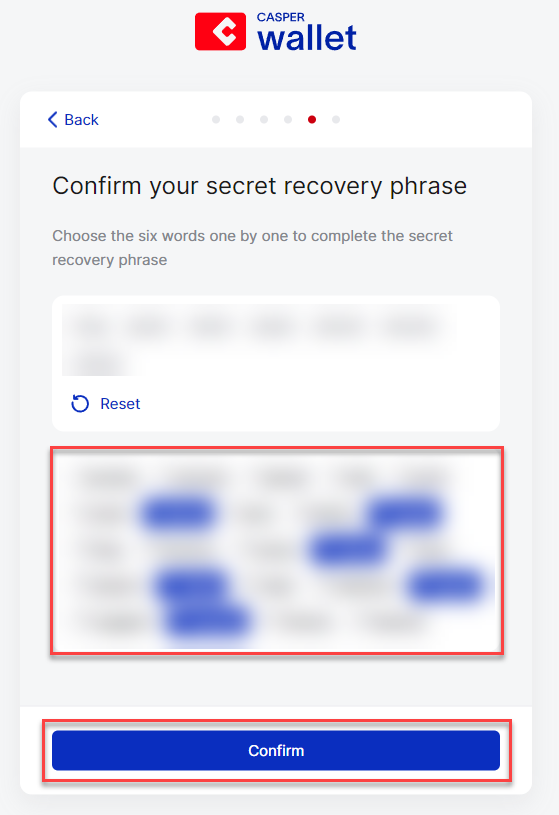
**Step 9:** Fill in the missing words from your secret recovery phrase correctly and click '**Confirm**'.

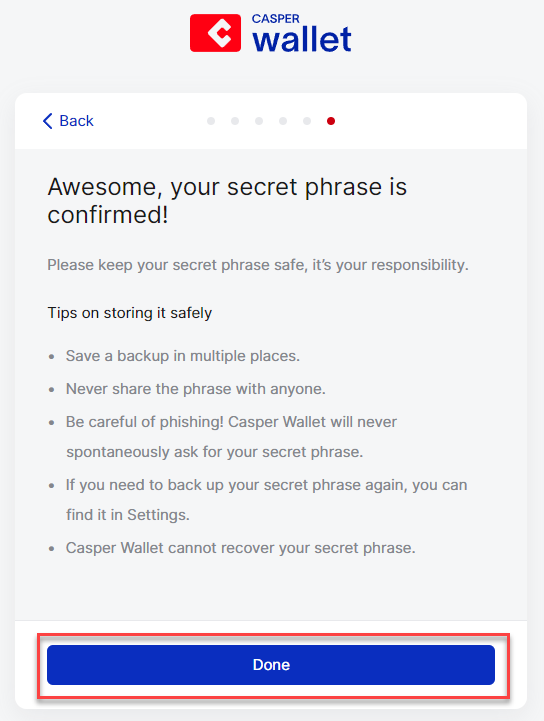
<figure><img src="https://3883897532-files.gitbook.io/~/files/v0/b/gitbook-x-prod.appspot.com/o/spaces%2F0mRE72CK4C3BU2yX3xxe%2Fuploads%2FPFwJjvGWp2m1njzQQcIx%2FStep10.png?alt=media&amp;token=64100fcc-b992-4445-b1bc-c21f826770d0" alt=""><figcaption></figcaption></figure>

**Step 10:** Click on '**Done**'.

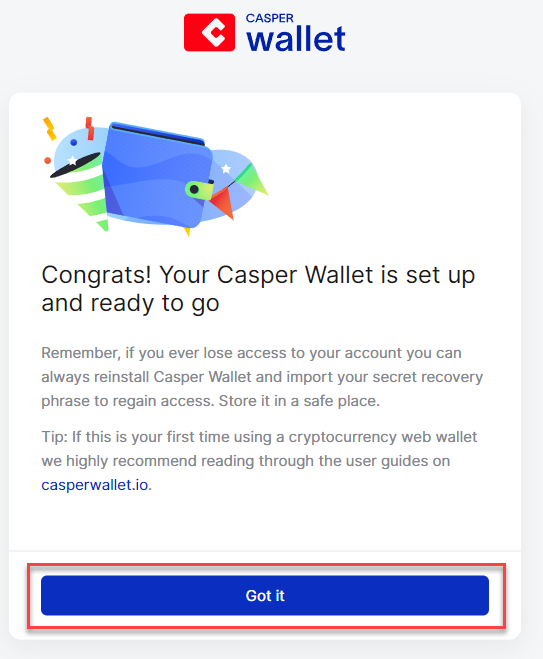
<figure><img src="https://3883897532-files.gitbook.io/~/files/v0/b/gitbook-x-prod.appspot.com/o/spaces%2F0mRE72CK4C3BU2yX3xxe%2Fuploads%2FPRMGvPVZIAjCar8MKcZn%2FStep11.png?alt=media&amp;token=8640325f-6156-4c98-9ac3-36eda5da49b1" alt=""><figcaption></figcaption></figure>

**Step 11:** Click on '**Got it**'.

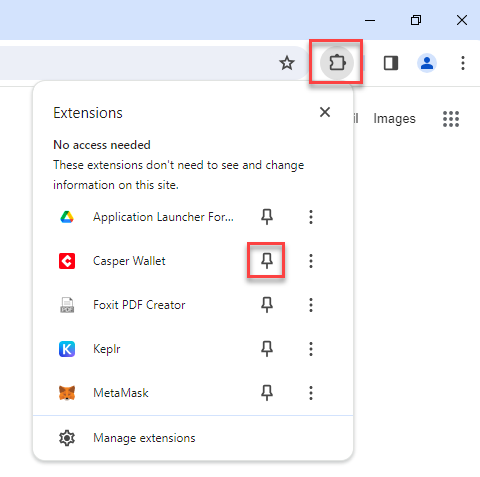
<figure><img src="https://3883897532-files.gitbook.io/~/files/v0/b/gitbook-x-prod.appspot.com/o/spaces%2F0mRE72CK4C3BU2yX3xxe%2Fuploads%2FI8UVXVCJAYiwvuoyG2yT%2FStep12.png?alt=media&amp;token=7c57e918-41c4-40bc-8023-f33770c34d10" alt=""><figcaption></figcaption></figure>

**Step 12 (recommended):** Go to the extension icon on the top right of Google Chrome, click on it and click on the pin next to Casper Wallet. This way, you will always have easy access to your Casper Wallet extension.

## **Part 2 – Connect Casper Wallet With CSPR.Live Blockchain Explorer**

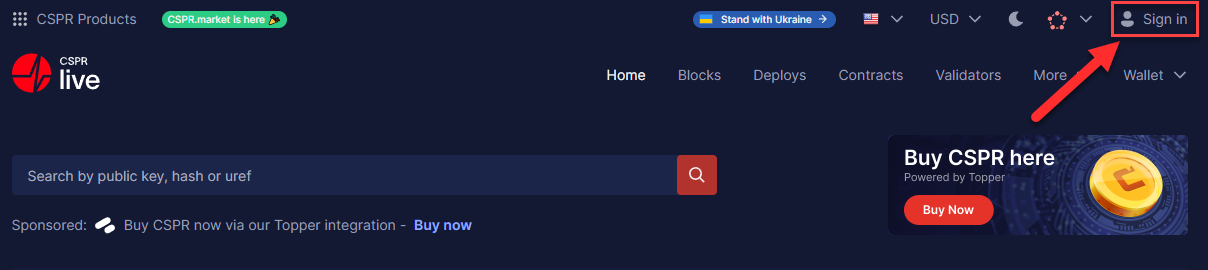
<figure><img src="https://3883897532-files.gitbook.io/~/files/v0/b/gitbook-x-prod.appspot.com/o/spaces%2F0mRE72CK4C3BU2yX3xxe%2Fuploads%2Ftq8KaPuiSh2L0bH7liBj%2FStep13.png?alt=media&amp;token=e9024e98-dfc6-447d-b0c3-ef9b789edef9" alt=""><figcaption></figcaption></figure>

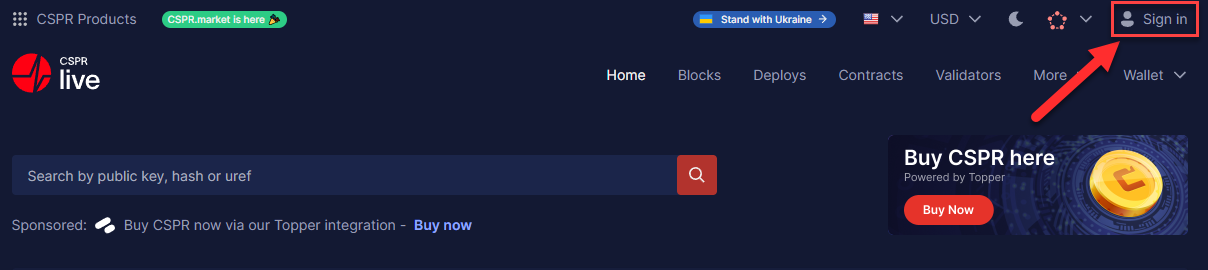
**Step 1:** Go to CSPR.live and click '**Sign in**' on the top right of the screen.&#x20;

<figure><img src="https://3883897532-files.gitbook.io/~/files/v0/b/gitbook-x-prod.appspot.com/o/spaces%2F0mRE72CK4C3BU2yX3xxe%2Fuploads%2FXiIpJOVE01ldIVma0iGp%2FStep14.png?alt=media&amp;token=5db19fc9-7ef2-4cb7-811a-a56d0828ac1e" alt=""><figcaption></figcaption></figure>

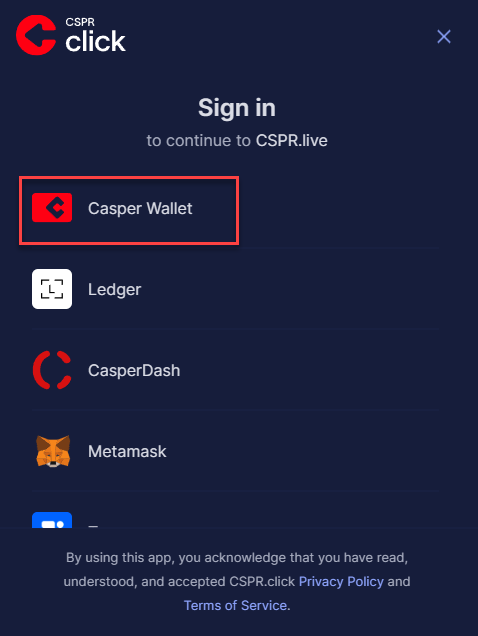
**Step 2:** Click on '**Casper Wallet**'.

<figure><img src="https://3883897532-files.gitbook.io/~/files/v0/b/gitbook-x-prod.appspot.com/o/spaces%2F0mRE72CK4C3BU2yX3xxe%2Fuploads%2FHM3T2z6ukWbrS7w8VDoO%2FStep15.png?alt=media&amp;token=7a2eb561-2e67-4d55-a3ef-3d565f09ca64" alt=""><figcaption></figcaption></figure>

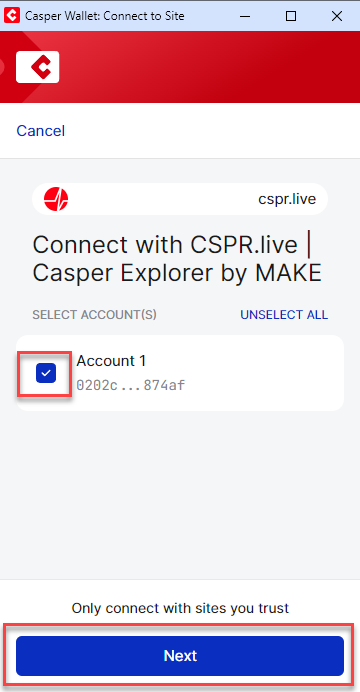
**Step 3:** Mark the checkbox next to the account you want to connect and click on '**Next**'.

<figure><img src="https://3883897532-files.gitbook.io/~/files/v0/b/gitbook-x-prod.appspot.com/o/spaces%2F0mRE72CK4C3BU2yX3xxe%2Fuploads%2FAL0kF1TSSs9KBquyeJ4z%2FStep16.png?alt=media&amp;token=9e8c7182-4dae-4ba7-81a4-76290b3ee325" alt=""><figcaption></figcaption></figure>

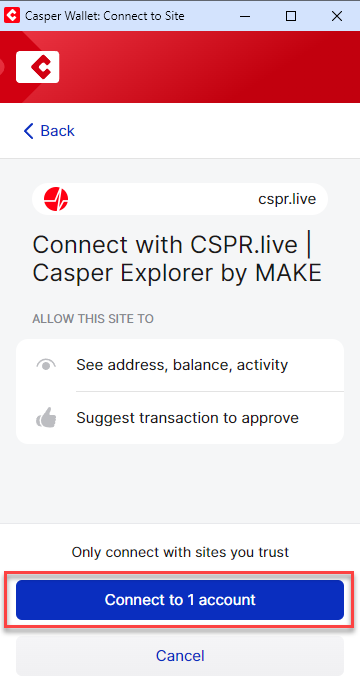
**Step 4:** Click on '**Connect to 1 account**'.

## **Part 3 – Receive $CSPR On Your Casper Wallet Created Public Key**

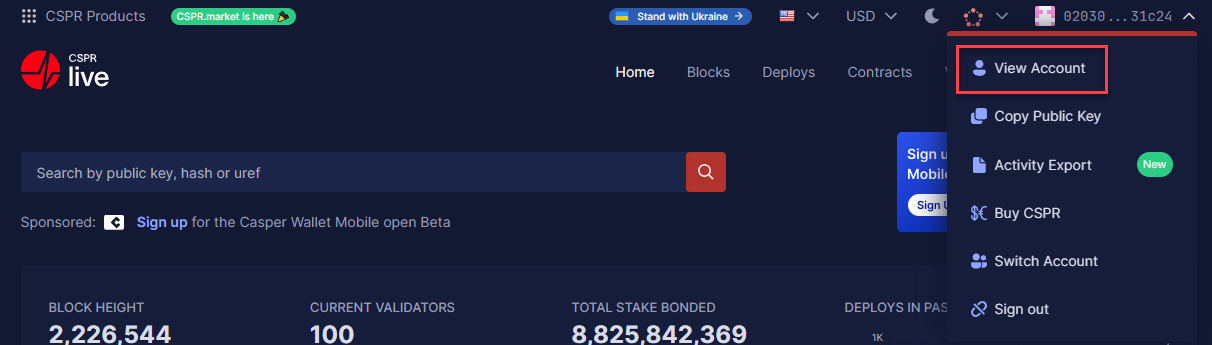
<figure><img src="https://3883897532-files.gitbook.io/~/files/v0/b/gitbook-x-prod.appspot.com/o/spaces%2F0mRE72CK4C3BU2yX3xxe%2Fuploads%2FgmwdHFoyUHYsmKfvTcGI%2FStep17.png?alt=media&amp;token=9fd781a7-d101-46d9-97b7-59b57c85aeec" alt=""><figcaption></figcaption></figure>

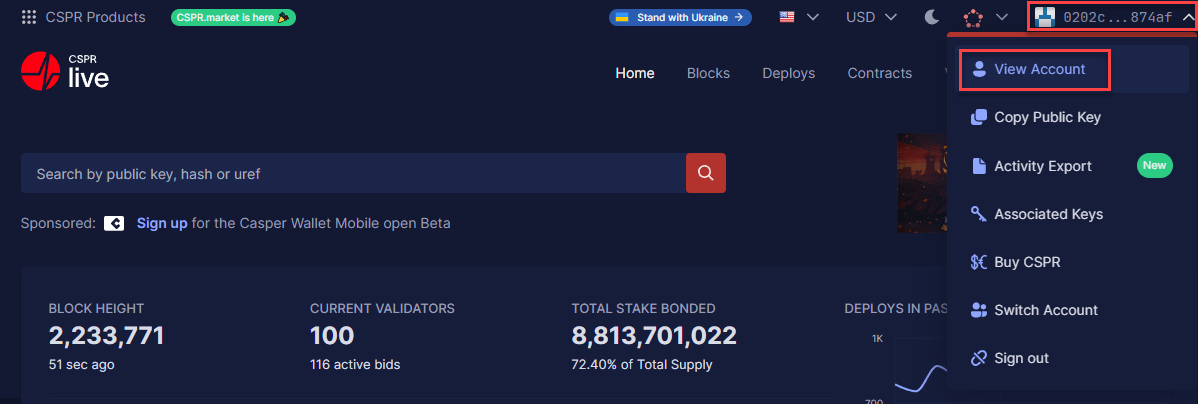
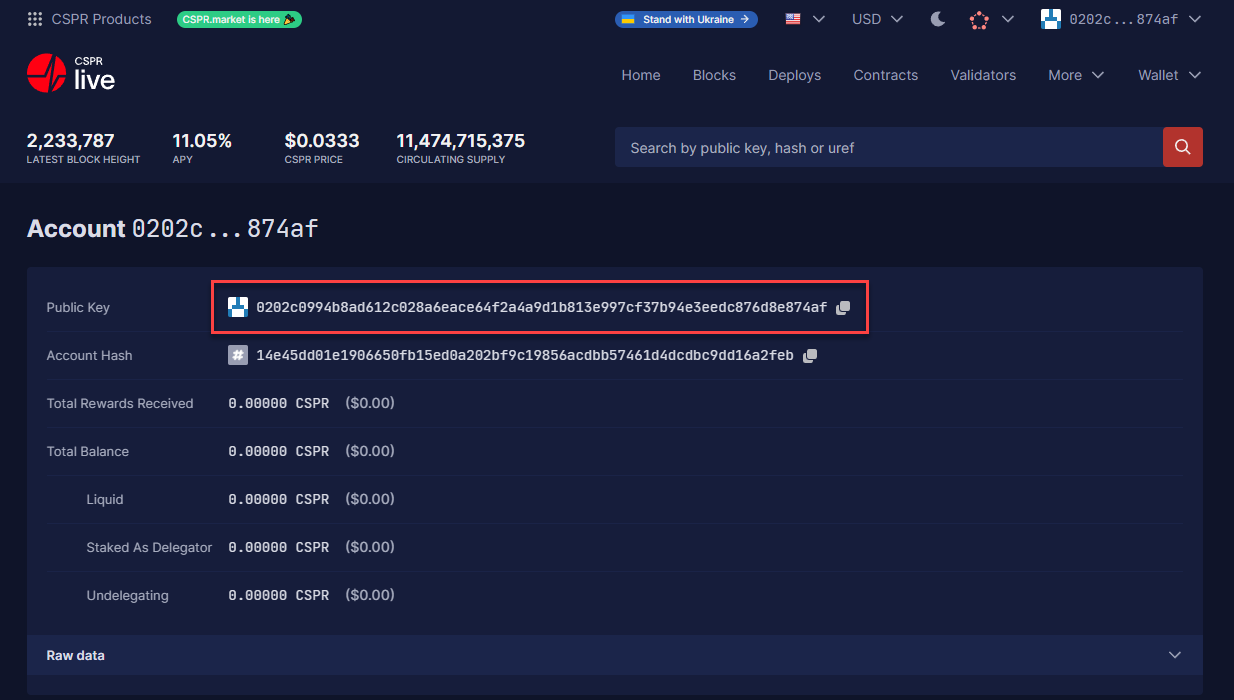
**Step 1:** Hover over your public key in the top right corner and select '**View Account**'.

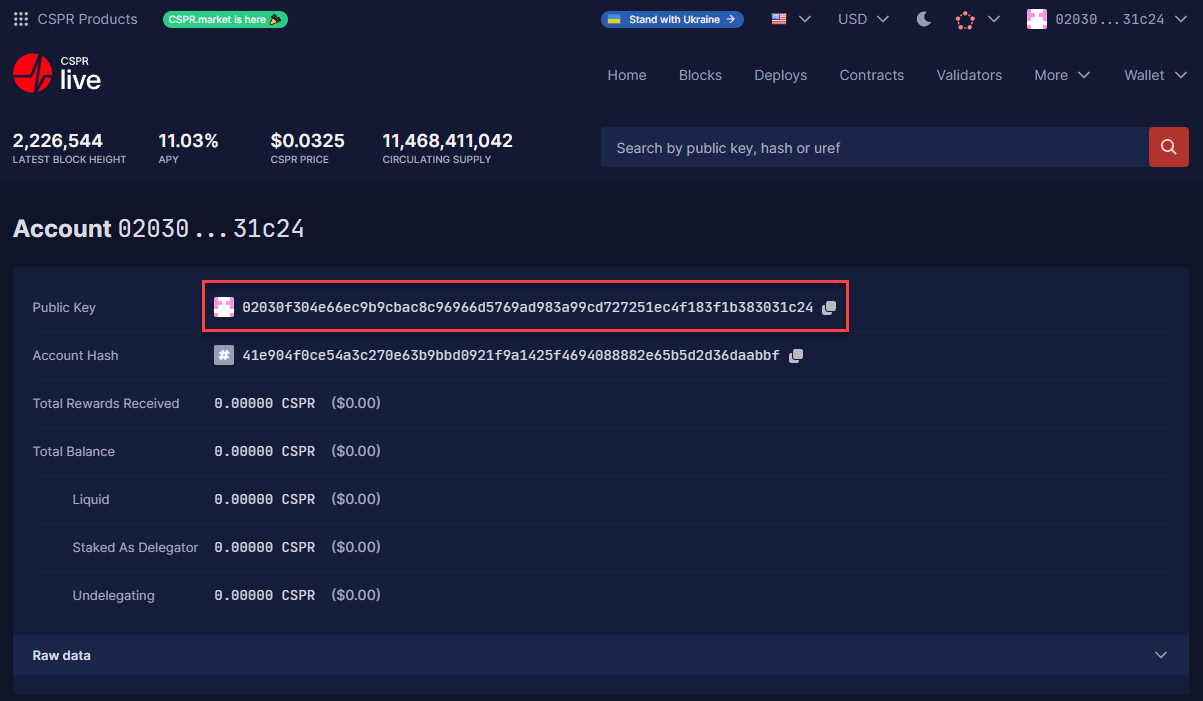
<figure><img src="https://3883897532-files.gitbook.io/~/files/v0/b/gitbook-x-prod.appspot.com/o/spaces%2F0mRE72CK4C3BU2yX3xxe%2Fuploads%2FFWuADABU89bV8YGIlYj7%2FStep18.png?alt=media&amp;token=31d6e65e-e1ba-41e1-ac18-5651f6380287" alt=""><figcaption></figcaption></figure>

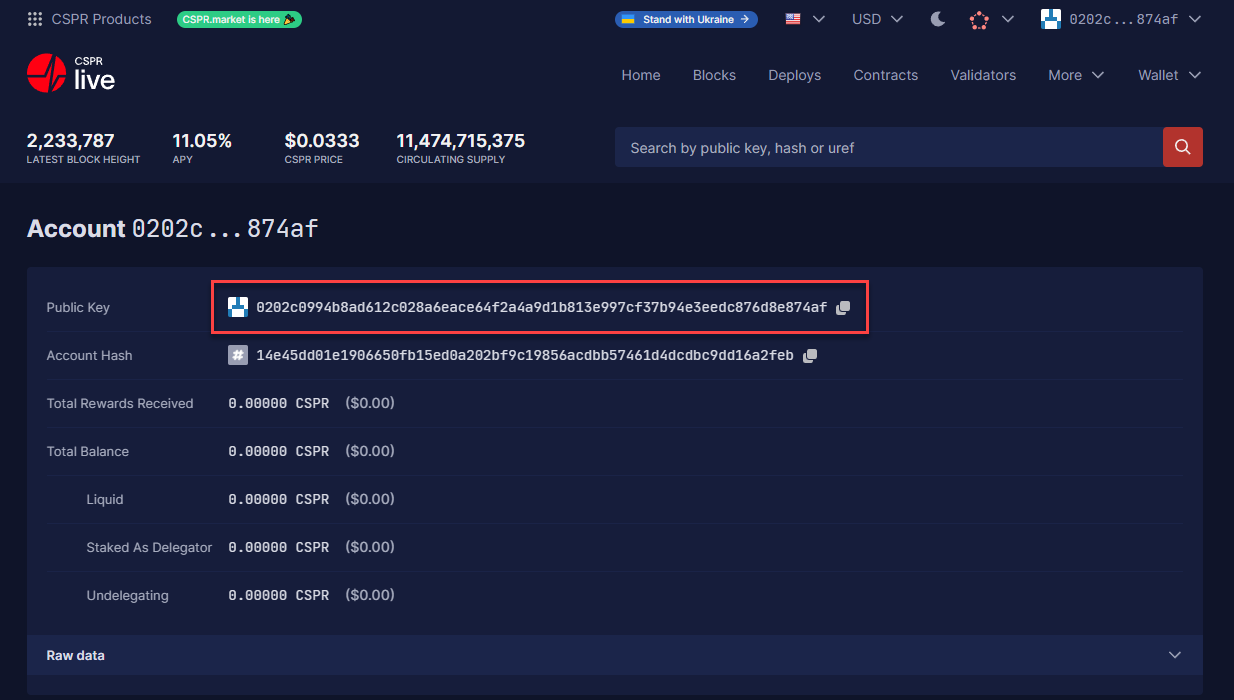
**Step 2:** Your Public Key (wallet address) is on the top. This is the address you use to send $CSPR to.&#x20;

## **Part 4a – Transfer $CSPR Using Casper Wallet Together With CSPR.Live**

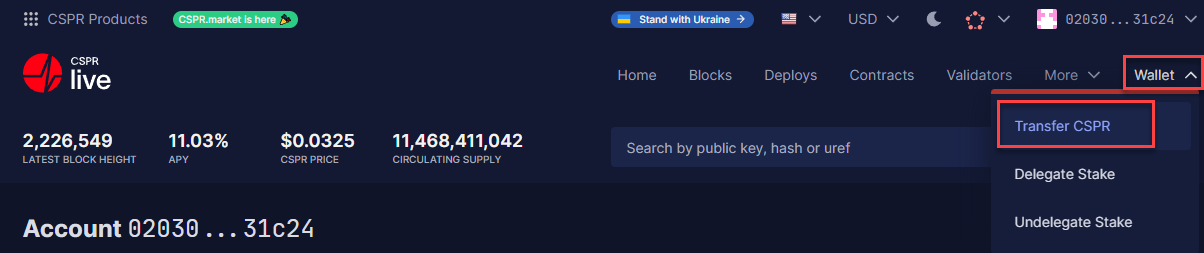
<figure><img src="https://3883897532-files.gitbook.io/~/files/v0/b/gitbook-x-prod.appspot.com/o/spaces%2F0mRE72CK4C3BU2yX3xxe%2Fuploads%2FmmAcXuTl09W32qA8B0NN%2FStep19.png?alt=media&amp;token=d37b669f-ff60-44ef-be87-ae4f44efb101" alt=""><figcaption></figcaption></figure>

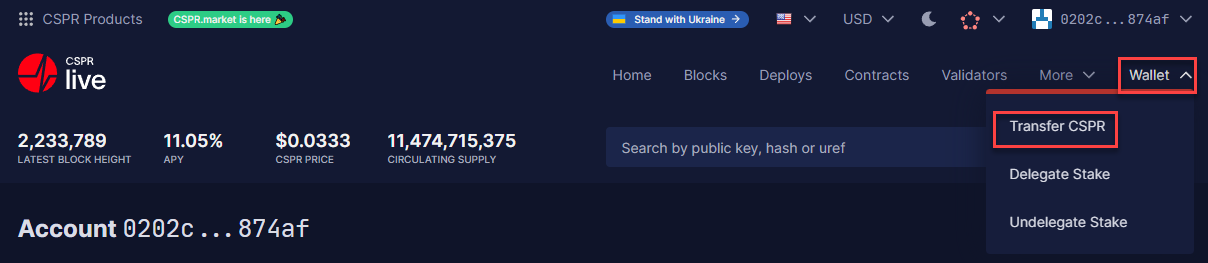
**Step 1:** Hover over '**Wallet**' in the top right corner and select '**Transfer CSPR**'.

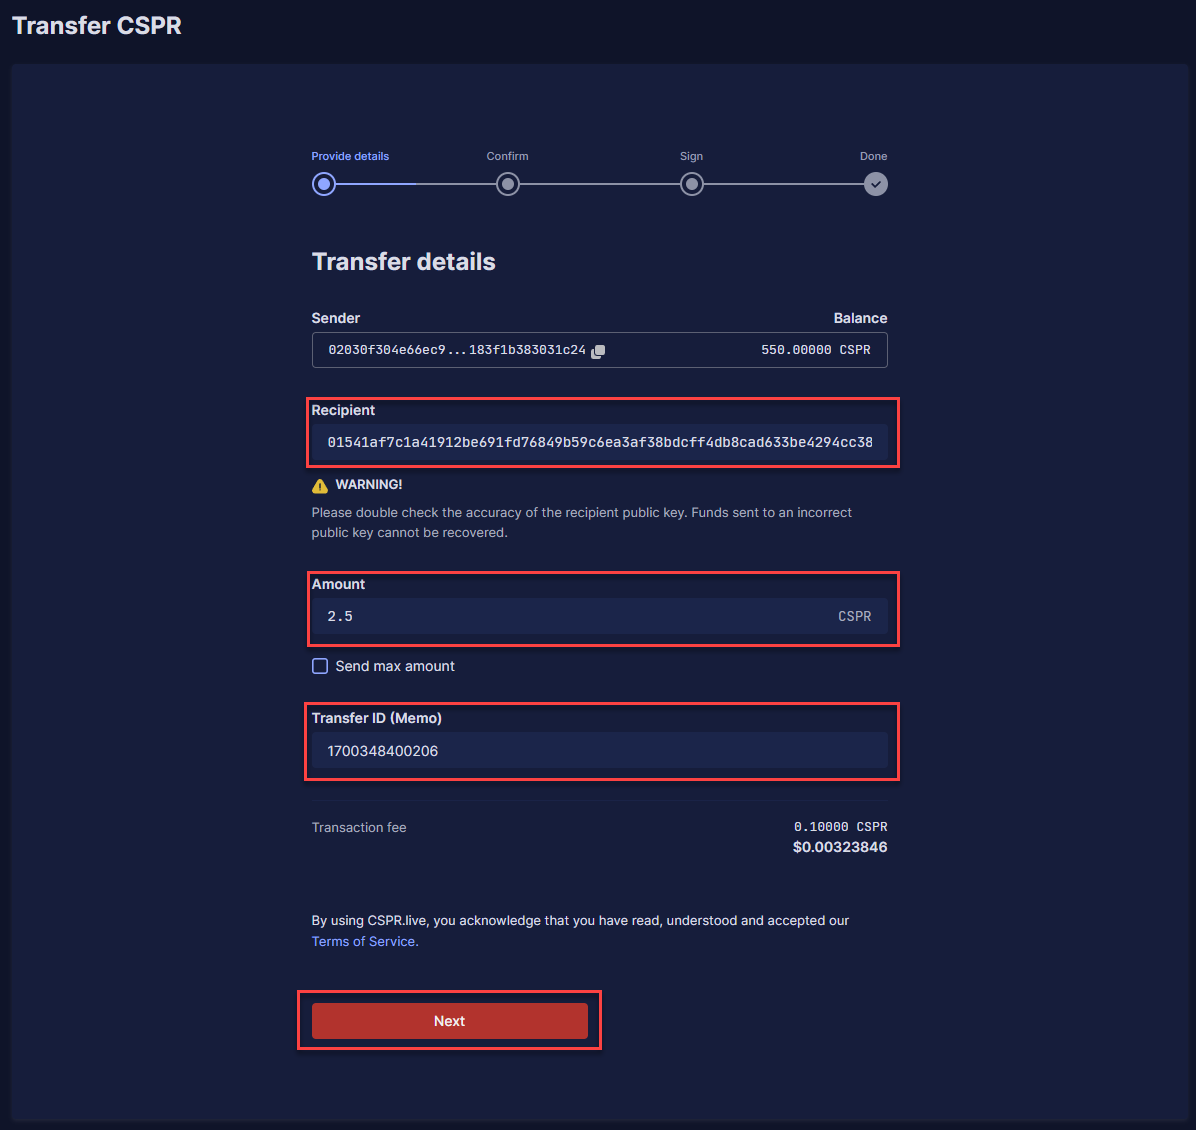
<figure><img src="https://3883897532-files.gitbook.io/~/files/v0/b/gitbook-x-prod.appspot.com/o/spaces%2F0mRE72CK4C3BU2yX3xxe%2Fuploads%2FOqz0GA83Yq7qKtKbId2d%2FStep20.png?alt=media&amp;token=0ba3c024-0aed-4da6-8633-a63d87008a39" alt=""><figcaption></figcaption></figure>

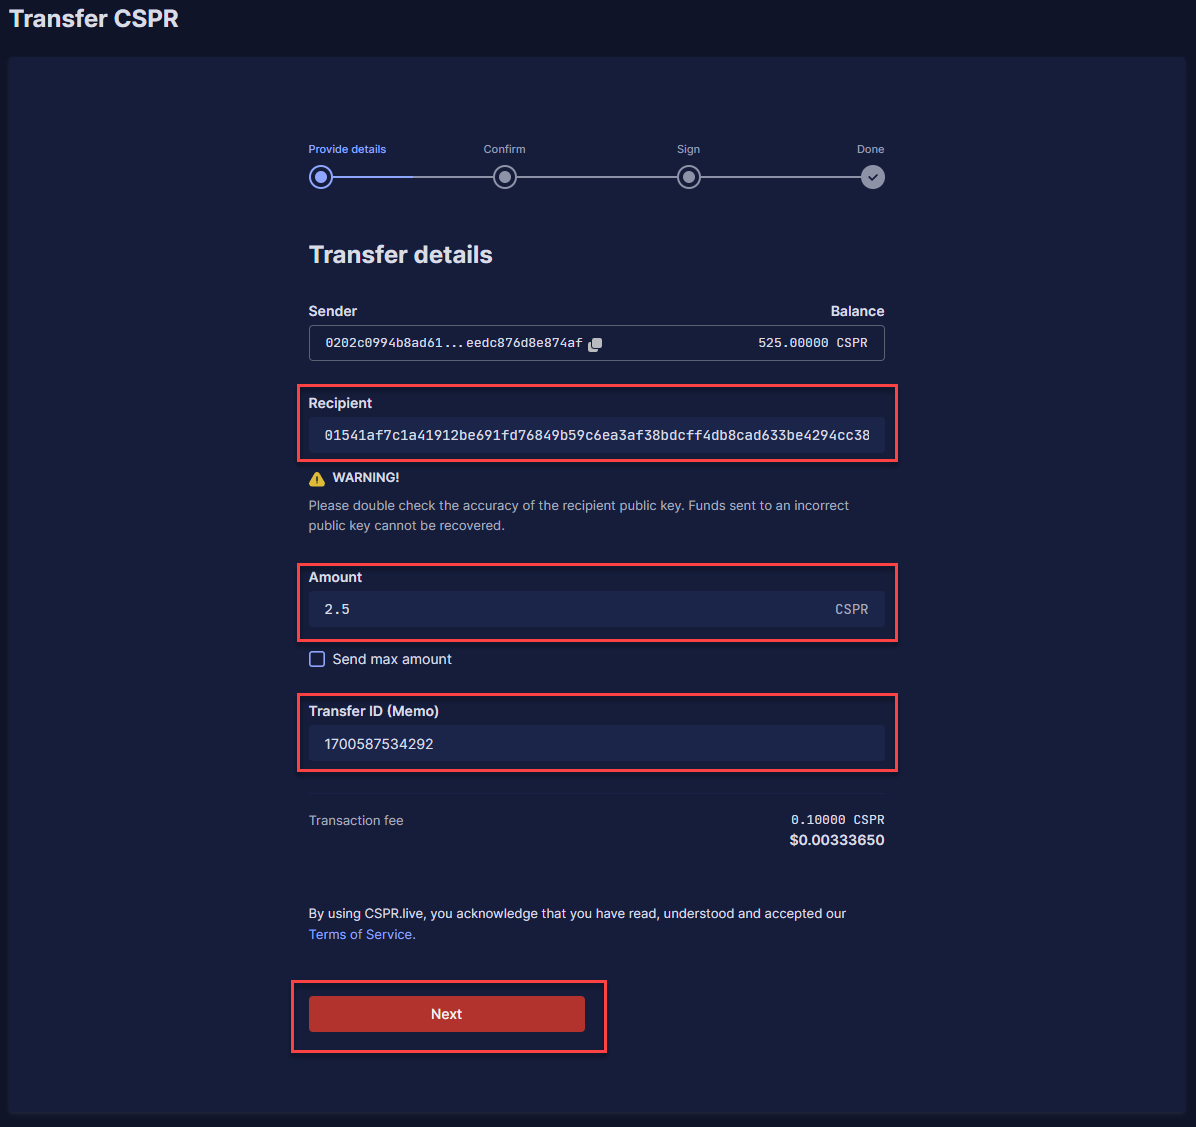
**Step 2:** Fill in the public key of where you want to send your $CSPR under '**Recipient**', the amount of $CSPR you want to send under '**Amount**' and fill in a specific Transfer ID if you wish to/need under '**Transfer ID (Memo)**'. This is sometimes required if you send $CSPR to an exchange. If not needed, you can use '**0**'. After this, click on '**Next**'.

<figure><img src="https://3883897532-files.gitbook.io/~/files/v0/b/gitbook-x-prod.appspot.com/o/spaces%2F0mRE72CK4C3BU2yX3xxe%2Fuploads%2FOZAXEiKitYkr4yZrZ6rx%2FStep21.png?alt=media&amp;token=bc93d100-1a4f-4902-8e8c-0f71f887819c" alt=""><figcaption></figcaption></figure>

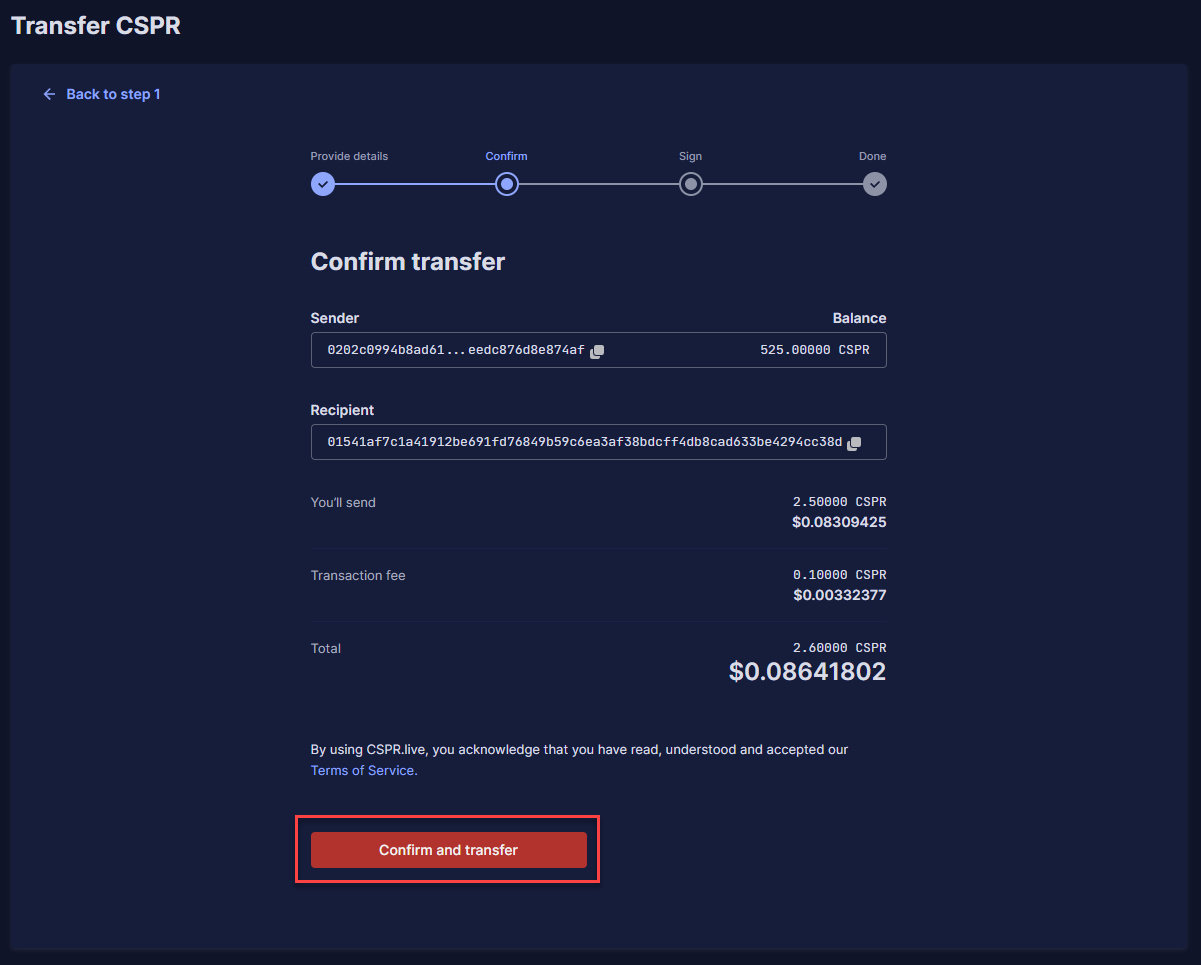
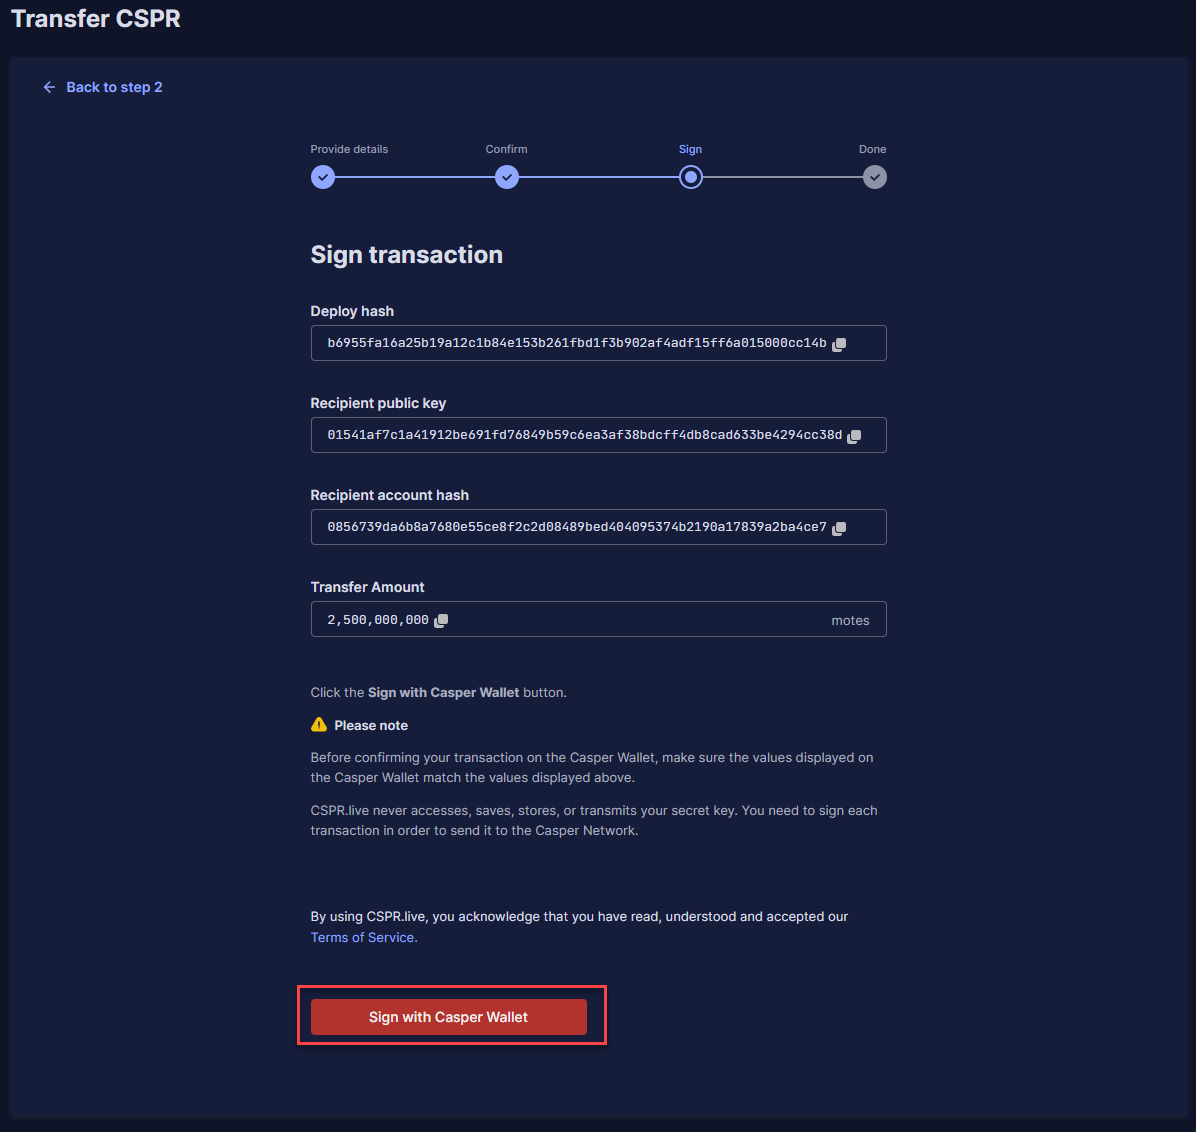
**Step 3:** Check if the information is correct and click '**Confirm and transfer**'.

<figure><img src="https://3883897532-files.gitbook.io/~/files/v0/b/gitbook-x-prod.appspot.com/o/spaces%2F0mRE72CK4C3BU2yX3xxe%2Fuploads%2FOu4uBVduiy23PDj9LWFO%2FStep22-1.png?alt=media&amp;token=d9a4a83b-ae9b-47c3-b35e-753363cac2f1" alt=""><figcaption></figcaption></figure>

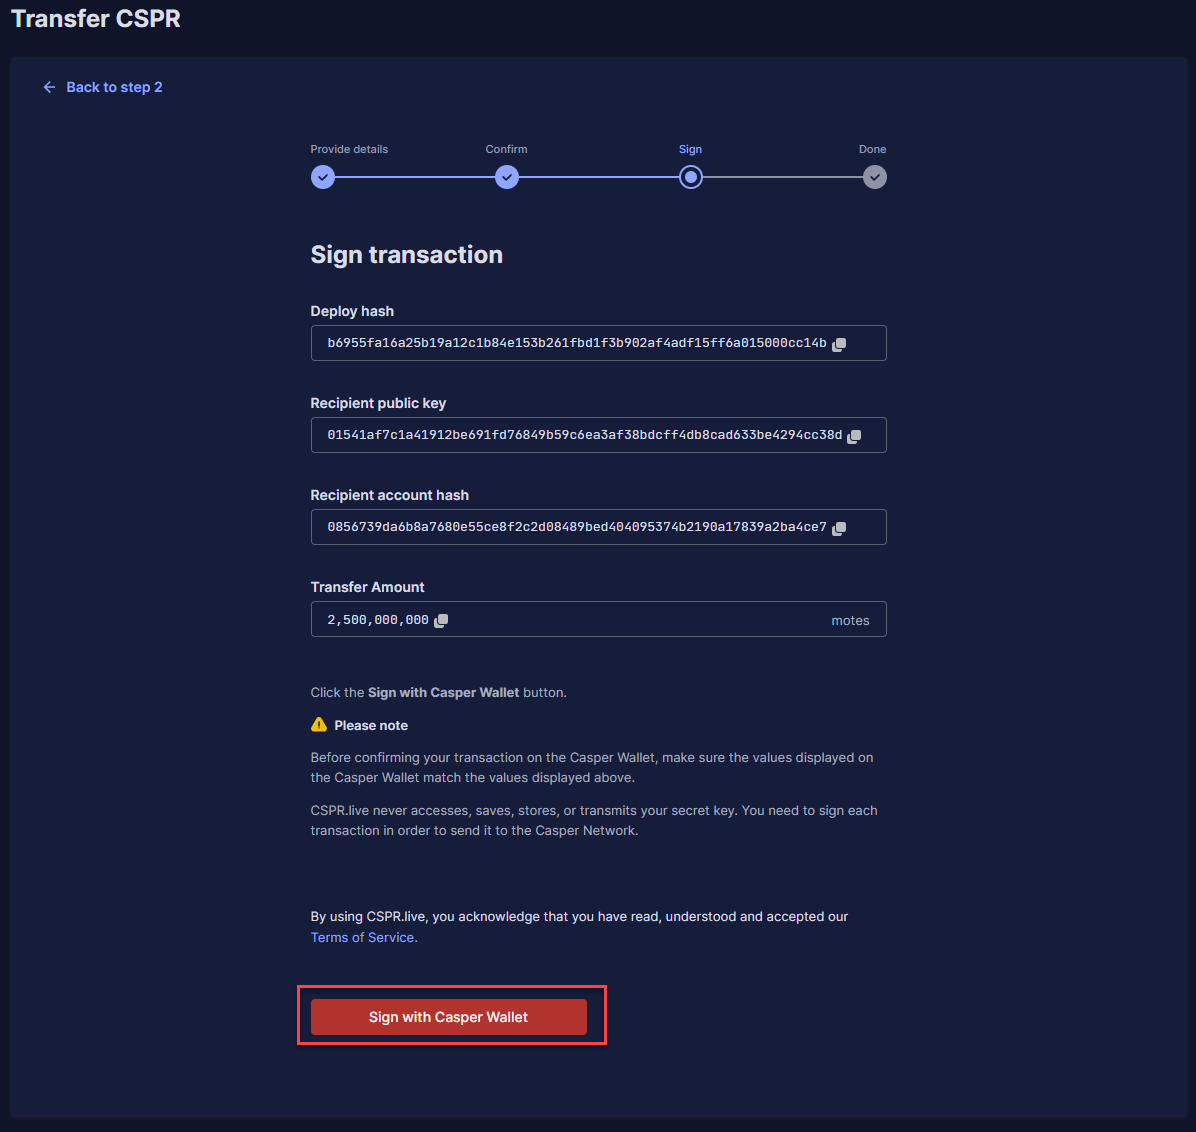
**Step 4:** It will now show you all the information about your transaction, and you can click '**Sign with Casper Wallet**'.

<figure><img src="https://3883897532-files.gitbook.io/~/files/v0/b/gitbook-x-prod.appspot.com/o/spaces%2F0mRE72CK4C3BU2yX3xxe%2Fuploads%2FuAxcpyqETX4TU09uPvp3%2FStep22.png?alt=media&amp;token=33cb6182-3210-46f4-b532-2c455f6f2c9b" alt=""><figcaption></figcaption></figure>

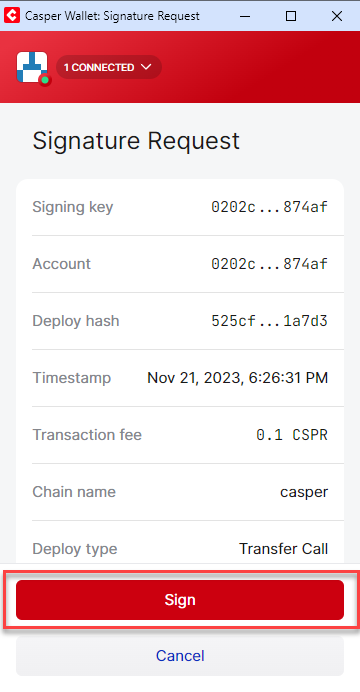
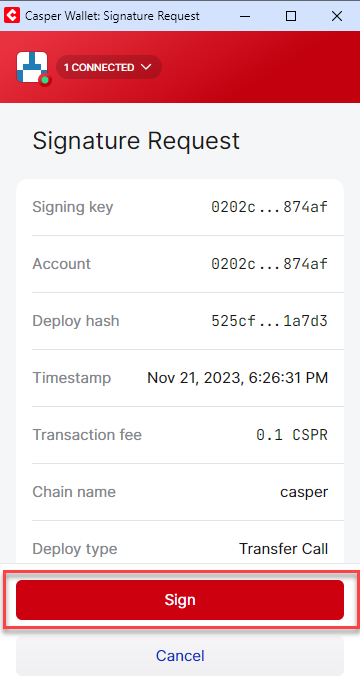
**Step 5:** Click on '**Sign**' in the Casper Wallet extension prompt.

<figure><img src="https://3883897532-files.gitbook.io/~/files/v0/b/gitbook-x-prod.appspot.com/o/spaces%2F0mRE72CK4C3BU2yX3xxe%2Fuploads%2F1Yr7fRSLik67LBlcEFqH%2FStep23.png?alt=media&amp;token=4d803a9c-91ee-4c29-b070-d397aaec72af" alt=""><figcaption></figcaption></figure>

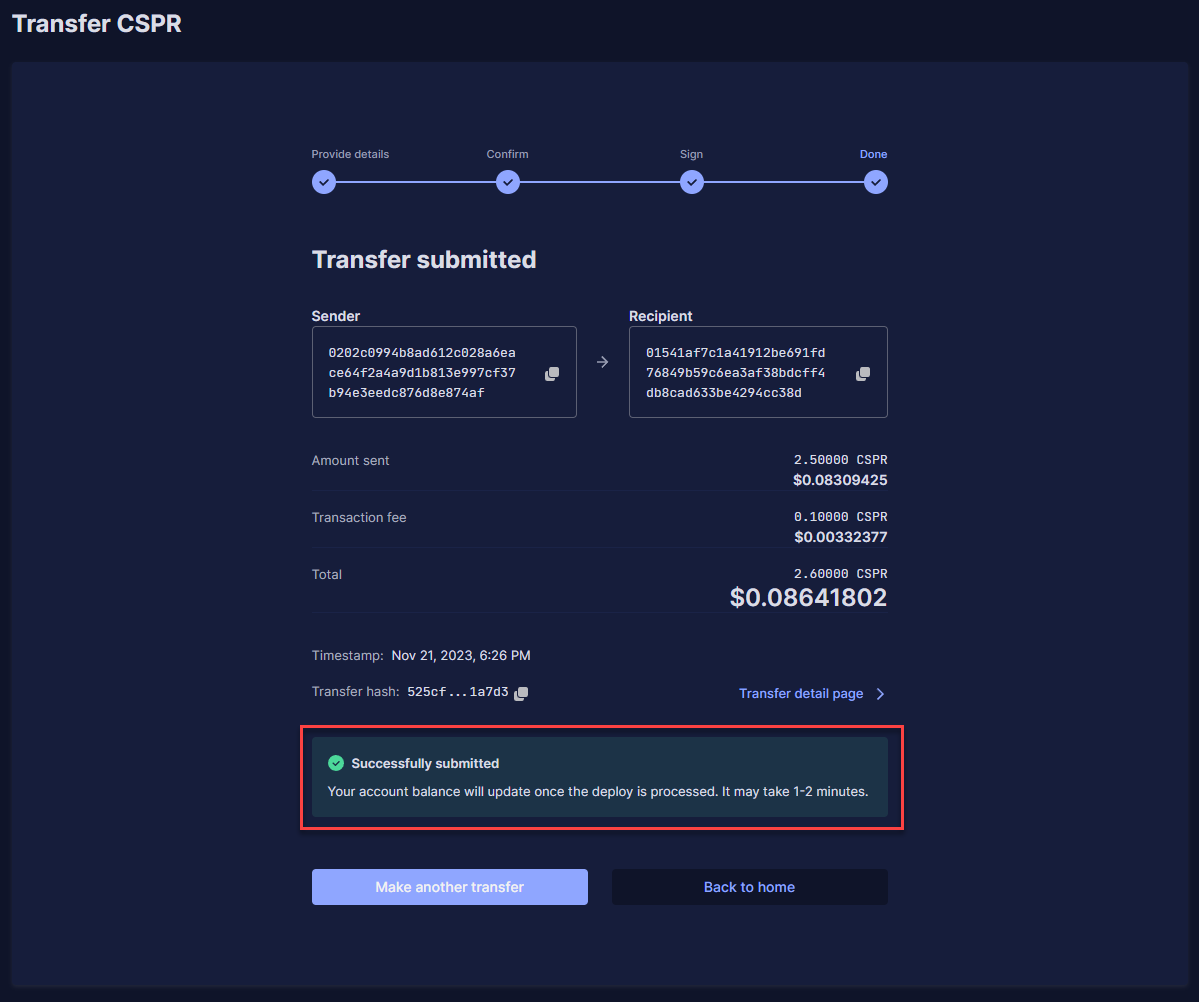
**Step 6:** You will see the details of the successful transfer.

## **Part 4b – Transfer $CSPR Using Casper Wallet**

<figure><img src="https://3883897532-files.gitbook.io/~/files/v0/b/gitbook-x-prod.appspot.com/o/spaces%2F0mRE72CK4C3BU2yX3xxe%2Fuploads%2FnsDcUCmmoWtJpFdK5ji6%2FSend1.png?alt=media&amp;token=93543c89-c101-41b9-8da4-0d60dc6f13e2" alt=""><figcaption></figcaption></figure>

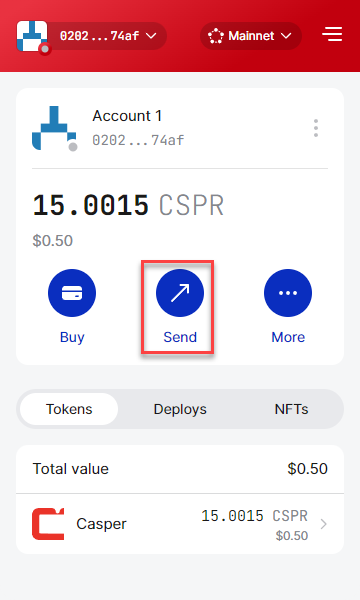
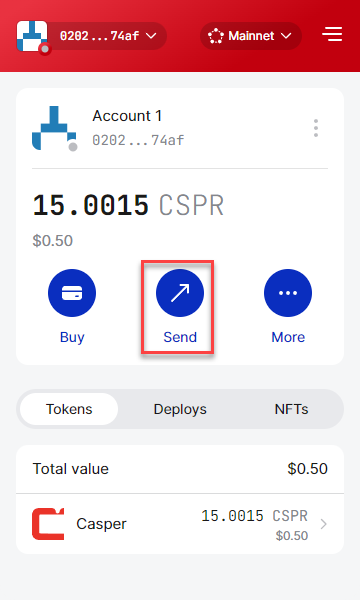
**Step 1:** Click on '**Send**' in the Casper Wallet extension.

<figure><img src="https://3883897532-files.gitbook.io/~/files/v0/b/gitbook-x-prod.appspot.com/o/spaces%2F0mRE72CK4C3BU2yX3xxe%2Fuploads%2FkM9KQGsvQPNX52LEtIKS%2FSend2.png?alt=media&amp;token=a656a144-5d69-4efd-83de-a9a7df61611b" alt=""><figcaption></figcaption></figure>

**Step 2:** Fill in the public key of where you want to send your $CSPR under '**To** **recipient**' and click '**Next**'.

<figure><img src="https://3883897532-files.gitbook.io/~/files/v0/b/gitbook-x-prod.appspot.com/o/spaces%2F0mRE72CK4C3BU2yX3xxe%2Fuploads%2F4HgkGsgbiU4tdnz3qvJ3%2FSend3.png?alt=media&amp;token=ed074516-ac6b-4315-9017-f5e65bc6208d" alt=""><figcaption></figcaption></figure>

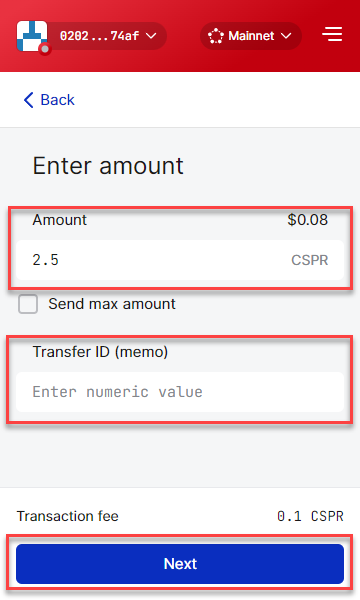
**Step 3:** Fill in the amount of $CSPR you want to send under '**Amount**' and fill in a specific Transfer ID if you wish to/need under '**Transfer ID (memo)**'. This is sometimes required if you send $CSPR to an exchange. If not needed, you can use '**0**'. After this, click on '**Next**'.

<figure><img src="https://3883897532-files.gitbook.io/~/files/v0/b/gitbook-x-prod.appspot.com/o/spaces%2F0mRE72CK4C3BU2yX3xxe%2Fuploads%2FUSZ8pnSOlmJpbDbztDuw%2FSend4.png?alt=media&amp;token=30c40bda-a723-42ce-b367-1284c17904b8" alt=""><figcaption></figcaption></figure>

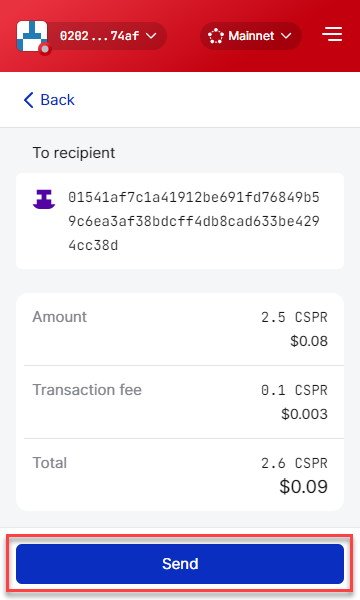
**Step 4:** Click on '**Send**'.

<figure><img src="https://3883897532-files.gitbook.io/~/files/v0/b/gitbook-x-prod.appspot.com/o/spaces%2F0mRE72CK4C3BU2yX3xxe%2Fuploads%2FhHaFXWMhNbHWjuzvYuWZ%2FSend5.png?alt=media&amp;token=0d4b962a-57a2-44b2-8cac-61fca27298e2" alt=""><figcaption></figcaption></figure>

**Step 5:** You have successfully submitted the transfer transaction. Click on '**Done**'.

## **Part 5a – Delegate $CSPR Using Casper Wallet And CSPR.Live**

<figure><img src="https://3883897532-files.gitbook.io/~/files/v0/b/gitbook-x-prod.appspot.com/o/spaces%2F0mRE72CK4C3BU2yX3xxe%2Fuploads%2FeAT4nfxhsAeoxtOguNcW%2FStep24.png?alt=media&amp;token=13e8a434-b304-42ad-b3e4-c80b0d7e1f6a" alt=""><figcaption></figcaption></figure>

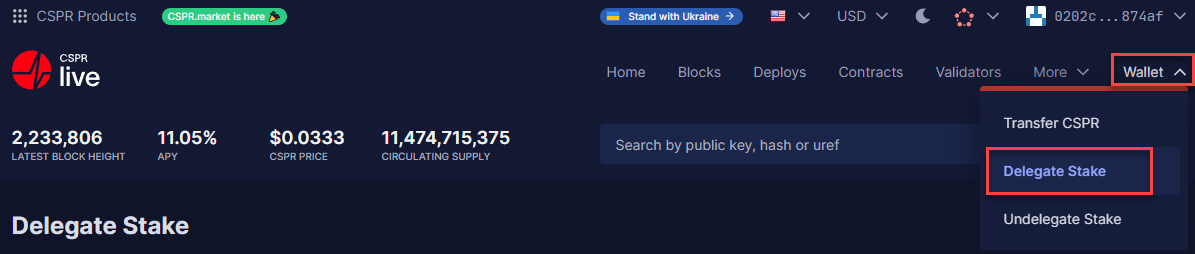
**Step 1:** Hover over '**Wallet**' in the top right corner and select '**Delegate Stake**'.

<figure><img src="https://3883897532-files.gitbook.io/~/files/v0/b/gitbook-x-prod.appspot.com/o/spaces%2F0mRE72CK4C3BU2yX3xxe%2Fuploads%2FkHywLWZnFS55cp0A90aJ%2FStep25.png?alt=media&amp;token=db1eb732-0f6a-43de-bd63-07323c7f16ec" alt=""><figcaption></figcaption></figure>

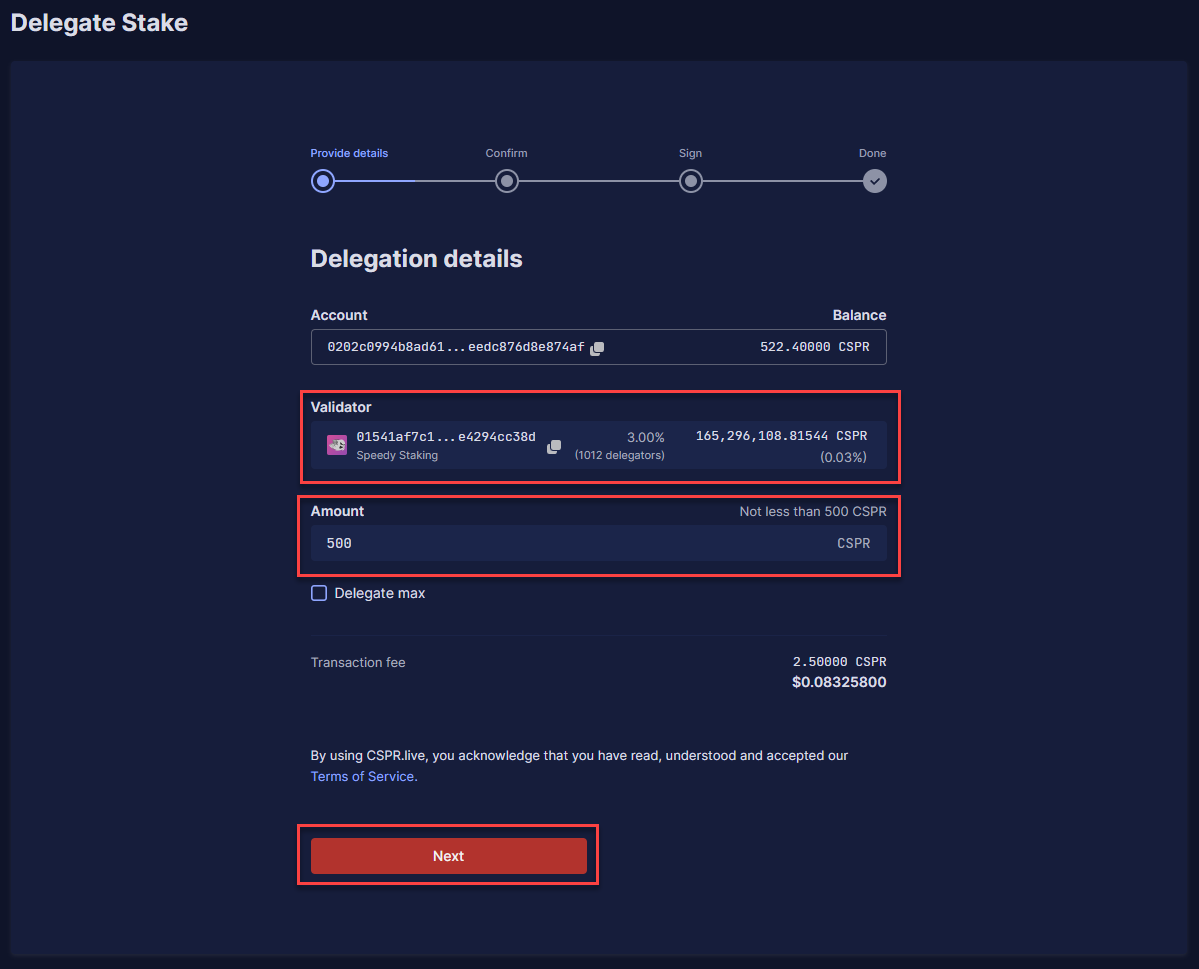
**Step 2:** Choose a validator under '**Validator**' (**For example, Speedy Staking**) and the amount of $CSPR you want to delegate under '**Amount**'. After this, click on '**Next**'.

<figure><img src="https://3883897532-files.gitbook.io/~/files/v0/b/gitbook-x-prod.appspot.com/o/spaces%2F0mRE72CK4C3BU2yX3xxe%2Fuploads%2FIKGR6mDuUDgxSDO63K9b%2FStep26.png?alt=media&amp;token=5e970f22-f62c-4109-8547-062d2f61aeab" alt=""><figcaption></figcaption></figure>

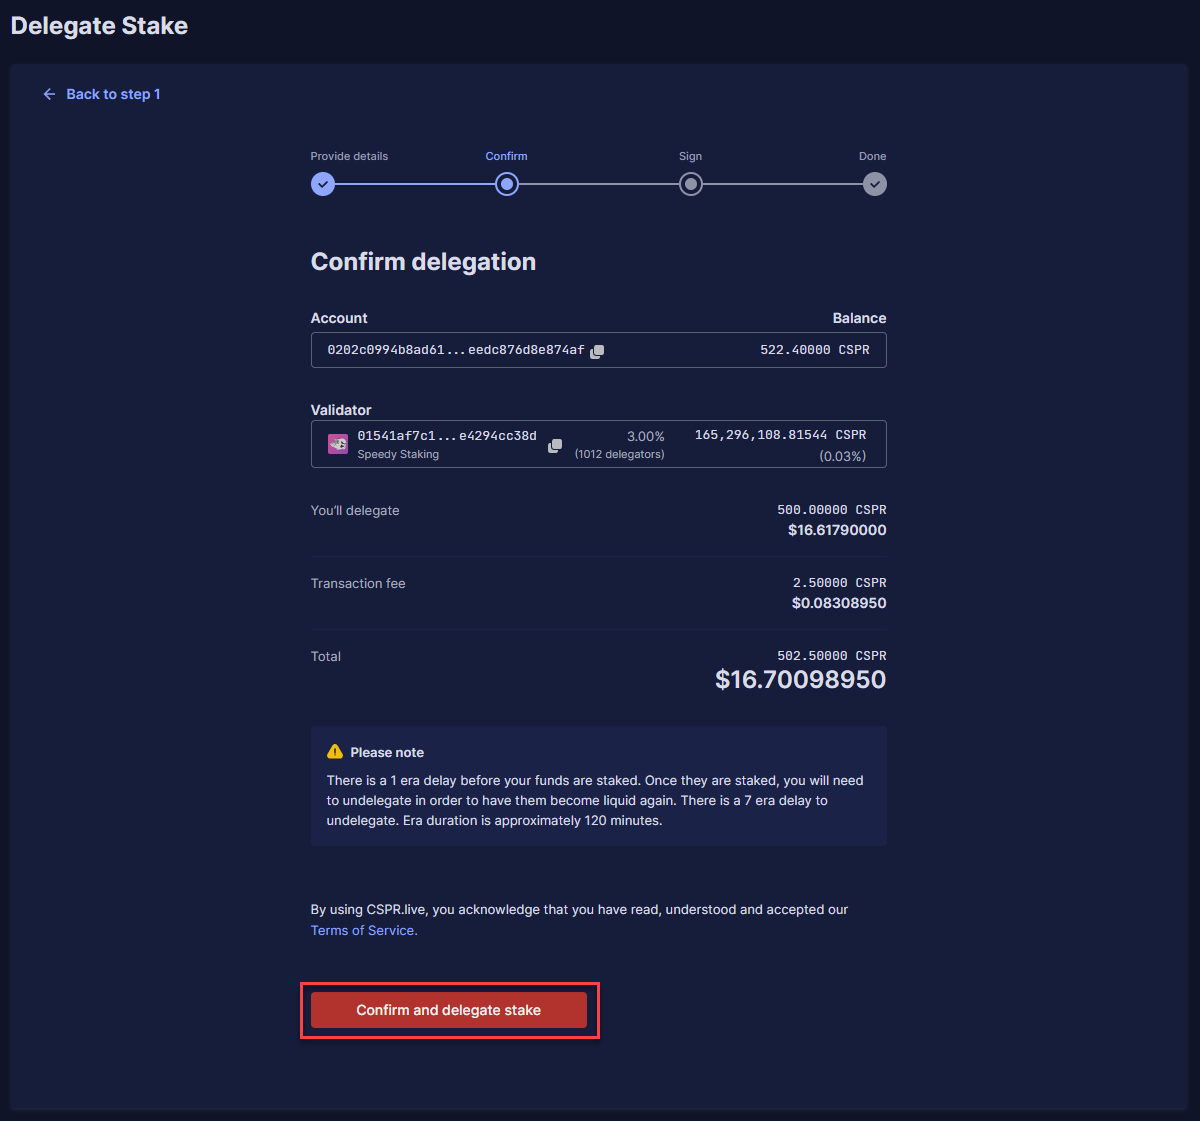
**Step 3:** Check if the information is correct and click '**Confirm and delegate stake**'.

<figure><img src="https://3883897532-files.gitbook.io/~/files/v0/b/gitbook-x-prod.appspot.com/o/spaces%2F0mRE72CK4C3BU2yX3xxe%2Fuploads%2F7eHjNNcA7bl6ITKte3sY%2FStep27.png?alt=media&amp;token=56aed044-e751-40bd-95a3-99d4b3039ed0" alt=""><figcaption></figcaption></figure>

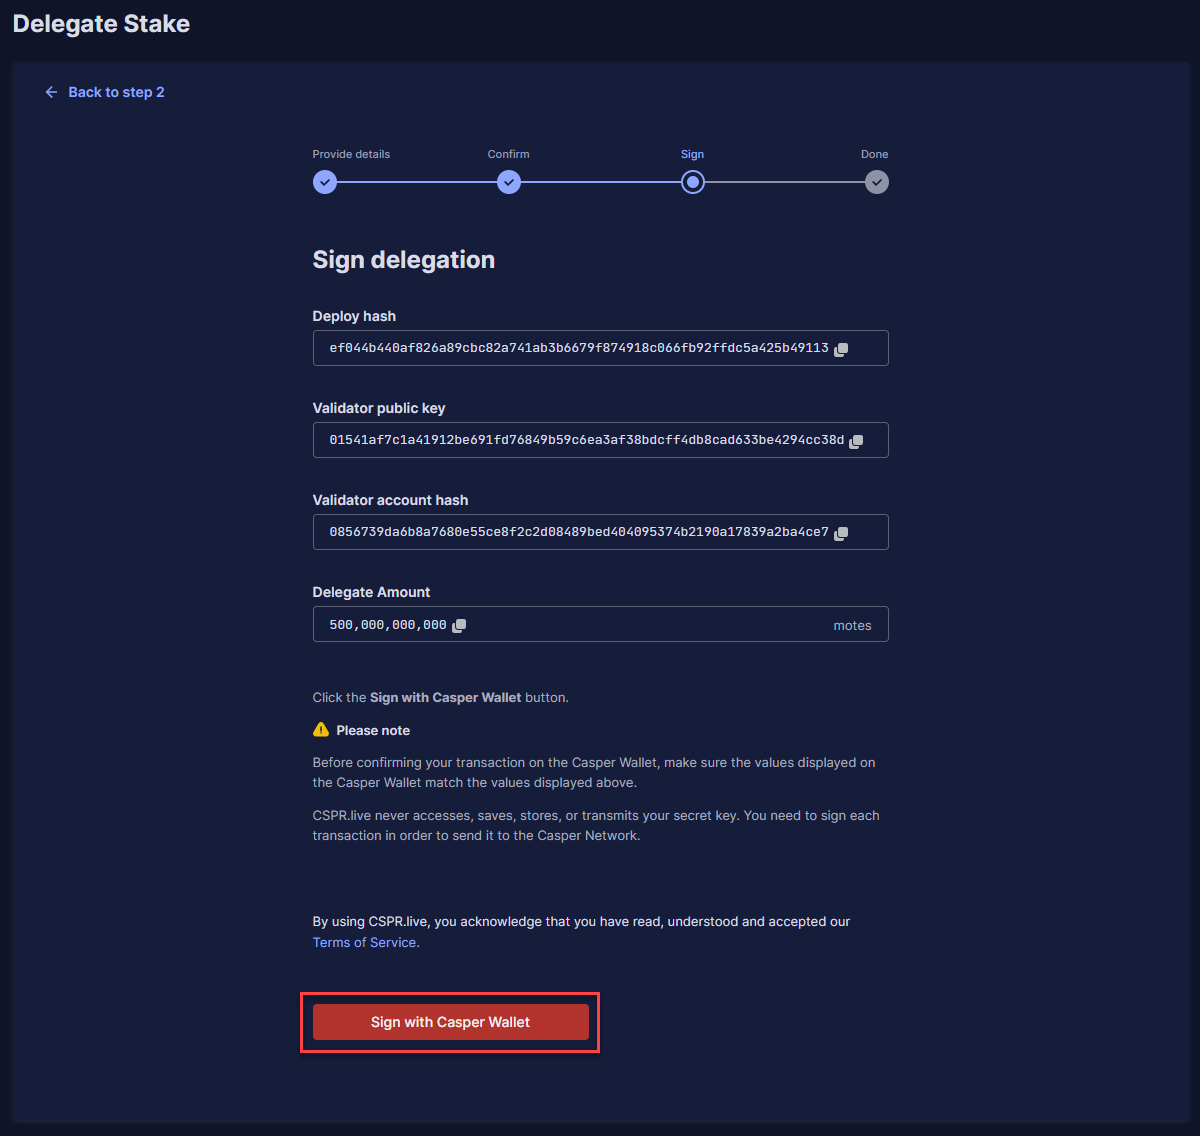
**Step 4:** It will now show you all the information about your transaction, and you can click '**Sign with Casper Wallet**'.

<figure><img src="https://3883897532-files.gitbook.io/~/files/v0/b/gitbook-x-prod.appspot.com/o/spaces%2F0mRE72CK4C3BU2yX3xxe%2Fuploads%2FctsuRtcxnNYiExOrWhqE%2FStep28.png?alt=media&amp;token=09879680-513e-49af-8d17-26216bdf89c4" alt=""><figcaption></figcaption></figure>

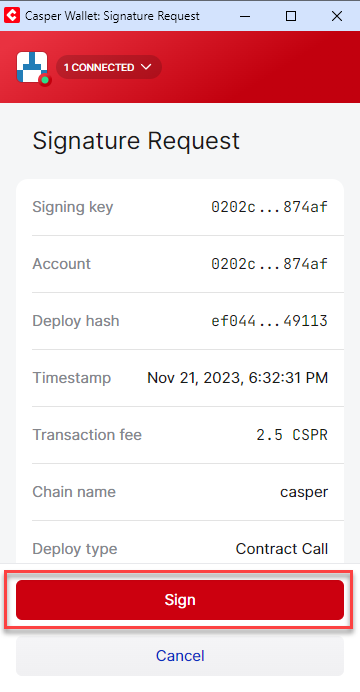
**Step 5:** Click on '**Sign**'.

<figure><img src="https://3883897532-files.gitbook.io/~/files/v0/b/gitbook-x-prod.appspot.com/o/spaces%2F0mRE72CK4C3BU2yX3xxe%2Fuploads%2FpHpkZ53pwh7GCMHVR2fT%2FStep29.png?alt=media&amp;token=4e3a1d4e-3c25-4e72-9172-3050f6073ca4" alt=""><figcaption></figcaption></figure>

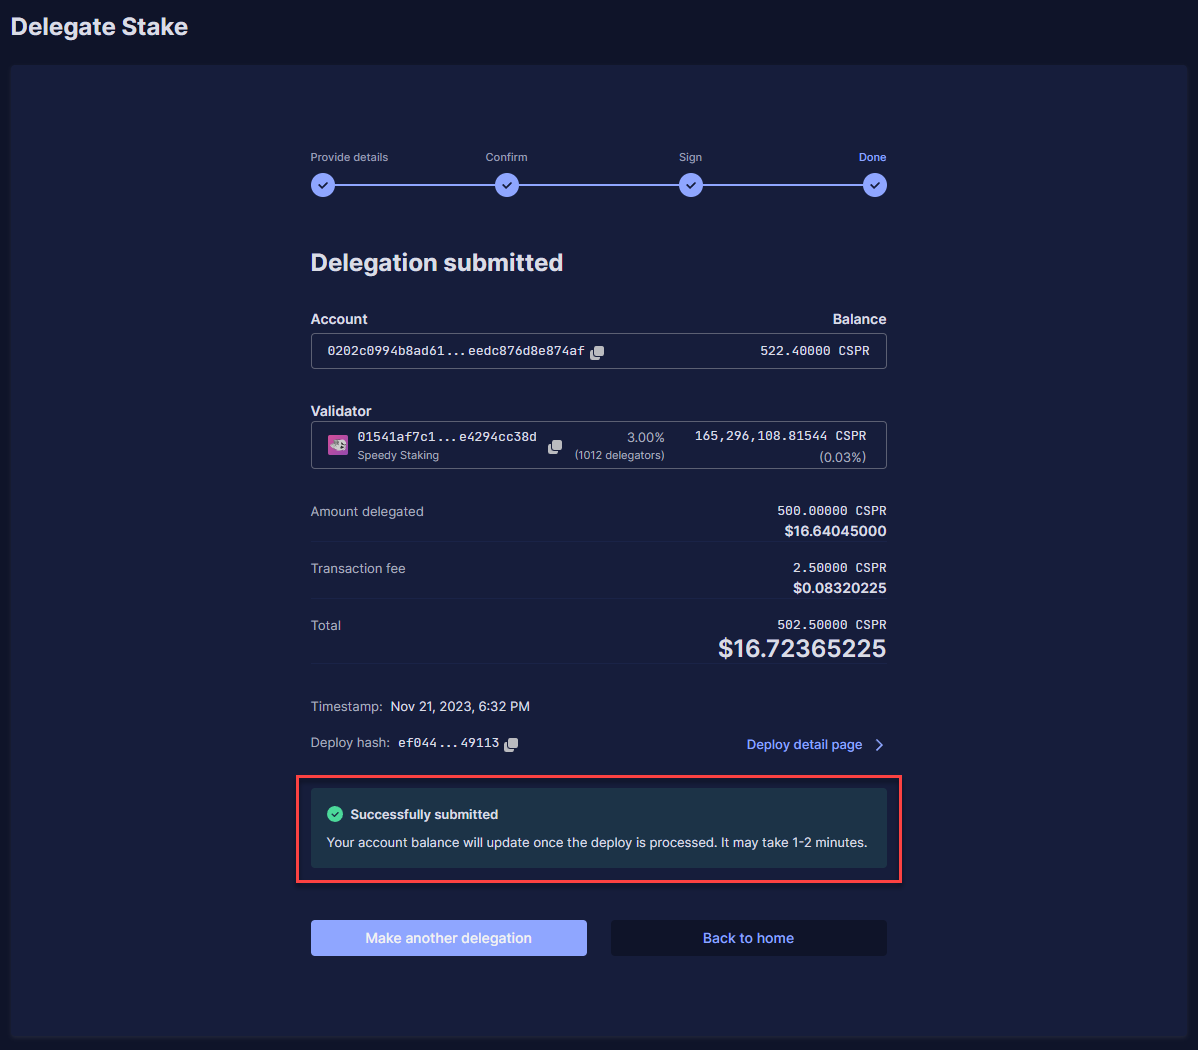
**Step 6:** You will see the details of the successful delegation. You will start receiving Staking Rewards after \~4 hours. You will then receive Staking Rewards every ERA (\~2 hours).

## **Part 5b – Delegate $CSPR Using Casper Wallet**

<figure><img src="https://3883897532-files.gitbook.io/~/files/v0/b/gitbook-x-prod.appspot.com/o/spaces%2F0mRE72CK4C3BU2yX3xxe%2Fuploads%2FEkRf1TJxCo8arNB9Bu0M%2FStep30.png?alt=media&amp;token=e98a6620-6e11-4f82-92ff-7554ddcfc4e9" alt=""><figcaption></figcaption></figure>

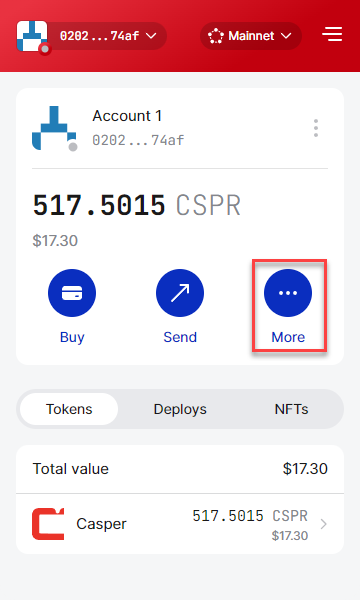
**Step 1:** Click on '**More**' in the Casper Wallet extension.

<figure><img src="https://3883897532-files.gitbook.io/~/files/v0/b/gitbook-x-prod.appspot.com/o/spaces%2F0mRE72CK4C3BU2yX3xxe%2Fuploads%2FSzAvqJUhJesyeJEll8Mc%2FStep31.png?alt=media&amp;token=f4bc023a-71e5-4d82-8c72-0413b097e690" alt=""><figcaption></figcaption></figure>

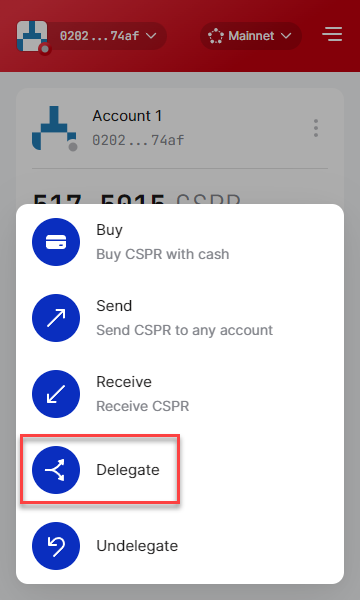
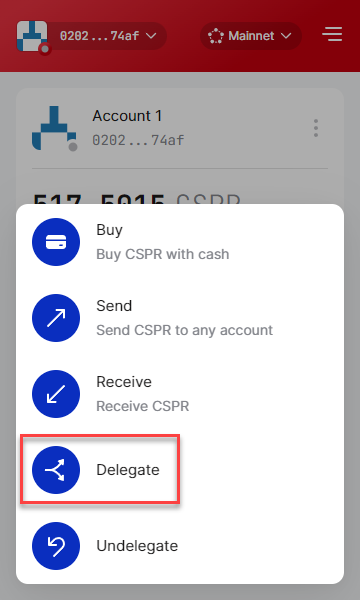
**Step 2:** Click on '**Delegate**'.

<figure><img src="https://3883897532-files.gitbook.io/~/files/v0/b/gitbook-x-prod.appspot.com/o/spaces%2F0mRE72CK4C3BU2yX3xxe%2Fuploads%2Fl9UXcMLr2hcknBzBe2tO%2FStep32.png?alt=media&amp;token=c663bd7f-d9d8-4c52-9703-957912258501" alt=""><figcaption></figcaption></figure>

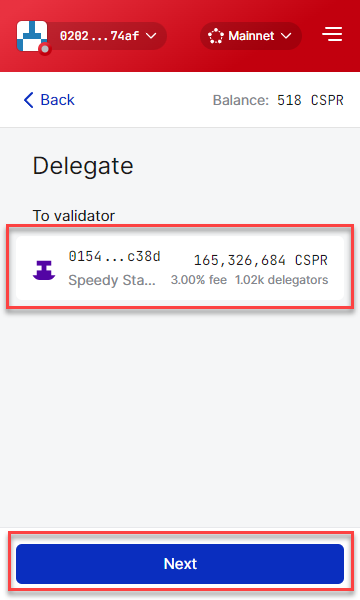
**Step 3:** Select a validator under '**To validator**' (For example, Speedy Staking) and click on '**Next**'.

<figure><img src="https://3883897532-files.gitbook.io/~/files/v0/b/gitbook-x-prod.appspot.com/o/spaces%2F0mRE72CK4C3BU2yX3xxe%2Fuploads%2FjXZjnonitILcj3SikUQB%2FStep33.png?alt=media&amp;token=3a96b840-a5ea-4414-9345-34f5b1e1014c" alt=""><figcaption></figcaption></figure>

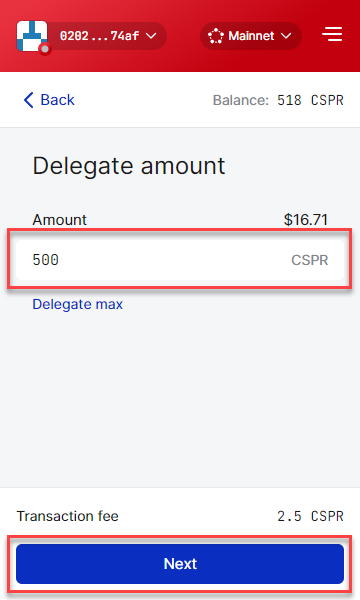
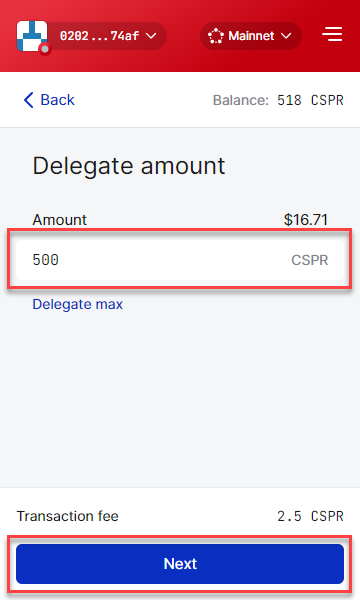
**Step 4:** Fill in the amount of $CSPR you want to delegate under '**Amount**' and click on '**Next**'.

<figure><img src="https://3883897532-files.gitbook.io/~/files/v0/b/gitbook-x-prod.appspot.com/o/spaces%2F0mRE72CK4C3BU2yX3xxe%2Fuploads%2FYuFZCNqWsA0XwS3Fduvb%2FStep34.png?alt=media&amp;token=40f393e1-651e-469c-9d63-6bf42919dbd6" alt=""><figcaption></figcaption></figure>

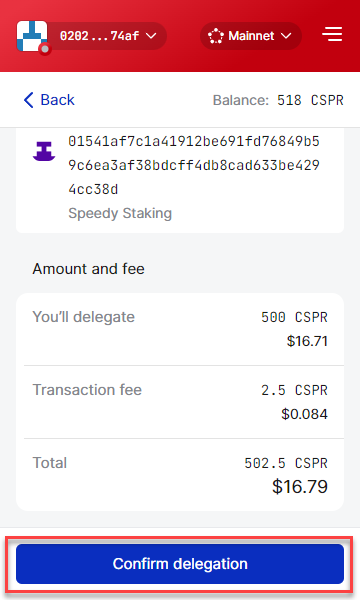
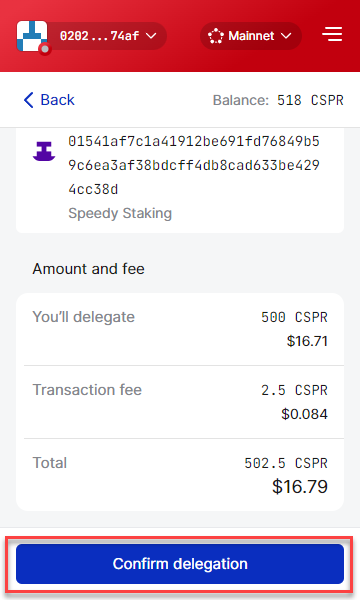
**Step 5:** Click on '**Confirm delegation**'.

<figure><img src="https://3883897532-files.gitbook.io/~/files/v0/b/gitbook-x-prod.appspot.com/o/spaces%2F0mRE72CK4C3BU2yX3xxe%2Fuploads%2FuY2cE0w8ZAf2UpGERtXH%2FStep35.png?alt=media&amp;token=5153edb8-d8da-40f5-b1d6-9ac784528c83" alt=""><figcaption></figcaption></figure>

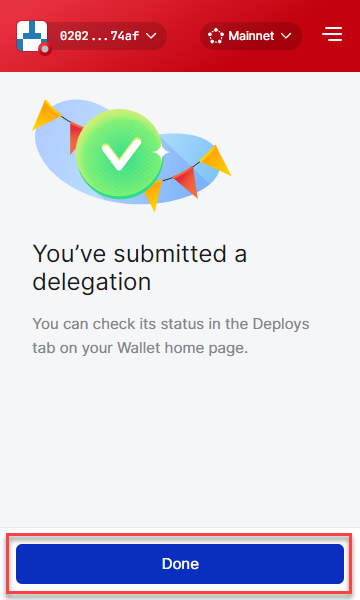
**Step 6:** You have successfully submitted the delegation transaction. Click on '**Done**'. You will start receiving Staking Rewards after \~4 hours. You will then receive Staking Rewards every ERA (\~2 hours).


# Casper Wallet - Installation and Setup

<figure><img src="https://3883897532-files.gitbook.io/~/files/v0/b/gitbook-x-prod.appspot.com/o/spaces%2F0mRE72CK4C3BU2yX3xxe%2Fuploads%2FklDsUAmBThhetCEkOjmu%2FStep1.png?alt=media&amp;token=0bf0f507-5f75-4767-9b84-dd4547ad482e" alt=""><figcaption></figcaption></figure>

**Step 1:** Navigate to the [Casper Wallet website](https://casperwallet.io) and click '**Download**'.

<figure><img src="https://3883897532-files.gitbook.io/~/files/v0/b/gitbook-x-prod.appspot.com/o/spaces%2F0mRE72CK4C3BU2yX3xxe%2Fuploads%2FaR7aROProNqPPtNHe7j8%2FStep2.png?alt=media&amp;token=87e798e6-9dd3-4e11-9992-2c493bd1c5fa" alt=""><figcaption></figcaption></figure>

**Step 2:** This will bring you to the Chrome Store (or equivalent on other browsers); click '**Add to Chrome**' (or equivalent on other browsers).

<figure><img src="https://3883897532-files.gitbook.io/~/files/v0/b/gitbook-x-prod.appspot.com/o/spaces%2F0mRE72CK4C3BU2yX3xxe%2Fuploads%2FvuxT7MT7zf7ajZLZ89dr%2FStep3.png?alt=media&amp;token=1d684465-9de1-4a2e-b215-5ab93f797302" alt=""><figcaption></figcaption></figure>

**Step 3:** Click on '**Add extension**'.

<figure><img src="https://3883897532-files.gitbook.io/~/files/v0/b/gitbook-x-prod.appspot.com/o/spaces%2F0mRE72CK4C3BU2yX3xxe%2Fuploads%2FzIM364lXZc2VSeNnqWZP%2FStep4.png?alt=media&amp;token=742e5ab8-2a3e-401c-bddd-8f09be4c9d11" alt=""><figcaption></figcaption></figure>

**Step 4:** After adding the Casper Wallet extension, it will open a new tab in your browser for the setup; click '**Get started**'.

<figure><img src="https://3883897532-files.gitbook.io/~/files/v0/b/gitbook-x-prod.appspot.com/o/spaces%2F0mRE72CK4C3BU2yX3xxe%2Fuploads%2FrcEn9Be8ogiByoOI6Eo6%2FStep5.png?alt=media&amp;token=4fbf3ccf-b906-4d89-8c9d-97bf22444e6a" alt=""><figcaption></figcaption></figure>

**Step 5:** Think of a secure password, fill it in twice, mark the checkbox, and click '**Create password**'.

<figure><img src="https://3883897532-files.gitbook.io/~/files/v0/b/gitbook-x-prod.appspot.com/o/spaces%2F0mRE72CK4C3BU2yX3xxe%2Fuploads%2FRsYdTzzQOc4QXkILon8p%2FStep6.png?alt=media&amp;token=c13d888b-95d8-4528-847c-e6f11ae29e27" alt=""><figcaption></figcaption></figure>

**Step 6:** Click on '**Create my secret recovery phrase**'.

<figure><img src="https://3883897532-files.gitbook.io/~/files/v0/b/gitbook-x-prod.appspot.com/o/spaces%2F0mRE72CK4C3BU2yX3xxe%2Fuploads%2FXiUSdIAep1gmmQLc1kgY%2FStep7.png?alt=media&amp;token=d2a6f682-2c5d-4294-bf98-5664e789a253" alt=""><figcaption></figcaption></figure>

**Step 7:** Mark the checkbox and click on '**Next**'.

<figure><img src="https://3883897532-files.gitbook.io/~/files/v0/b/gitbook-x-prod.appspot.com/o/spaces%2F0mRE72CK4C3BU2yX3xxe%2Fuploads%2Ffmu0fbSEDNSD5i6p0flv%2FStep8.png?alt=media&amp;token=f823139f-edac-4bd9-aad1-4bfb54f830c6" alt=""><figcaption></figcaption></figure>

**Step 8:** Save your secret recovery phrase somewhere safe, mark the checkbox and click '**Next**'.

<figure><img src="https://3883897532-files.gitbook.io/~/files/v0/b/gitbook-x-prod.appspot.com/o/spaces%2F0mRE72CK4C3BU2yX3xxe%2Fuploads%2FFOxGKraJCL7UWaJDa922%2FStep9.png?alt=media&amp;token=35639ae5-70be-431e-9ba4-0879818f52dc" alt=""><figcaption></figcaption></figure>

**Step 9:** Fill in the missing words from your secret recovery phrase correctly and click '**Confirm**'.

<figure><img src="https://3883897532-files.gitbook.io/~/files/v0/b/gitbook-x-prod.appspot.com/o/spaces%2F0mRE72CK4C3BU2yX3xxe%2Fuploads%2FPFwJjvGWp2m1njzQQcIx%2FStep10.png?alt=media&amp;token=64100fcc-b992-4445-b1bc-c21f826770d0" alt=""><figcaption></figcaption></figure>

**Step 10:** Click on '**Done**'.

<figure><img src="https://3883897532-files.gitbook.io/~/files/v0/b/gitbook-x-prod.appspot.com/o/spaces%2F0mRE72CK4C3BU2yX3xxe%2Fuploads%2FPRMGvPVZIAjCar8MKcZn%2FStep11.png?alt=media&amp;token=8640325f-6156-4c98-9ac3-36eda5da49b1" alt=""><figcaption></figcaption></figure>

**Step 11:** Click on '**Got it**'.

<figure><img src="https://3883897532-files.gitbook.io/~/files/v0/b/gitbook-x-prod.appspot.com/o/spaces%2F0mRE72CK4C3BU2yX3xxe%2Fuploads%2FI8UVXVCJAYiwvuoyG2yT%2FStep12.png?alt=media&amp;token=7c57e918-41c4-40bc-8023-f33770c34d10" alt=""><figcaption></figcaption></figure>

**Step 12 (recommended):** Go to the extension icon on the top right of Google Chrome, click on it and click on the pin next to Casper Wallet. This way, you will always have easy access to your Casper Wallet extension.


# Casper Wallet - Connect Casper Wallet with CSPR.live

<figure><img src="https://3883897532-files.gitbook.io/~/files/v0/b/gitbook-x-prod.appspot.com/o/spaces%2F0mRE72CK4C3BU2yX3xxe%2Fuploads%2Ftq8KaPuiSh2L0bH7liBj%2FStep13.png?alt=media&amp;token=e9024e98-dfc6-447d-b0c3-ef9b789edef9" alt=""><figcaption></figcaption></figure>

**Step 1:** Go to CSPR.live and click '**Sign in**' on the top right of the screen.&#x20;

<figure><img src="https://3883897532-files.gitbook.io/~/files/v0/b/gitbook-x-prod.appspot.com/o/spaces%2F0mRE72CK4C3BU2yX3xxe%2Fuploads%2FXiIpJOVE01ldIVma0iGp%2FStep14.png?alt=media&amp;token=5db19fc9-7ef2-4cb7-811a-a56d0828ac1e" alt=""><figcaption></figcaption></figure>

**Step 2:** Click on '**Casper Wallet**'.

<figure><img src="https://3883897532-files.gitbook.io/~/files/v0/b/gitbook-x-prod.appspot.com/o/spaces%2F0mRE72CK4C3BU2yX3xxe%2Fuploads%2FHM3T2z6ukWbrS7w8VDoO%2FStep15.png?alt=media&amp;token=7a2eb561-2e67-4d55-a3ef-3d565f09ca64" alt=""><figcaption></figcaption></figure>

**Step 3:** Mark the checkbox next to the account you want to connect and click on '**Next**'.

<figure><img src="https://3883897532-files.gitbook.io/~/files/v0/b/gitbook-x-prod.appspot.com/o/spaces%2F0mRE72CK4C3BU2yX3xxe%2Fuploads%2FAL0kF1TSSs9KBquyeJ4z%2FStep16.png?alt=media&amp;token=9e8c7182-4dae-4ba7-81a4-76290b3ee325" alt=""><figcaption></figcaption></figure>

**Step 4:** Click on '**Connect to 1 account**'.


# Casper Wallet - Receive $CSPR

<figure><img src="https://3883897532-files.gitbook.io/~/files/v0/b/gitbook-x-prod.appspot.com/o/spaces%2F0mRE72CK4C3BU2yX3xxe%2Fuploads%2FgmwdHFoyUHYsmKfvTcGI%2FStep17.png?alt=media&amp;token=9fd781a7-d101-46d9-97b7-59b57c85aeec" alt=""><figcaption></figcaption></figure>

**Step 1:** Hover over your public key in the top right corner and select '**View Account**'.

<figure><img src="https://3883897532-files.gitbook.io/~/files/v0/b/gitbook-x-prod.appspot.com/o/spaces%2F0mRE72CK4C3BU2yX3xxe%2Fuploads%2FFWuADABU89bV8YGIlYj7%2FStep18.png?alt=media&amp;token=31d6e65e-e1ba-41e1-ac18-5651f6380287" alt=""><figcaption></figcaption></figure>

**Step 2:** Your Public Key (wallet address) is on the top. This is the address you use to send $CSPR to.&#x20;


# Casper Wallet - Transfer $CSPR (CSPR.live)

<figure><img src="https://3883897532-files.gitbook.io/~/files/v0/b/gitbook-x-prod.appspot.com/o/spaces%2F0mRE72CK4C3BU2yX3xxe%2Fuploads%2FmmAcXuTl09W32qA8B0NN%2FStep19.png?alt=media&amp;token=d37b669f-ff60-44ef-be87-ae4f44efb101" alt=""><figcaption></figcaption></figure>

**Step 1:** Hover over '**Wallet**' in the top right corner and select '**Transfer CSPR**'.

<figure><img src="https://3883897532-files.gitbook.io/~/files/v0/b/gitbook-x-prod.appspot.com/o/spaces%2F0mRE72CK4C3BU2yX3xxe%2Fuploads%2FOqz0GA83Yq7qKtKbId2d%2FStep20.png?alt=media&amp;token=0ba3c024-0aed-4da6-8633-a63d87008a39" alt=""><figcaption></figcaption></figure>

**Step 2:** Fill in the public key of where you want to send your $CSPR under '**Recipient**', the amount of $CSPR you want to send under '**Amount**' and fill in a specific Transfer ID if you wish to/need under '**Transfer ID (Memo)**'. This is sometimes required if you send $CSPR to an exchange. If not needed, you can use '**0**'. After this, click on '**Next**'.

<figure><img src="https://3883897532-files.gitbook.io/~/files/v0/b/gitbook-x-prod.appspot.com/o/spaces%2F0mRE72CK4C3BU2yX3xxe%2Fuploads%2FOZAXEiKitYkr4yZrZ6rx%2FStep21.png?alt=media&amp;token=bc93d100-1a4f-4902-8e8c-0f71f887819c" alt=""><figcaption></figcaption></figure>

**Step 3:** Check if the information is correct and click '**Confirm and transfer**'.

<figure><img src="https://3883897532-files.gitbook.io/~/files/v0/b/gitbook-x-prod.appspot.com/o/spaces%2F0mRE72CK4C3BU2yX3xxe%2Fuploads%2FOu4uBVduiy23PDj9LWFO%2FStep22-1.png?alt=media&amp;token=d9a4a83b-ae9b-47c3-b35e-753363cac2f1" alt=""><figcaption></figcaption></figure>

**Step 4:** It will now show you all the information about your transaction, and you can click '**Sign with Casper Wallet**'.

<figure><img src="https://3883897532-files.gitbook.io/~/files/v0/b/gitbook-x-prod.appspot.com/o/spaces%2F0mRE72CK4C3BU2yX3xxe%2Fuploads%2FuAxcpyqETX4TU09uPvp3%2FStep22.png?alt=media&amp;token=33cb6182-3210-46f4-b532-2c455f6f2c9b" alt=""><figcaption></figcaption></figure>

**Step 5:** Click on '**Sign**' in the Casper Wallet extension prompt.

<figure><img src="https://3883897532-files.gitbook.io/~/files/v0/b/gitbook-x-prod.appspot.com/o/spaces%2F0mRE72CK4C3BU2yX3xxe%2Fuploads%2F1Yr7fRSLik67LBlcEFqH%2FStep23.png?alt=media&amp;token=4d803a9c-91ee-4c29-b070-d397aaec72af" alt=""><figcaption></figcaption></figure>

**Step 6:** You will see the details of the successful transfer.


# Casper Wallet - Transfer $CSPR (In-App)

<figure><img src="https://3883897532-files.gitbook.io/~/files/v0/b/gitbook-x-prod.appspot.com/o/spaces%2F0mRE72CK4C3BU2yX3xxe%2Fuploads%2FnsDcUCmmoWtJpFdK5ji6%2FSend1.png?alt=media&amp;token=93543c89-c101-41b9-8da4-0d60dc6f13e2" alt=""><figcaption></figcaption></figure>

**Step 1:** Click on '**Send**' in the Casper Wallet extension.

<figure><img src="https://3883897532-files.gitbook.io/~/files/v0/b/gitbook-x-prod.appspot.com/o/spaces%2F0mRE72CK4C3BU2yX3xxe%2Fuploads%2FkM9KQGsvQPNX52LEtIKS%2FSend2.png?alt=media&amp;token=a656a144-5d69-4efd-83de-a9a7df61611b" alt=""><figcaption></figcaption></figure>

**Step 2:** Fill in the public key of where you want to send your $CSPR under '**To** **recipient**' and click '**Next**'.

<figure><img src="https://3883897532-files.gitbook.io/~/files/v0/b/gitbook-x-prod.appspot.com/o/spaces%2F0mRE72CK4C3BU2yX3xxe%2Fuploads%2F4HgkGsgbiU4tdnz3qvJ3%2FSend3.png?alt=media&amp;token=ed074516-ac6b-4315-9017-f5e65bc6208d" alt=""><figcaption></figcaption></figure>

**Step 3:** Fill in the amount of $CSPR you want to send under '**Amount**' and fill in a specific Transfer ID if you wish to/need under '**Transfer ID (memo)**'. This is sometimes required if you send $CSPR to an exchange. If not needed, you can use '**0**'. After this, click on '**Next**'.

<figure><img src="https://3883897532-files.gitbook.io/~/files/v0/b/gitbook-x-prod.appspot.com/o/spaces%2F0mRE72CK4C3BU2yX3xxe%2Fuploads%2FUSZ8pnSOlmJpbDbztDuw%2FSend4.png?alt=media&amp;token=30c40bda-a723-42ce-b367-1284c17904b8" alt=""><figcaption></figcaption></figure>

**Step 4:** Click on '**Send**'.

<figure><img src="https://3883897532-files.gitbook.io/~/files/v0/b/gitbook-x-prod.appspot.com/o/spaces%2F0mRE72CK4C3BU2yX3xxe%2Fuploads%2FhHaFXWMhNbHWjuzvYuWZ%2FSend5.png?alt=media&amp;token=0d4b962a-57a2-44b2-8cac-61fca27298e2" alt=""><figcaption></figcaption></figure>

**Step 5:** You have successfully submitted the transfer transaction. Click on '**Done**'.


# Casper Wallet - Delegate (Stake) $CSPR (CSPR.live)

<figure><img src="https://3883897532-files.gitbook.io/~/files/v0/b/gitbook-x-prod.appspot.com/o/spaces%2F0mRE72CK4C3BU2yX3xxe%2Fuploads%2FeAT4nfxhsAeoxtOguNcW%2FStep24.png?alt=media&amp;token=13e8a434-b304-42ad-b3e4-c80b0d7e1f6a" alt=""><figcaption></figcaption></figure>

**Step 1:** Hover over '**Wallet**' in the top right corner and select '**Delegate Stake**'.

<figure><img src="https://3883897532-files.gitbook.io/~/files/v0/b/gitbook-x-prod.appspot.com/o/spaces%2F0mRE72CK4C3BU2yX3xxe%2Fuploads%2FkHywLWZnFS55cp0A90aJ%2FStep25.png?alt=media&amp;token=db1eb732-0f6a-43de-bd63-07323c7f16ec" alt=""><figcaption></figcaption></figure>

**Step 2:** Choose a validator under '**Validator**' (**For example, Speedy Staking**) and the amount of $CSPR you want to delegate under '**Amount**'. After this, click on '**Next**'.

<figure><img src="https://3883897532-files.gitbook.io/~/files/v0/b/gitbook-x-prod.appspot.com/o/spaces%2F0mRE72CK4C3BU2yX3xxe%2Fuploads%2FIKGR6mDuUDgxSDO63K9b%2FStep26.png?alt=media&amp;token=5e970f22-f62c-4109-8547-062d2f61aeab" alt=""><figcaption></figcaption></figure>

**Step 3:** Check if the information is correct and click '**Confirm and delegate stake**'.

<figure><img src="https://3883897532-files.gitbook.io/~/files/v0/b/gitbook-x-prod.appspot.com/o/spaces%2F0mRE72CK4C3BU2yX3xxe%2Fuploads%2F7eHjNNcA7bl6ITKte3sY%2FStep27.png?alt=media&amp;token=56aed044-e751-40bd-95a3-99d4b3039ed0" alt=""><figcaption></figcaption></figure>

**Step 4:** It will now show you all the information about your transaction, and you can click '**Sign with Casper Wallet**'.

<figure><img src="https://3883897532-files.gitbook.io/~/files/v0/b/gitbook-x-prod.appspot.com/o/spaces%2F0mRE72CK4C3BU2yX3xxe%2Fuploads%2FctsuRtcxnNYiExOrWhqE%2FStep28.png?alt=media&amp;token=09879680-513e-49af-8d17-26216bdf89c4" alt=""><figcaption></figcaption></figure>

**Step 5:** Click on '**Sign**'.

<figure><img src="https://3883897532-files.gitbook.io/~/files/v0/b/gitbook-x-prod.appspot.com/o/spaces%2F0mRE72CK4C3BU2yX3xxe%2Fuploads%2FpHpkZ53pwh7GCMHVR2fT%2FStep29.png?alt=media&amp;token=4e3a1d4e-3c25-4e72-9172-3050f6073ca4" alt=""><figcaption></figcaption></figure>

**Step 6:** You will see the details of the successful delegation. You will start receiving Staking Rewards after \~4 hours. You will then receive Staking Rewards every ERA (\~2 hours).


# Casper Wallet - Delegate (Stake) $CSPR (In-App)

<figure><img src="https://3883897532-files.gitbook.io/~/files/v0/b/gitbook-x-prod.appspot.com/o/spaces%2F0mRE72CK4C3BU2yX3xxe%2Fuploads%2FEkRf1TJxCo8arNB9Bu0M%2FStep30.png?alt=media&amp;token=e98a6620-6e11-4f82-92ff-7554ddcfc4e9" alt=""><figcaption></figcaption></figure>

**Step 1:** Click on '**More**' in the Casper Wallet extension.

<figure><img src="https://3883897532-files.gitbook.io/~/files/v0/b/gitbook-x-prod.appspot.com/o/spaces%2F0mRE72CK4C3BU2yX3xxe%2Fuploads%2FSzAvqJUhJesyeJEll8Mc%2FStep31.png?alt=media&amp;token=f4bc023a-71e5-4d82-8c72-0413b097e690" alt=""><figcaption></figcaption></figure>

**Step 2:** Click on '**Delegate**'.

<figure><img src="https://3883897532-files.gitbook.io/~/files/v0/b/gitbook-x-prod.appspot.com/o/spaces%2F0mRE72CK4C3BU2yX3xxe%2Fuploads%2Fl9UXcMLr2hcknBzBe2tO%2FStep32.png?alt=media&amp;token=c663bd7f-d9d8-4c52-9703-957912258501" alt=""><figcaption></figcaption></figure>

**Step 3:** Select a validator under '**To validator**' (For example, Speedy Staking) and click on '**Next**'.

<figure><img src="https://3883897532-files.gitbook.io/~/files/v0/b/gitbook-x-prod.appspot.com/o/spaces%2F0mRE72CK4C3BU2yX3xxe%2Fuploads%2FjXZjnonitILcj3SikUQB%2FStep33.png?alt=media&amp;token=3a96b840-a5ea-4414-9345-34f5b1e1014c" alt=""><figcaption></figcaption></figure>

**Step 4:** Fill in the amount of $CSPR you want to delegate under '**Amount**' and click on '**Next**'.

<figure><img src="https://3883897532-files.gitbook.io/~/files/v0/b/gitbook-x-prod.appspot.com/o/spaces%2F0mRE72CK4C3BU2yX3xxe%2Fuploads%2FYuFZCNqWsA0XwS3Fduvb%2FStep34.png?alt=media&amp;token=40f393e1-651e-469c-9d63-6bf42919dbd6" alt=""><figcaption></figcaption></figure>

**Step 5:** Click on '**Confirm delegation**'.

<figure><img src="https://3883897532-files.gitbook.io/~/files/v0/b/gitbook-x-prod.appspot.com/o/spaces%2F0mRE72CK4C3BU2yX3xxe%2Fuploads%2FuY2cE0w8ZAf2UpGERtXH%2FStep35.png?alt=media&amp;token=5153edb8-d8da-40f5-b1d6-9ac784528c83" alt=""><figcaption></figcaption></figure>

**Step 6:** You have successfully submitted the delegation transaction. Click on '**Done**'. You will start receiving Staking Rewards after \~4 hours. You will then receive Staking Rewards every ERA (\~2 hours).


# MetaMask

<figure><img src="https://3883897532-files.gitbook.io/~/files/v0/b/gitbook-x-prod.appspot.com/o/spaces%2F0mRE72CK4C3BU2yX3xxe%2Fuploads%2FQodltuqjQ2kgzeL62Tym%2Fgitbook-mm.png?alt=media&amp;token=99ba140b-d2ea-4d85-8760-5c95566c7714" alt=""><figcaption></figcaption></figure>

* [Official Website](https://metamask.io/)
* [Download Casper Snap](https://snaps.metamask.io/snap/npm/casper-manager/)
* [Twitter](https://twitter.com/MetaMask)


# MetaMask - Full Guide

## **Part 1 – Setup MetaMask For Use With Casper**

**Step 1:** Install and set up a MetaMask wallet if you haven't yet: [**CLICK HERE**](https://metamask.io/download/)

<figure><img src="https://3883897532-files.gitbook.io/~/files/v0/b/gitbook-x-prod.appspot.com/o/spaces%2F0mRE72CK4C3BU2yX3xxe%2Fuploads%2FwQesTiqCZwzj7xXBcoAZ%2FStep1.png?alt=media&amp;token=15cf4a34-dc87-480e-bd6c-d84fe56a19f2" alt=""><figcaption></figcaption></figure>

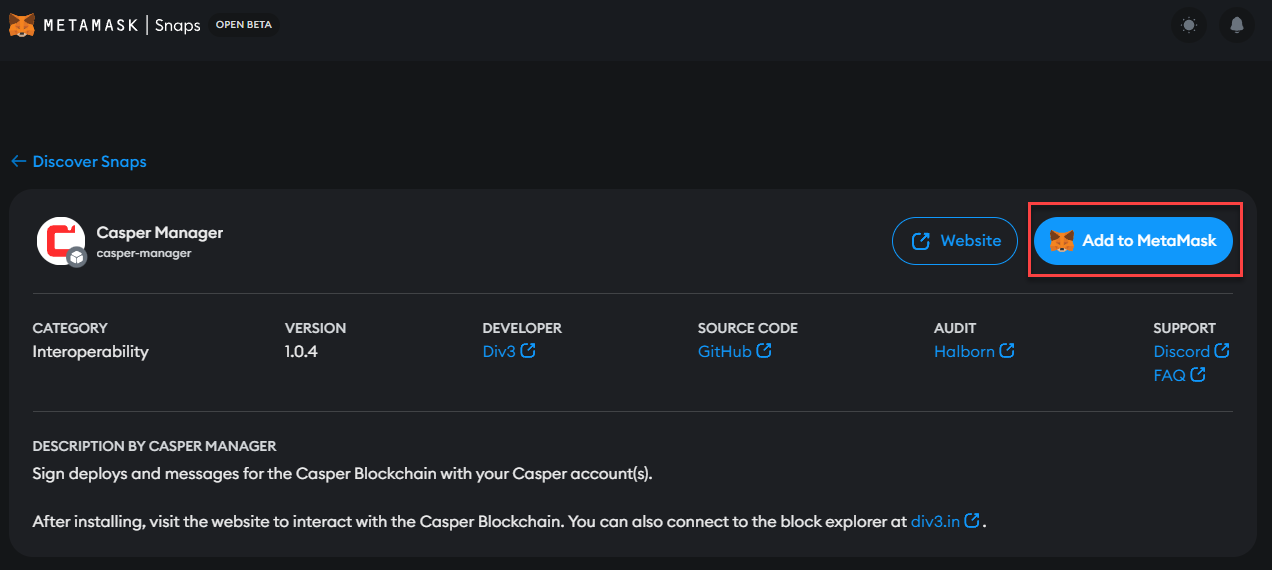
**Step 2:** Install the Casper MetaMask Snap by clicking on '**Add to MetaMask**': [**CLICK HERE**](https://snaps.metamask.io/snap/npm/casper-manager/)

<figure><img src="https://3883897532-files.gitbook.io/~/files/v0/b/gitbook-x-prod.appspot.com/o/spaces%2F0mRE72CK4C3BU2yX3xxe%2Fuploads%2FGFOU906N14TSFUMWHLQN%2FStep2.png?alt=media&amp;token=c858bbc8-312c-4b66-a714-6a197402b89a" alt=""><figcaption></figcaption></figure>

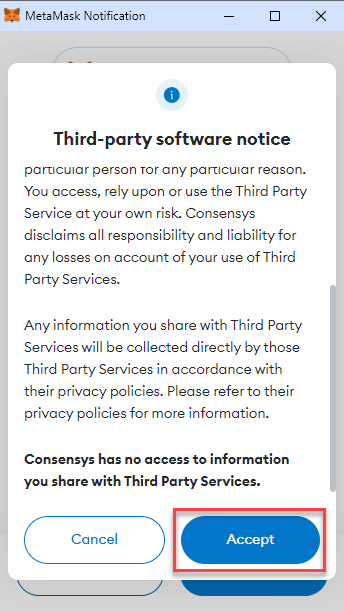
**Step 3:** Click on '**Accept**' in the MetaMask extension prompt.

<figure><img src="https://3883897532-files.gitbook.io/~/files/v0/b/gitbook-x-prod.appspot.com/o/spaces%2F0mRE72CK4C3BU2yX3xxe%2Fuploads%2Flwuqk2aPGvnbpsp3Kap1%2FStep3.png?alt=media&amp;token=23937b30-bb80-408a-95c3-128b6011d300" alt=""><figcaption></figcaption></figure>

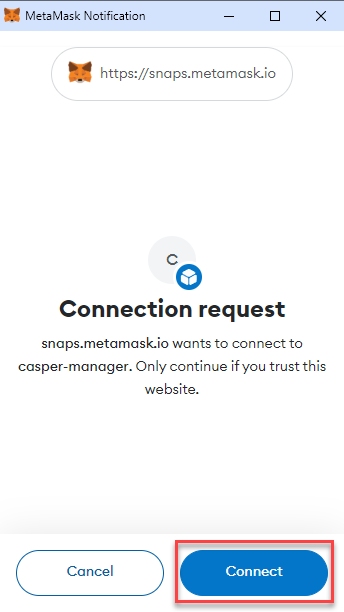
**Step 4:** Click on '**Connect**' in the MetaMask extension.

<figure><img src="https://3883897532-files.gitbook.io/~/files/v0/b/gitbook-x-prod.appspot.com/o/spaces%2F0mRE72CK4C3BU2yX3xxe%2Fuploads%2FsjmdlDCG9FfTyTZf0OR2%2FStep4.png?alt=media&amp;token=fca9d6d8-86ec-4c66-a99c-b12f19a597ed" alt=""><figcaption></figcaption></figure>

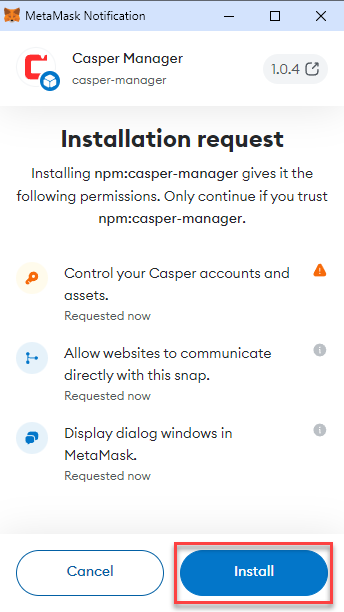
**Step 5:** Click on '**Install**' in the MetaMask extension.

<figure><img src="https://3883897532-files.gitbook.io/~/files/v0/b/gitbook-x-prod.appspot.com/o/spaces%2F0mRE72CK4C3BU2yX3xxe%2Fuploads%2FM5Vg774nOfxbHGmoe3IR%2FStep5.png?alt=media&amp;token=7ac69df5-cbf5-4193-a368-52951c728905" alt=""><figcaption></figcaption></figure>

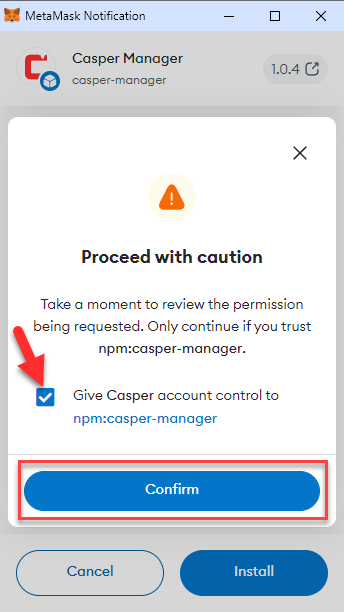
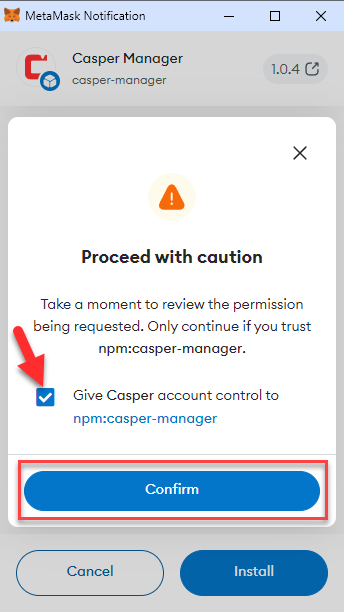
**Step 6:** Check the checkbox and click '**Confirm**' in the MetaMask extension.

<figure><img src="https://3883897532-files.gitbook.io/~/files/v0/b/gitbook-x-prod.appspot.com/o/spaces%2F0mRE72CK4C3BU2yX3xxe%2Fuploads%2F99od9gSm0VLN9ZgiJqAT%2FStep6.png?alt=media&amp;token=11c4b9e1-daf1-496b-9548-59fd39663541" alt=""><figcaption></figcaption></figure>

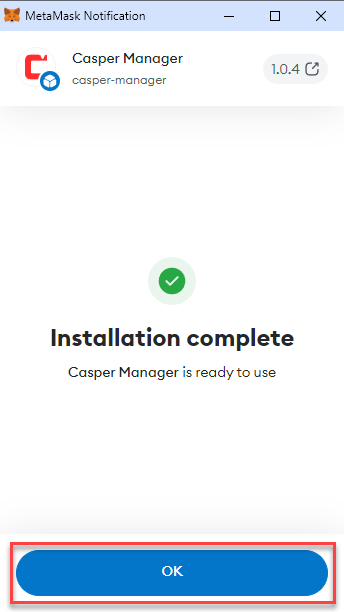
**Step 7:** Click on '**OK**' in the MetaMask extension after the installation is complete.

## **Part 2 – Connect MetaMask With CSPR.Live Blockchain Explorer**

<figure><img src="https://3883897532-files.gitbook.io/~/files/v0/b/gitbook-x-prod.appspot.com/o/spaces%2F0mRE72CK4C3BU2yX3xxe%2Fuploads%2Fa0hj1SThVpnKxxb0f2Al%2FStep7.png?alt=media&amp;token=72adffae-f1a0-4290-a06c-5ce367ca5579" alt=""><figcaption></figcaption></figure>

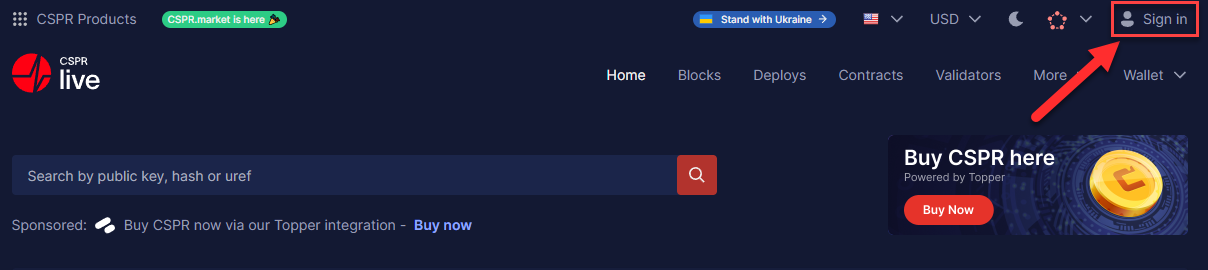
**Step 1:** Go to [CSPR.live](https://cspr.live/) and click '**Sign in**' on the top right of the screen.

<figure><img src="https://3883897532-files.gitbook.io/~/files/v0/b/gitbook-x-prod.appspot.com/o/spaces%2F0mRE72CK4C3BU2yX3xxe%2Fuploads%2FBgrlEoB8AzDPi5C70Wgw%2FStep8.png?alt=media&amp;token=3a9c34a0-107b-4c8e-8ca9-617a11cdd4fa" alt=""><figcaption></figcaption></figure>

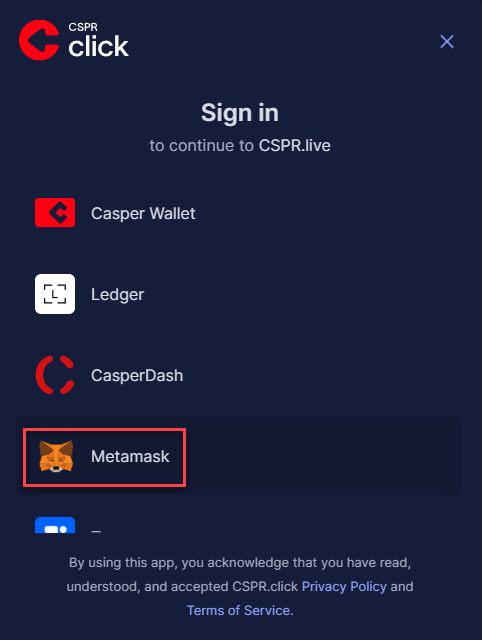
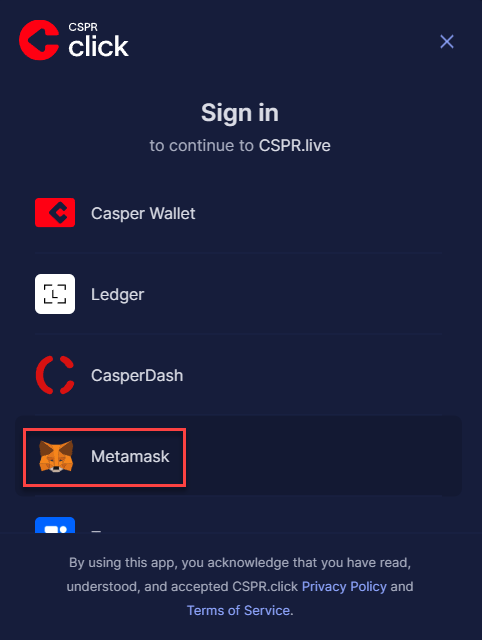
**Step 2:** Click on '**Metamask**'.

<figure><img src="https://3883897532-files.gitbook.io/~/files/v0/b/gitbook-x-prod.appspot.com/o/spaces%2F0mRE72CK4C3BU2yX3xxe%2Fuploads%2Fp7laLvP9YHVeYwOJw5vW%2FStep9.png?alt=media&amp;token=001c9800-b640-4cd4-9b41-4cb87e2a6f08" alt=""><figcaption></figcaption></figure>

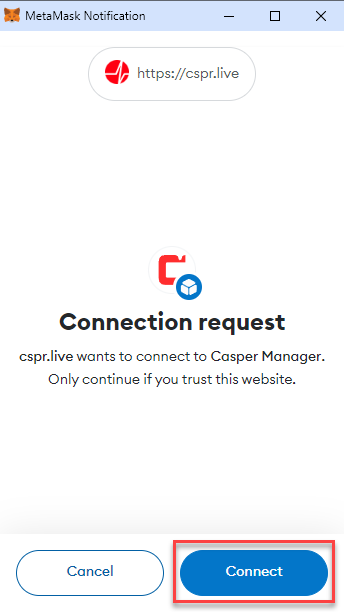
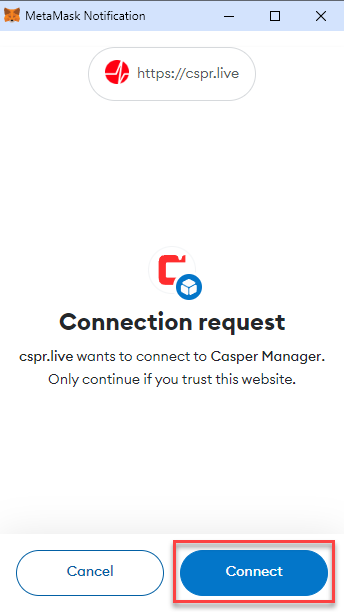
**Step 3:** Click on '**Connect**' in the MetaMask extension prompt.

<figure><img src="https://3883897532-files.gitbook.io/~/files/v0/b/gitbook-x-prod.appspot.com/o/spaces%2F0mRE72CK4C3BU2yX3xxe%2Fuploads%2FCQs0v7JAogoF4uCEfoqS%2FStep10.png?alt=media&amp;token=0d2f4a5f-5b02-4ba5-8942-58582b896479" alt=""><figcaption></figcaption></figure>

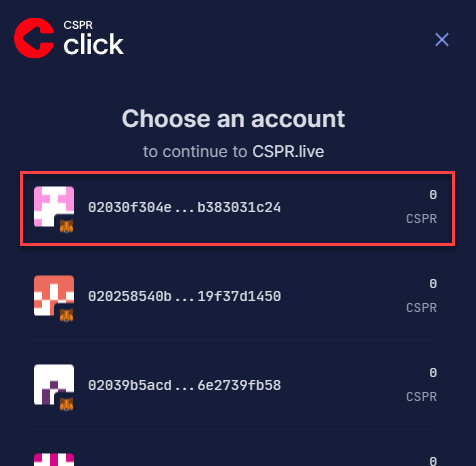
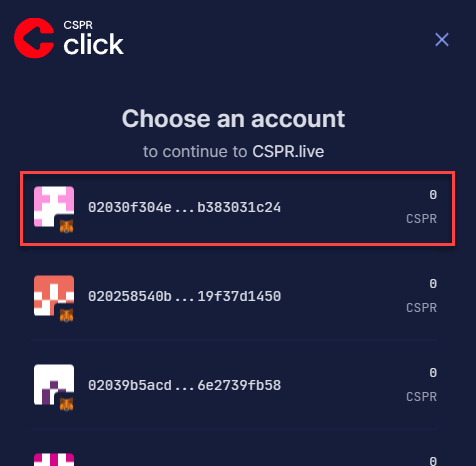
**Step 4:** Select one of the addresses CSPR.live shows you; you can choose the first one for ease of use.

## **Part 3 – Receive $CSPR On Your MetaMask Created Public Key**

<figure><img src="https://3883897532-files.gitbook.io/~/files/v0/b/gitbook-x-prod.appspot.com/o/spaces%2F0mRE72CK4C3BU2yX3xxe%2Fuploads%2FGohTMyeUCako2KOfYkzy%2FStep11.png?alt=media&amp;token=83c7c198-fe72-4eae-a4e9-a966b97ffa24" alt=""><figcaption></figcaption></figure>

**Step 1:** Hover over your public key in the top right corner and select '**View Account**'.

<figure><img src="https://3883897532-files.gitbook.io/~/files/v0/b/gitbook-x-prod.appspot.com/o/spaces%2F0mRE72CK4C3BU2yX3xxe%2Fuploads%2FNm10bloSM3HnUDfZg0pb%2FStep12.png?alt=media&amp;token=f0161431-5dda-45dd-9838-93a0e5e297cd" alt=""><figcaption></figcaption></figure>

**Step 2:** You will see your Public Key (also called wallet address) on the top. This is the address you use to send $CSPR to.

## **Part 4 – Transfer $CSPR Using MetaMask And CSPR.Live**

<figure><img src="https://3883897532-files.gitbook.io/~/files/v0/b/gitbook-x-prod.appspot.com/o/spaces%2F0mRE72CK4C3BU2yX3xxe%2Fuploads%2FzBiudMKQqIBscd2CGfXd%2FStep13.png?alt=media&amp;token=a5640528-fd02-4272-8b5b-fe2914d94ad1" alt=""><figcaption></figcaption></figure>

**Step 1:** Hover over '**Wallet**' in the top right corner and select '**Transfer CSPR**'.

<figure><img src="https://3883897532-files.gitbook.io/~/files/v0/b/gitbook-x-prod.appspot.com/o/spaces%2F0mRE72CK4C3BU2yX3xxe%2Fuploads%2Fy5WYeFC47u3XubkORBMV%2FStep14.png?alt=media&amp;token=583283f6-bde7-4064-af5b-cd2017717ffb" alt=""><figcaption></figcaption></figure>

**Step 2:** Fill in the public key of where you want to send your $CSPR under '**Recipient**', the amount of $CSPR you want to send under '**Amount**' and fill in a specific Transfer ID if you wish to/need under '**Transfer ID (Memo)**'. This is sometimes required if you send $CSPR to an exchange. If not needed, you can use '**0**'. After this, click on '**Next**'.

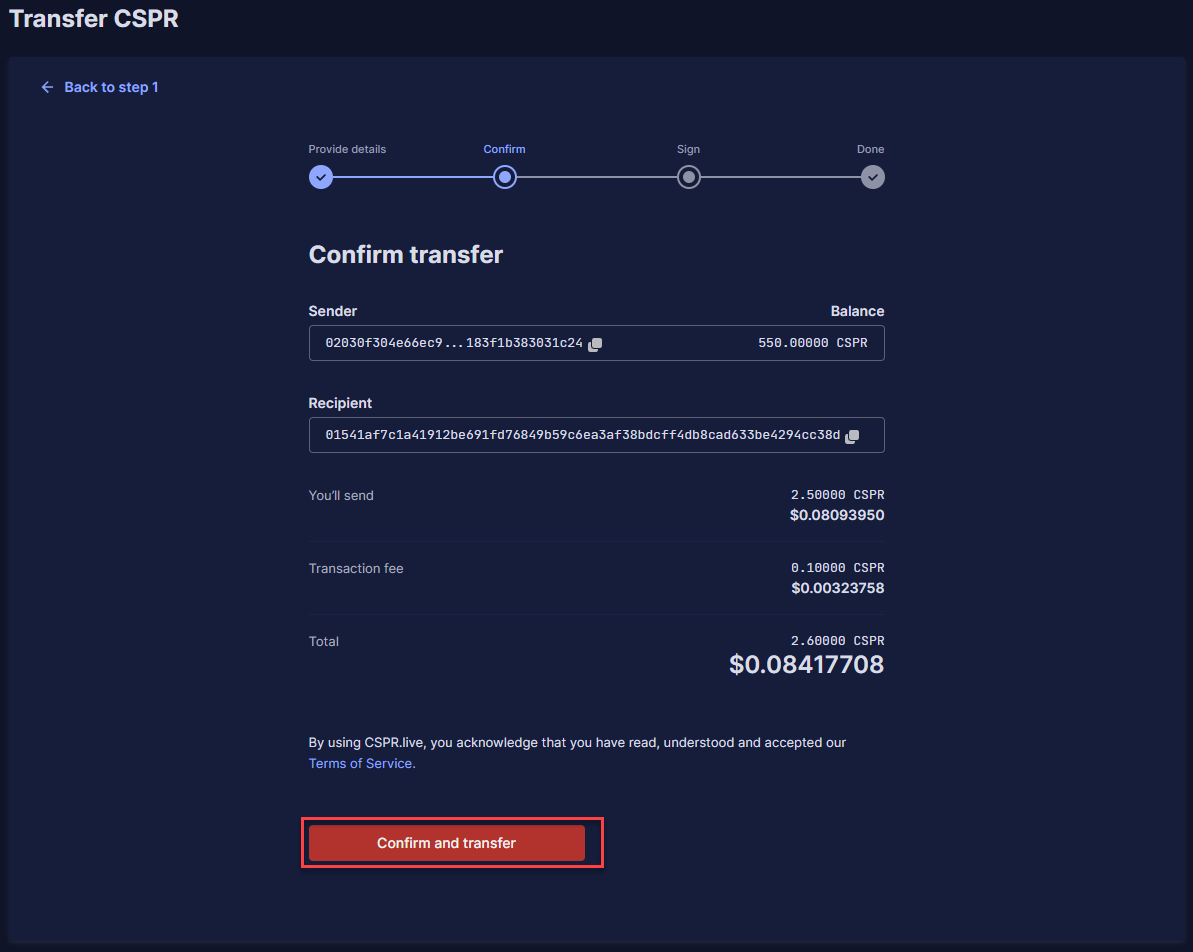
<figure><img src="https://3883897532-files.gitbook.io/~/files/v0/b/gitbook-x-prod.appspot.com/o/spaces%2F0mRE72CK4C3BU2yX3xxe%2Fuploads%2FC9eWTO4OjN0GG39uk1oU%2FStep15.png?alt=media&amp;token=39bd4eb8-0c2c-4a87-91bf-82249cc5de16" alt=""><figcaption></figcaption></figure>

**Step 3:** Check if the information is correct and click '**Confirm and transfer**'.

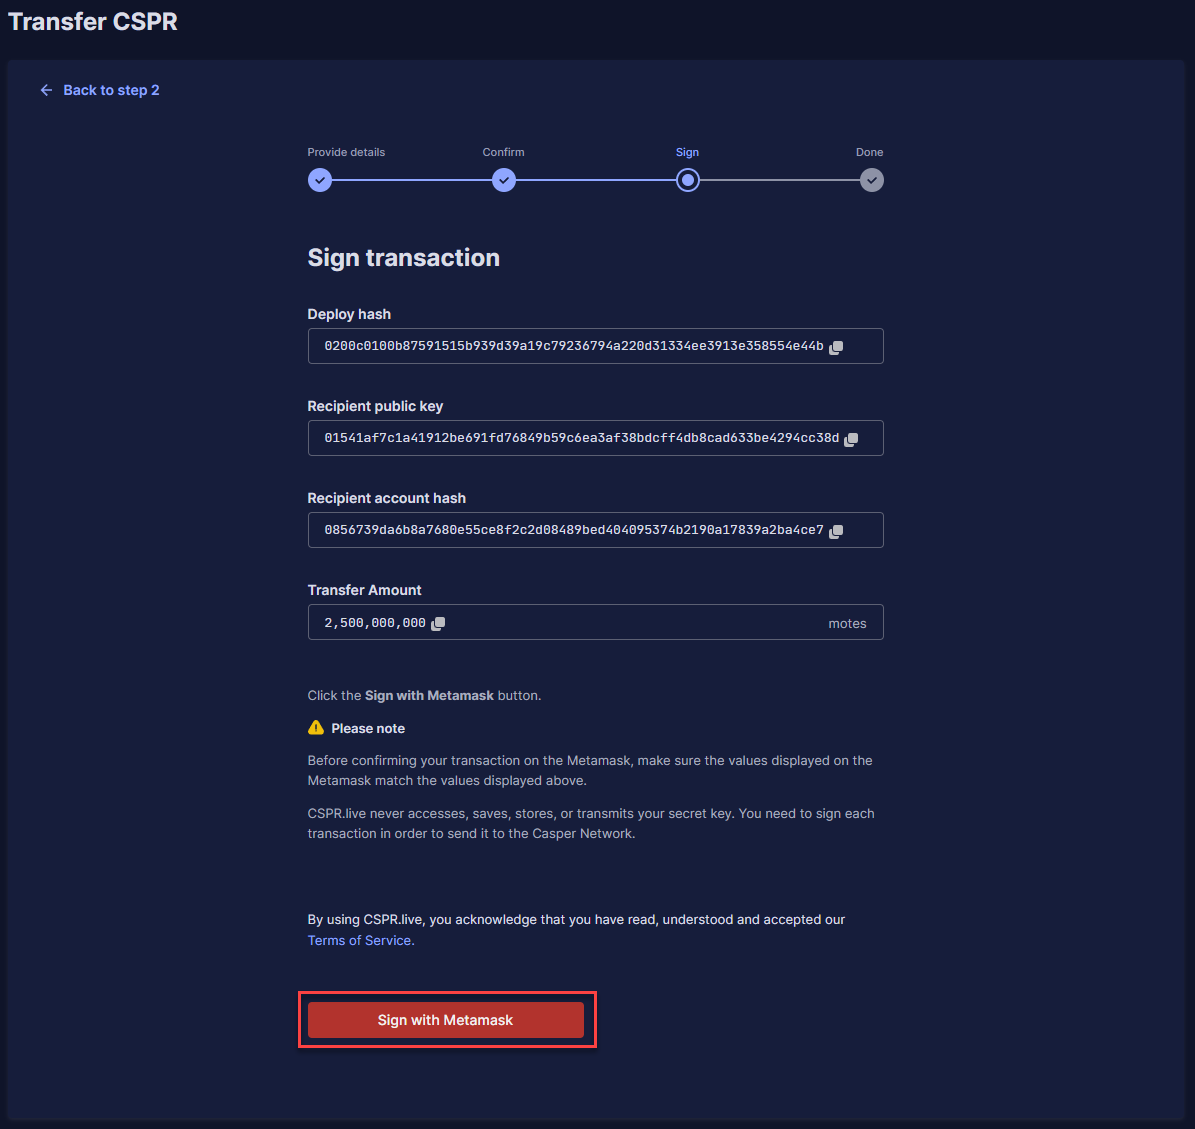
<figure><img src="https://3883897532-files.gitbook.io/~/files/v0/b/gitbook-x-prod.appspot.com/o/spaces%2F0mRE72CK4C3BU2yX3xxe%2Fuploads%2FaYxhnFmbe2EBeC3BFLj7%2FStep16.png?alt=media&amp;token=7d94519c-deac-48c9-9cab-06cdec903855" alt=""><figcaption></figcaption></figure>

**Step 4:** It will now show you all the information about your transaction, and you can click '**Sign with Metamask**'.

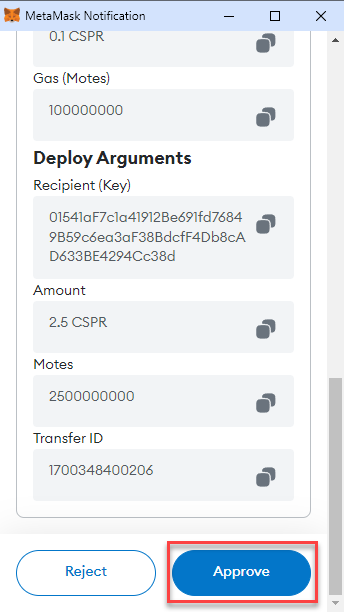
<figure><img src="https://3883897532-files.gitbook.io/~/files/v0/b/gitbook-x-prod.appspot.com/o/spaces%2F0mRE72CK4C3BU2yX3xxe%2Fuploads%2F4Wt66wMYcfm82AHWvxKj%2FStep17.png?alt=media&amp;token=96667c15-64bc-40d2-bc11-2d925c897b20" alt=""><figcaption></figcaption></figure>

**Step 5:** Scroll down and click '**Approve**' in the MetaMask extension prompt.

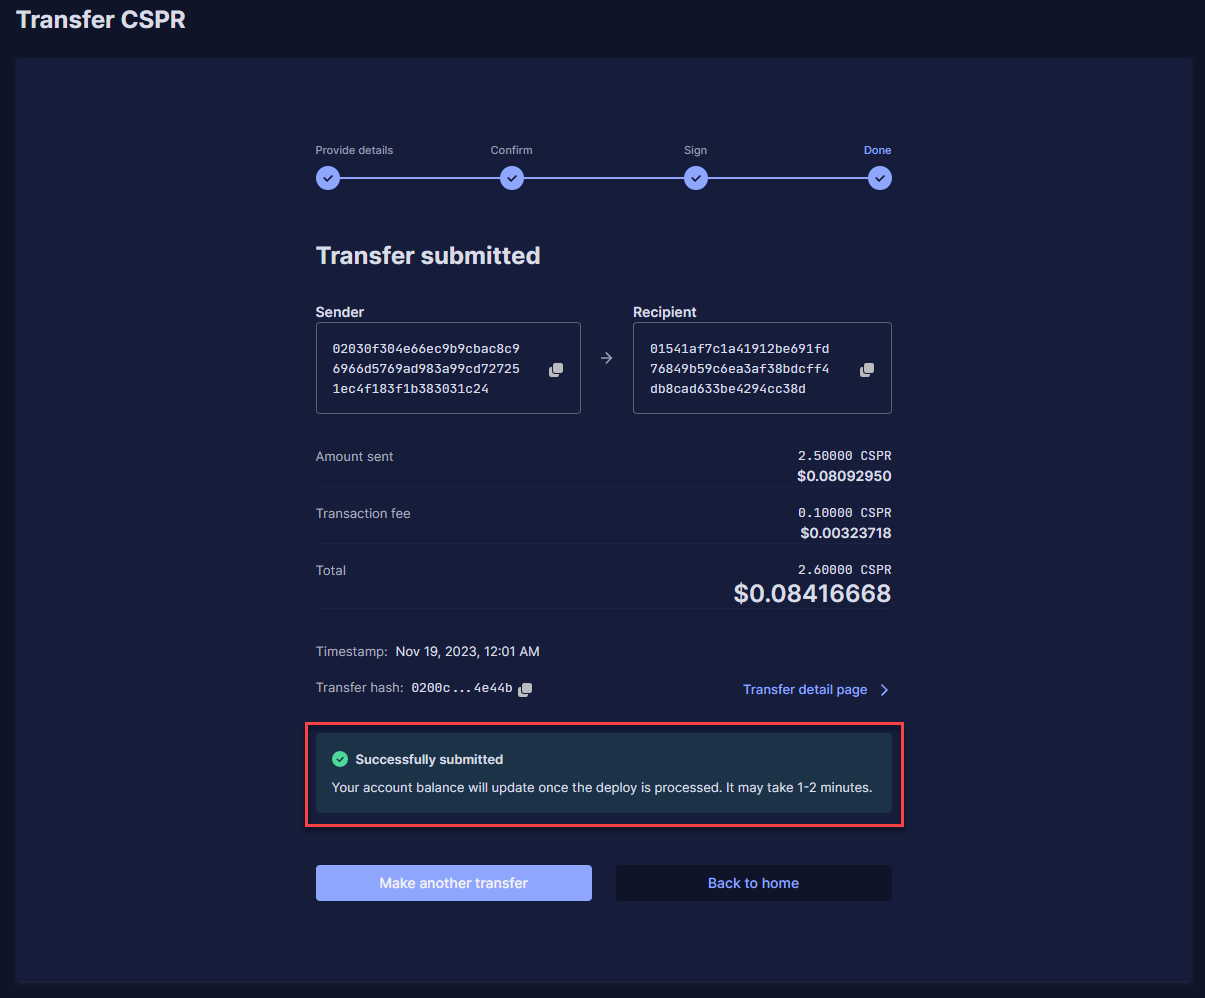
<figure><img src="https://3883897532-files.gitbook.io/~/files/v0/b/gitbook-x-prod.appspot.com/o/spaces%2F0mRE72CK4C3BU2yX3xxe%2Fuploads%2FBF6YcLQr4P86kAR9MCdB%2FStep18.png?alt=media&amp;token=d2b7425a-2d42-4590-9784-76fa67408a6a" alt=""><figcaption></figcaption></figure>

**Step 6:** You will see the details of the successful transfer.

## **Part 5 – Delegate $CSPR Using MetaMask And CSPR.Live**

<figure><img src="https://3883897532-files.gitbook.io/~/files/v0/b/gitbook-x-prod.appspot.com/o/spaces%2F0mRE72CK4C3BU2yX3xxe%2Fuploads%2FkO1afxcXWXqIWWjvQWMq%2FStep19.png?alt=media&amp;token=29816665-0f61-4e76-9f84-b70416957034" alt=""><figcaption></figcaption></figure>

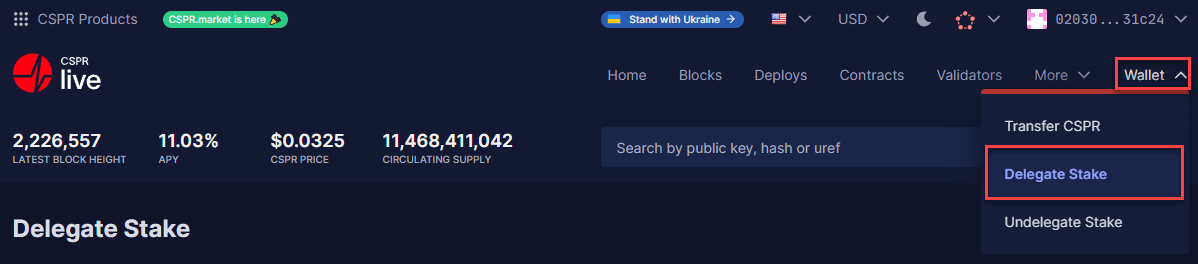
**Step 1:** Hover over '**Wallet**' in the top right corner and select '**Delegate Stake**'.

<figure><img src="https://3883897532-files.gitbook.io/~/files/v0/b/gitbook-x-prod.appspot.com/o/spaces%2F0mRE72CK4C3BU2yX3xxe%2Fuploads%2FQE96feH9CwQAdCHeNiKb%2FStep20.png?alt=media&amp;token=0da76143-6396-4947-939c-1b1adeb26da5" alt=""><figcaption></figcaption></figure>

**Step 2:** Choose a validator under '**Validator**' (**For example, Speedy Staking**) and the amount of $CSPR you want to delegate under '**Amount**'. After this, click on '**Next**'.

{% hint style="warning" %}
**IMPORTANT: Don’t stake all of your CSPR, as you will need some CSPR left to unstake your tokens in the future.**
{% endhint %}

<figure><img src="https://3883897532-files.gitbook.io/~/files/v0/b/gitbook-x-prod.appspot.com/o/spaces%2F0mRE72CK4C3BU2yX3xxe%2Fuploads%2Ff9L36JJAdyGGnMfoZy7c%2FStep21.png?alt=media&amp;token=9850d537-d9e8-4849-aa3a-cf0ee98ba0be" alt=""><figcaption></figcaption></figure>

**Step 3:** Check if the information is correct and click '**Confirm and delegate stake**'.

<figure><img src="https://3883897532-files.gitbook.io/~/files/v0/b/gitbook-x-prod.appspot.com/o/spaces%2F0mRE72CK4C3BU2yX3xxe%2Fuploads%2FO5UScr6IPhpgwu9ijkGe%2FStep22.png?alt=media&amp;token=006310e9-eaf8-4211-8cb3-82d5c69ab026" alt=""><figcaption></figcaption></figure>

**Step 4:** It will now show you all the information about your transaction, and you can click '**Sign with Metamask**'.

<figure><img src="https://3883897532-files.gitbook.io/~/files/v0/b/gitbook-x-prod.appspot.com/o/spaces%2F0mRE72CK4C3BU2yX3xxe%2Fuploads%2FsTkhUhlZXTjVlGg5oUS7%2FStep23.png?alt=media&amp;token=e7293c96-7274-4580-a087-acda53caa959" alt=""><figcaption></figcaption></figure>

**Step 5:** Scroll down and click '**Approve**' in the MetaMask extension prompt.

<figure><img src="https://3883897532-files.gitbook.io/~/files/v0/b/gitbook-x-prod.appspot.com/o/spaces%2F0mRE72CK4C3BU2yX3xxe%2Fuploads%2FrepvpLevW8fWt5OdiQdT%2FStep24.png?alt=media&amp;token=511bab77-c71e-4380-86d8-5300d834c9ae" alt=""><figcaption></figcaption></figure>

**Step 6:** You will see the details of the successful delegation. You will start receiving Staking Rewards after \~4 hours. You will then receive Staking Rewards every ERA (\~2 hours).


# MetaMask - Setup

**Step 1:** Install and set up a MetaMask wallet if you haven't yet: [**CLICK HERE**](https://metamask.io/download/)

<figure><img src="https://3883897532-files.gitbook.io/~/files/v0/b/gitbook-x-prod.appspot.com/o/spaces%2F0mRE72CK4C3BU2yX3xxe%2Fuploads%2FwQesTiqCZwzj7xXBcoAZ%2FStep1.png?alt=media&amp;token=15cf4a34-dc87-480e-bd6c-d84fe56a19f2" alt=""><figcaption></figcaption></figure>

**Step 2:** Install the Casper MetaMask Snap by clicking on '**Add to MetaMask**': [**CLICK HERE**](https://snaps.metamask.io/snap/npm/casper-manager/)

<figure><img src="https://3883897532-files.gitbook.io/~/files/v0/b/gitbook-x-prod.appspot.com/o/spaces%2F0mRE72CK4C3BU2yX3xxe%2Fuploads%2FGFOU906N14TSFUMWHLQN%2FStep2.png?alt=media&amp;token=c858bbc8-312c-4b66-a714-6a197402b89a" alt=""><figcaption></figcaption></figure>

**Step 3:** Click on '**Accept**' in the MetaMask extension prompt.

<figure><img src="https://3883897532-files.gitbook.io/~/files/v0/b/gitbook-x-prod.appspot.com/o/spaces%2F0mRE72CK4C3BU2yX3xxe%2Fuploads%2Flwuqk2aPGvnbpsp3Kap1%2FStep3.png?alt=media&amp;token=23937b30-bb80-408a-95c3-128b6011d300" alt=""><figcaption></figcaption></figure>

**Step 4:** Click on '**Connect**' in the MetaMask extension.

<figure><img src="https://3883897532-files.gitbook.io/~/files/v0/b/gitbook-x-prod.appspot.com/o/spaces%2F0mRE72CK4C3BU2yX3xxe%2Fuploads%2FsjmdlDCG9FfTyTZf0OR2%2FStep4.png?alt=media&amp;token=fca9d6d8-86ec-4c66-a99c-b12f19a597ed" alt=""><figcaption></figcaption></figure>

**Step 5:** Click on '**Install**' in the MetaMask extension.

<figure><img src="https://3883897532-files.gitbook.io/~/files/v0/b/gitbook-x-prod.appspot.com/o/spaces%2F0mRE72CK4C3BU2yX3xxe%2Fuploads%2FM5Vg774nOfxbHGmoe3IR%2FStep5.png?alt=media&amp;token=7ac69df5-cbf5-4193-a368-52951c728905" alt=""><figcaption></figcaption></figure>

**Step 6:** Check the checkbox and click '**Confirm**' in the MetaMask extension.

<figure><img src="https://3883897532-files.gitbook.io/~/files/v0/b/gitbook-x-prod.appspot.com/o/spaces%2F0mRE72CK4C3BU2yX3xxe%2Fuploads%2F99od9gSm0VLN9ZgiJqAT%2FStep6.png?alt=media&amp;token=11c4b9e1-daf1-496b-9548-59fd39663541" alt=""><figcaption></figcaption></figure>

**Step 7:** Click on '**OK**' in the MetaMask extension after the installation is complete.


# MetaMask - Connect MetaMask with CSPR.live

<figure><img src="https://3883897532-files.gitbook.io/~/files/v0/b/gitbook-x-prod.appspot.com/o/spaces%2F0mRE72CK4C3BU2yX3xxe%2Fuploads%2Fa0hj1SThVpnKxxb0f2Al%2FStep7.png?alt=media&amp;token=72adffae-f1a0-4290-a06c-5ce367ca5579" alt=""><figcaption></figcaption></figure>

**Step 1:** Go to [CSPR.live](https://cspr.live/) and click '**Sign in**' on the top right of the screen.

<figure><img src="https://3883897532-files.gitbook.io/~/files/v0/b/gitbook-x-prod.appspot.com/o/spaces%2F0mRE72CK4C3BU2yX3xxe%2Fuploads%2FBgrlEoB8AzDPi5C70Wgw%2FStep8.png?alt=media&amp;token=3a9c34a0-107b-4c8e-8ca9-617a11cdd4fa" alt=""><figcaption></figcaption></figure>

**Step 2:** Click on '**Metamask**'.

<figure><img src="https://3883897532-files.gitbook.io/~/files/v0/b/gitbook-x-prod.appspot.com/o/spaces%2F0mRE72CK4C3BU2yX3xxe%2Fuploads%2Fp7laLvP9YHVeYwOJw5vW%2FStep9.png?alt=media&amp;token=001c9800-b640-4cd4-9b41-4cb87e2a6f08" alt=""><figcaption></figcaption></figure>

**Step 3:** Click on '**Connect**' in the MetaMask extension prompt.

<figure><img src="https://3883897532-files.gitbook.io/~/files/v0/b/gitbook-x-prod.appspot.com/o/spaces%2F0mRE72CK4C3BU2yX3xxe%2Fuploads%2FCQs0v7JAogoF4uCEfoqS%2FStep10.png?alt=media&amp;token=0d2f4a5f-5b02-4ba5-8942-58582b896479" alt=""><figcaption></figcaption></figure>

**Step 4:** Select one of the addresses CSPR.live shows you; you can choose the first one for ease of use.


# MetaMask - Receive $CSPR

<figure><img src="https://3883897532-files.gitbook.io/~/files/v0/b/gitbook-x-prod.appspot.com/o/spaces%2F0mRE72CK4C3BU2yX3xxe%2Fuploads%2FGohTMyeUCako2KOfYkzy%2FStep11.png?alt=media&amp;token=83c7c198-fe72-4eae-a4e9-a966b97ffa24" alt=""><figcaption></figcaption></figure>

**Step 1:** Hover over your public key in the top right corner and select '**View Account**'.

<figure><img src="https://3883897532-files.gitbook.io/~/files/v0/b/gitbook-x-prod.appspot.com/o/spaces%2F0mRE72CK4C3BU2yX3xxe%2Fuploads%2FNm10bloSM3HnUDfZg0pb%2FStep12.png?alt=media&amp;token=f0161431-5dda-45dd-9838-93a0e5e297cd" alt=""><figcaption></figcaption></figure>

**Step 2:** You will see your Public Key (also called wallet address) on the top. This is the address you use to send $CSPR to.


# MetaMask - Transfer $CSPR

<figure><img src="https://3883897532-files.gitbook.io/~/files/v0/b/gitbook-x-prod.appspot.com/o/spaces%2F0mRE72CK4C3BU2yX3xxe%2Fuploads%2FzBiudMKQqIBscd2CGfXd%2FStep13.png?alt=media&amp;token=a5640528-fd02-4272-8b5b-fe2914d94ad1" alt=""><figcaption></figcaption></figure>

**Step 1:** Hover over '**Wallet**' in the top right corner and select '**Transfer CSPR**'.

<figure><img src="https://3883897532-files.gitbook.io/~/files/v0/b/gitbook-x-prod.appspot.com/o/spaces%2F0mRE72CK4C3BU2yX3xxe%2Fuploads%2Fy5WYeFC47u3XubkORBMV%2FStep14.png?alt=media&amp;token=583283f6-bde7-4064-af5b-cd2017717ffb" alt=""><figcaption></figcaption></figure>

**Step 2:** Fill in the public key of where you want to send your $CSPR under '**Recipient**', the amount of $CSPR you want to send under '**Amount**' and fill in a specific Transfer ID if you wish to/need under '**Transfer ID (Memo)**'. This is sometimes required if you send $CSPR to an exchange. If not needed, you can use '**0**'. After this, click on '**Next**'.

<figure><img src="https://3883897532-files.gitbook.io/~/files/v0/b/gitbook-x-prod.appspot.com/o/spaces%2F0mRE72CK4C3BU2yX3xxe%2Fuploads%2FC9eWTO4OjN0GG39uk1oU%2FStep15.png?alt=media&amp;token=39bd4eb8-0c2c-4a87-91bf-82249cc5de16" alt=""><figcaption></figcaption></figure>

**Step 3:** Check if the information is correct and click '**Confirm and transfer**'.

<figure><img src="https://3883897532-files.gitbook.io/~/files/v0/b/gitbook-x-prod.appspot.com/o/spaces%2F0mRE72CK4C3BU2yX3xxe%2Fuploads%2FaYxhnFmbe2EBeC3BFLj7%2FStep16.png?alt=media&amp;token=7d94519c-deac-48c9-9cab-06cdec903855" alt=""><figcaption></figcaption></figure>

**Step 4:** It will now show you all the information about your transaction, and you can click '**Sign with Metamask**'.

<figure><img src="https://3883897532-files.gitbook.io/~/files/v0/b/gitbook-x-prod.appspot.com/o/spaces%2F0mRE72CK4C3BU2yX3xxe%2Fuploads%2F4Wt66wMYcfm82AHWvxKj%2FStep17.png?alt=media&amp;token=96667c15-64bc-40d2-bc11-2d925c897b20" alt=""><figcaption></figcaption></figure>

**Step 5:** Scroll down and click '**Approve**' in the MetaMask extension prompt.

<figure><img src="https://3883897532-files.gitbook.io/~/files/v0/b/gitbook-x-prod.appspot.com/o/spaces%2F0mRE72CK4C3BU2yX3xxe%2Fuploads%2FBF6YcLQr4P86kAR9MCdB%2FStep18.png?alt=media&amp;token=d2b7425a-2d42-4590-9784-76fa67408a6a" alt=""><figcaption></figcaption></figure>

**Step 6:** You will see the details of the successful transfer.


# MetaMask - Delegate (Stake) $CSPR

<figure><img src="https://3883897532-files.gitbook.io/~/files/v0/b/gitbook-x-prod.appspot.com/o/spaces%2F0mRE72CK4C3BU2yX3xxe%2Fuploads%2FkO1afxcXWXqIWWjvQWMq%2FStep19.png?alt=media&amp;token=29816665-0f61-4e76-9f84-b70416957034" alt=""><figcaption></figcaption></figure>

**Step 1:** Hover over '**Wallet**' in the top right corner and select '**Delegate Stake**'.

<figure><img src="https://3883897532-files.gitbook.io/~/files/v0/b/gitbook-x-prod.appspot.com/o/spaces%2F0mRE72CK4C3BU2yX3xxe%2Fuploads%2FQE96feH9CwQAdCHeNiKb%2FStep20.png?alt=media&amp;token=0da76143-6396-4947-939c-1b1adeb26da5" alt=""><figcaption></figcaption></figure>

**Step 2:** Choose a validator under '**Validator**' (**For example, Speedy Staking**) and the amount of $CSPR you want to delegate under '**Amount**'. After this, click on '**Next**'.

{% hint style="warning" %}
**IMPORTANT: Don’t stake all of your CSPR, as you will need some CSPR left to unstake your tokens in the future.**
{% endhint %}

<figure><img src="https://3883897532-files.gitbook.io/~/files/v0/b/gitbook-x-prod.appspot.com/o/spaces%2F0mRE72CK4C3BU2yX3xxe%2Fuploads%2Ff9L36JJAdyGGnMfoZy7c%2FStep21.png?alt=media&amp;token=9850d537-d9e8-4849-aa3a-cf0ee98ba0be" alt=""><figcaption></figcaption></figure>

**Step 3:** Check if the information is correct and click '**Confirm and delegate stake**'.

<figure><img src="https://3883897532-files.gitbook.io/~/files/v0/b/gitbook-x-prod.appspot.com/o/spaces%2F0mRE72CK4C3BU2yX3xxe%2Fuploads%2FO5UScr6IPhpgwu9ijkGe%2FStep22.png?alt=media&amp;token=006310e9-eaf8-4211-8cb3-82d5c69ab026" alt=""><figcaption></figcaption></figure>

**Step 4:** It will now show you all the information about your transaction, and you can click '**Sign with Metamask**'.

<figure><img src="https://3883897532-files.gitbook.io/~/files/v0/b/gitbook-x-prod.appspot.com/o/spaces%2F0mRE72CK4C3BU2yX3xxe%2Fuploads%2FsTkhUhlZXTjVlGg5oUS7%2FStep23.png?alt=media&amp;token=e7293c96-7274-4580-a087-acda53caa959" alt=""><figcaption></figcaption></figure>

**Step 5:** Scroll down and click '**Approve**' in the MetaMask extension prompt.

<figure><img src="https://3883897532-files.gitbook.io/~/files/v0/b/gitbook-x-prod.appspot.com/o/spaces%2F0mRE72CK4C3BU2yX3xxe%2Fuploads%2FrepvpLevW8fWt5OdiQdT%2FStep24.png?alt=media&amp;token=511bab77-c71e-4380-86d8-5300d834c9ae" alt=""><figcaption></figcaption></figure>

**Step 6:** You will see the details of the successful delegation. You will start receiving Staking Rewards after \~4 hours. You will then receive Staking Rewards every ERA (\~2 hours).


# The Basics

<figure><img src="https://3883897532-files.gitbook.io/~/files/v0/b/gitbook-x-prod.appspot.com/o/spaces%2F0mRE72CK4C3BU2yX3xxe%2Fuploads%2FtE1hLqII8TGInp3uwTkY%2Fgitbook-avail.png?alt=media&amp;token=42e650fc-d8a8-4853-ab99-47e8ab395a56" alt=""><figcaption></figcaption></figure>

## **Introduction**

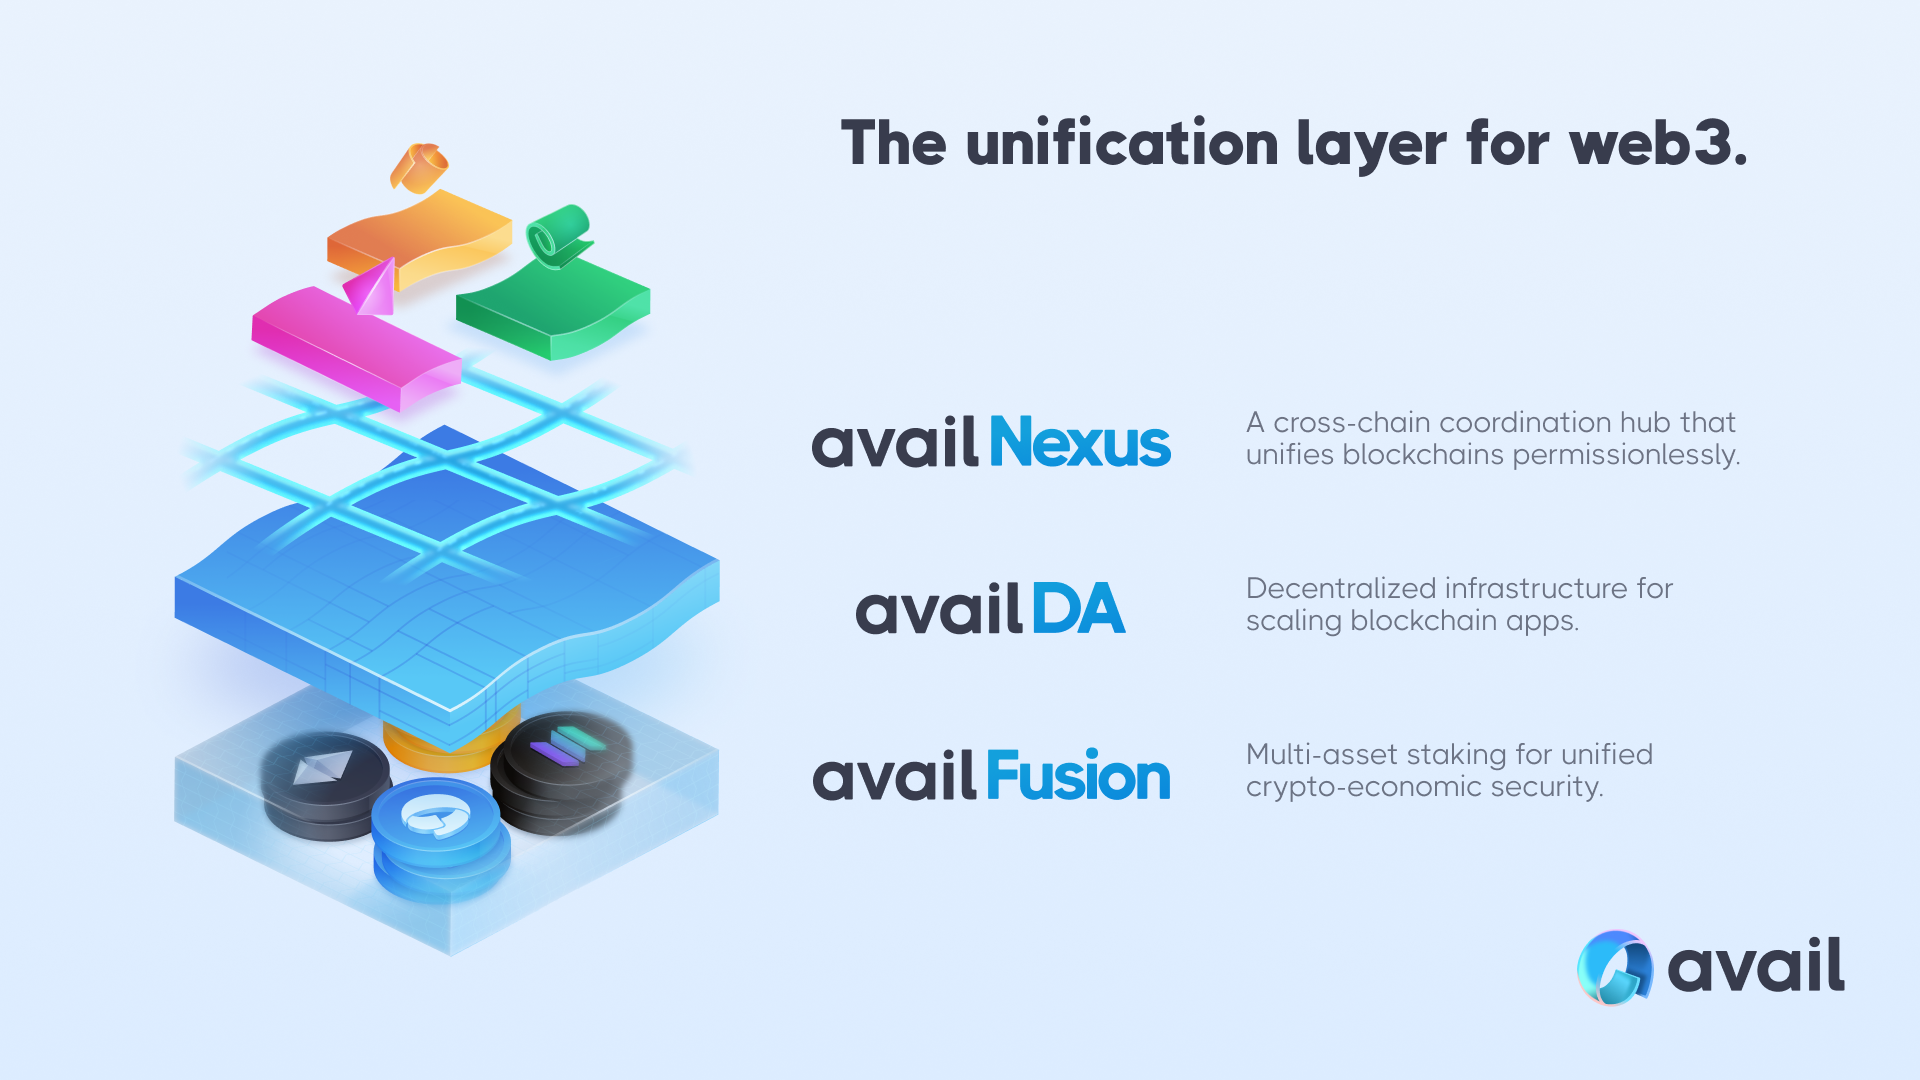
Avail’s ecosystem is designed to offer a superior experience for both users and developers, balancing the essentials of scalability, interoperability and security without compromise. The platform’s structure is anchored in three primary layers:

1. **Data Availability (DA) Layer**: A foundational layer focused exclusively on DA, forming the basis for abundantly scalable modular chains. The DA layer is a highly optimized, low-level layer specifically constructed for [data availability(opens in a new tab)](https://blog.availproject.org/data-availability-what-is-it/). This is the deepest blockchain layer, with the minimal functionality required to build cross-ecosystem interoperability on top.\
   Avail DA uses validity proofs to ensure that developers can verify their data’s availability without trusting Avail’s claims.
2. **Nexus Layer**: Nexus is a light but powerful proof aggregation and sequencer selection zk rollup on top of Avail DA. Avail Nexus acts as a permissionless verification hub that will unify rollups (not just those built within the Avail ecosystem), leveraging Avail DA as the root of trust.
3. **Fusion Security Layer**: Enhances the overall security of the Avail network by pooling different tokens, including established tokens and emerging tokens. Fusion will also help bring and lock more liquidity from other blockchains into the Avail ecosystem.\
   This approach will progressively bolster Avail’s crypto-economic security and marks one of the first instances where foreign tokens like ETH and BTC are utilized to power consensus on a different blockchain.

These layers collectively aim to dissolve the market’s fragmentation, providing a unified platform for users and developers from various ecosystems.

<figure><img src="https://3883897532-files.gitbook.io/~/files/v0/b/gitbook-x-prod.appspot.com/o/spaces%2F0mRE72CK4C3BU2yX3xxe%2Fuploads%2FjMmGceifmDIVOzcryXx1%2Funification-layer-graphic-updated.png?alt=media&amp;token=d708a0d4-740f-4f4f-a44b-8845f7cd9aaa" alt=""><figcaption></figcaption></figure>

## **Staking/Nominating**

There are currently less than 100 active validators(producing blocks and earning rewards). The network-wide APR can fluctuate but is currently around 15%. Staking Rewards accrue every ERA (1 day), and you can choose to have the rewards auto-compound, sent to your liquid account balance or to the liquid account balance of an entirely different account. Unstaking takes 28 days, during which you will NOT earn rewards.

### **Safety/Security**

Your tokens will stay in your custody when nominate $AVAIL with a validator. This means you can, at any point, undelegate. Slashing is active on Avail. Slashing can occur under the following conditions:

* Equivocation - producing two blocks in the same slot. In GRANDPA, it is sending pre-vote or pre-commit messages for two chains that conflict with each other in the same round. This will slash the **validator and nominators**.
* If more than 10% of the validators go offline simultaneously and are chilled in an epoch, all of those **validators (not nominators)** will be slashed.

This means it's important to nominate validators you can trust!

## **Useful Links**

### **Explorers**

[**Avail Explorer**](https://explorer.avail.so) **|** [**Subscan**](https://avail.subscan.io/)

### **Wallets**

[**Talisman**](https://talisman.xyz/) **|** [**Avail Space**](https://www.availspace.app/) **|** [**Nova Wallet**](https://novawallet.io/) **|** [**Bitget Wallet**](https://web3.bitget.com/en) **|** [**dWallet**](https://dwallet.io/) **|** [**SubWallet**](https://www.subwallet.app/) **|** [**Klever**](https://klever.io/) **|** [**Ledger**](https://www.ledger.com/)

### **Official Resources**

[**Website**](https://availproject.org/) **|** [**Documentation**](https://docs.availproject.org/) **|** [**Ecosystem**](https://www.availproject.org/ecosystem) **|** [**GitHub**](https://github.com/availproject) **|** [**Staking Website**](https://staking.availproject.org/)

**Social Media**

[**Twitter**](https://x.com/AvailProject) **|** [**Discord**](https://discord.gg/y6fHnxZQX8) **|** [**Blog**](https://blog.availproject.org/) **|** [**Telegram**](https://t.me/AvailCommunity) **|** [**LinkedIn**](https://www.linkedin.com/company/availproject/)


# Talisman

<figure><img src="https://3883897532-files.gitbook.io/~/files/v0/b/gitbook-x-prod.appspot.com/o/spaces%2F0mRE72CK4C3BU2yX3xxe%2Fuploads%2FJDliUyYwIikgYwF06M2P%2Fgitbook-talisman.png?alt=media&amp;token=11b9fc9a-fcb8-4a68-87c1-43452fc239a0" alt=""><figcaption></figcaption></figure>

* [Official Website](https://talisman.xyz)
* Download on [Chrome](https://chromewebstore.google.com/detail/talisman-ethereum-and-pol/fijngjgcjhjmmpcmkeiomlglpeiijkld) | [Firefox](https://addons.mozilla.org/en-US/firefox/addon/talisman-wallet-extension/)&#x20;
* [Official documentation](https://docs.talisman.xyz/talisman)
* [Twitter](https://twitter.com/wearetalisman)
* [Discord](http://discord.gg/talisman)


# Talisman - Full Guide

## **Part 1 – Install Talisman**

<figure><img src="https://3883897532-files.gitbook.io/~/files/v0/b/gitbook-x-prod.appspot.com/o/spaces%2F0mRE72CK4C3BU2yX3xxe%2Fuploads%2FhNRd9Nne2zz6VnNkYL3E%2FInstall1.png?alt=media&amp;token=bb2db014-e367-44d4-924a-e9fd68beb7e0" alt=""><figcaption></figcaption></figure>

**Step 1:** Navigate to the [Talisman website](https://talisman.xyz) and click '**Get Started**'.

<figure><img src="https://3883897532-files.gitbook.io/~/files/v0/b/gitbook-x-prod.appspot.com/o/spaces%2F0mRE72CK4C3BU2yX3xxe%2Fuploads%2F3UZIBMhQtTstCRa11HMj%2FInstall2.png?alt=media&amp;token=3df503b4-edea-4cd3-88c3-efa7c5eca59f" alt=""><figcaption></figcaption></figure>

**Step 2:** Click on **'Add to Chrome'**.

<figure><img src="https://3883897532-files.gitbook.io/~/files/v0/b/gitbook-x-prod.appspot.com/o/spaces%2F0mRE72CK4C3BU2yX3xxe%2Fuploads%2F6nZ5CpJJ3QSKEOTkzsU8%2FInstall3.png?alt=media&amp;token=b05b600c-1c76-4e62-9101-cae87aae3f3d" alt=""><figcaption></figcaption></figure>

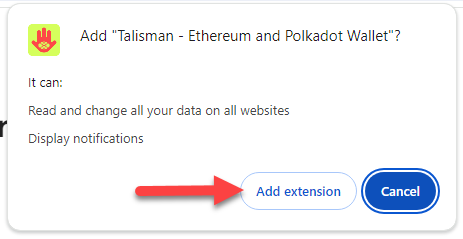
**Step 3:** Click on **'Add extension'**.

## **Part 2 – Create Wallet**

<figure><img src="https://3883897532-files.gitbook.io/~/files/v0/b/gitbook-x-prod.appspot.com/o/spaces%2F0mRE72CK4C3BU2yX3xxe%2Fuploads%2FmIAehqvhHJTJwMWm7ih4%2FCreate1.png?alt=media&amp;token=ce68d330-1201-4a3f-9548-012878a5eda8" alt=""><figcaption></figcaption></figure>

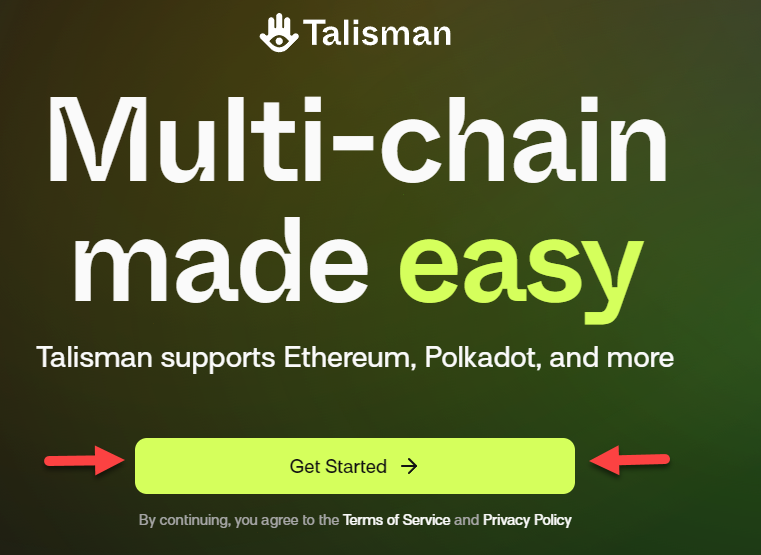
**Step 1:** After installing the extension, you will be redirected to the getting started page. Click on **'Get Started'**.

<figure><img src="https://3883897532-files.gitbook.io/~/files/v0/b/gitbook-x-prod.appspot.com/o/spaces%2F0mRE72CK4C3BU2yX3xxe%2Fuploads%2Fe0QQKy2mhrLEMIkmFz5z%2FCreate2.png?alt=media&amp;token=4d17a3b4-aaea-4ba4-9c67-c65a0714580a" alt=""><figcaption></figcaption></figure>

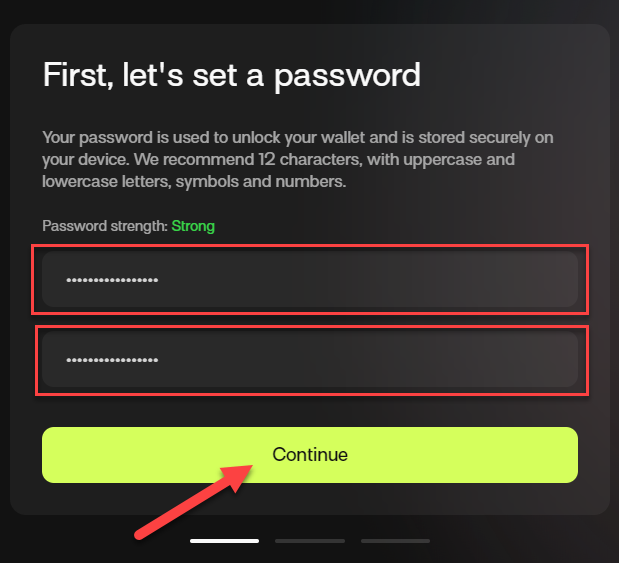
**Step 2:** Choose a strong password, fill it in twice and click on **'Continue'**.

<figure><img src="https://3883897532-files.gitbook.io/~/files/v0/b/gitbook-x-prod.appspot.com/o/spaces%2F0mRE72CK4C3BU2yX3xxe%2Fuploads%2FR1zBabbsE4U8bYruG02m%2FCreate3.png?alt=media&amp;token=7002a5ec-1c6a-4415-a621-719224e30f6f" alt=""><figcaption></figcaption></figure>

**Step 3:** Choose whether you want to share anonymous usage information with Talisman and proceed by clicking on either **'No thanks'** or **'I agree'**.

<figure><img src="https://3883897532-files.gitbook.io/~/files/v0/b/gitbook-x-prod.appspot.com/o/spaces%2F0mRE72CK4C3BU2yX3xxe%2Fuploads%2FWXUWb6BPDkX1xvodLVRq%2FCreate4.png?alt=media&amp;token=9e23e6aa-a929-450f-8b4b-1fc0218f2405" alt=""><figcaption></figcaption></figure>

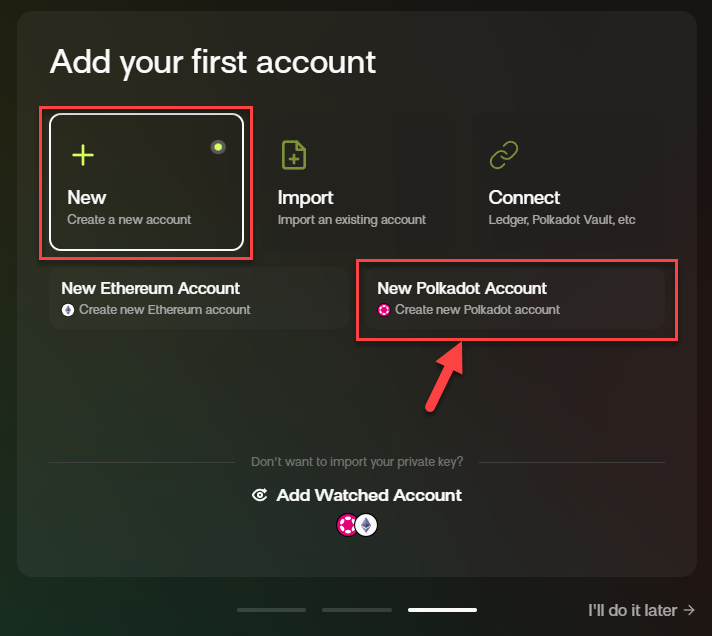
**Step 4:** Make sure **'New'** is selected and click on **'New Polkadot Account'**.

<figure><img src="https://3883897532-files.gitbook.io/~/files/v0/b/gitbook-x-prod.appspot.com/o/spaces%2F0mRE72CK4C3BU2yX3xxe%2Fuploads%2F6UIuMYG770BDvCPaNJtq%2FCreate5.png?alt=media&amp;token=564d012d-c443-4694-a8e1-5274fbd74a77" alt=""><figcaption></figcaption></figure>

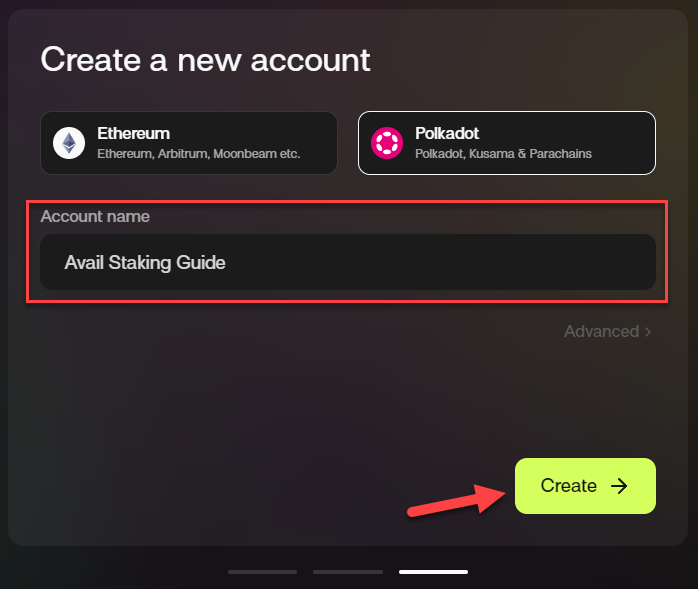
**Step 5:** Make sure **'Polkadot'** is selected, fill in a name for your account under **'Account name'** and click on **'Create'**.

<figure><img src="https://3883897532-files.gitbook.io/~/files/v0/b/gitbook-x-prod.appspot.com/o/spaces%2F0mRE72CK4C3BU2yX3xxe%2Fuploads%2FHULPyZx8uwEifWqUezNB%2FCreate6.png?alt=media&amp;token=a10f0366-9a78-4177-a346-d4f11d9d5c3c" alt=""><figcaption></figcaption></figure>

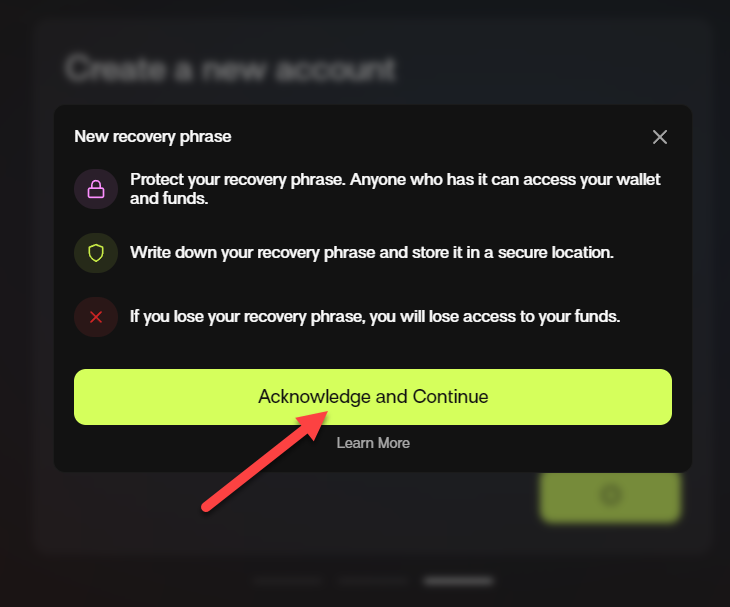
**Step 6:** Click on **'Acknowledge and Continue'**.

<figure><img src="https://3883897532-files.gitbook.io/~/files/v0/b/gitbook-x-prod.appspot.com/o/spaces%2F0mRE72CK4C3BU2yX3xxe%2Fuploads%2Febh7mv7THkaXUpnNVCxa%2FCreate7.png?alt=media&amp;token=5ead827f-ba4a-4c01-b8f6-02f317ae5e83" alt=""><figcaption></figcaption></figure>

**Step 7:** Select either **'12-word'** or **'24-word'**, ***save the recovery phrase words shown somewhere safe***, check the checkbox, and click on **'Verify recovery phrase'**.

<figure><img src="https://3883897532-files.gitbook.io/~/files/v0/b/gitbook-x-prod.appspot.com/o/spaces%2F0mRE72CK4C3BU2yX3xxe%2Fuploads%2FUsUaNqPV2saJgLZU4Dsm%2FCreate8.png?alt=media&amp;token=dde7aed1-5cf7-44b7-a7c0-6d04efd41f55" alt=""><figcaption></figcaption></figure>

**Step 8:** Click on the words of your recovery phrase in the correct order until all of them are filled in and click on **'Complete Verification'**.

<figure><img src="https://3883897532-files.gitbook.io/~/files/v0/b/gitbook-x-prod.appspot.com/o/spaces%2F0mRE72CK4C3BU2yX3xxe%2Fuploads%2FOwBuMzsZG8kGSTCD00Xb%2FCreate9.png?alt=media&amp;token=c369cd48-9e7a-432b-9d92-04a6e3fad7b4" alt=""><figcaption></figcaption></figure>

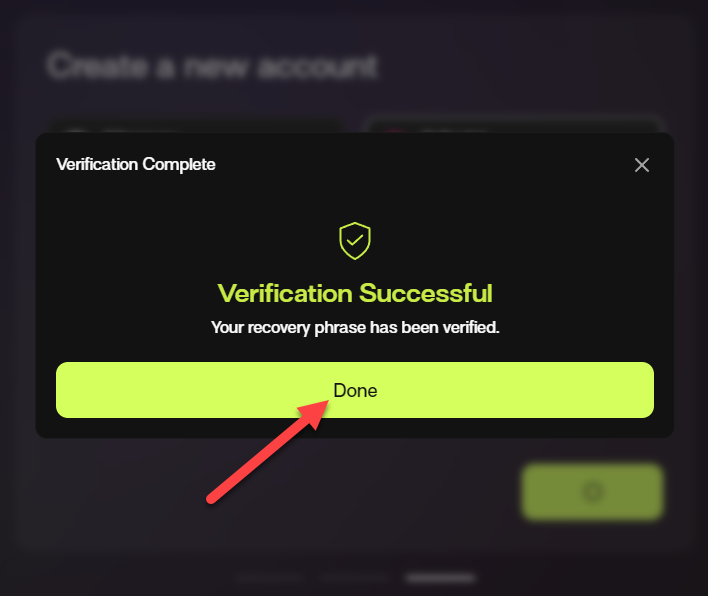
**Step 9:** Click on **'Done'**.

<figure><img src="https://3883897532-files.gitbook.io/~/files/v0/b/gitbook-x-prod.appspot.com/o/spaces%2F0mRE72CK4C3BU2yX3xxe%2Fuploads%2Fsk17Di3Kpb3HDaUZx2zf%2FCreate10.png?alt=media&amp;token=ebebf278-0c2a-4801-82bb-ecc28038c948" alt=""><figcaption></figcaption></figure>

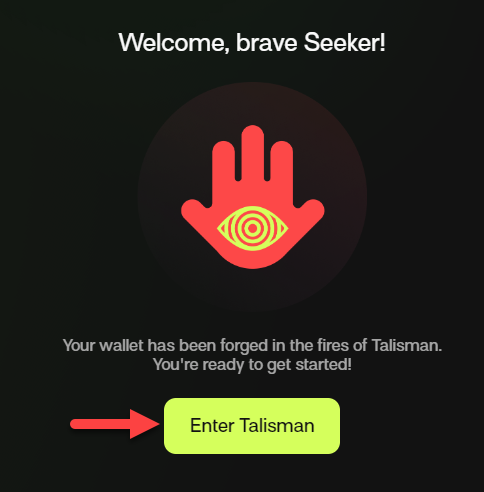
**Step 10:** Click on **'Enter Talisman'**.

<figure><img src="https://3883897532-files.gitbook.io/~/files/v0/b/gitbook-x-prod.appspot.com/o/spaces%2F0mRE72CK4C3BU2yX3xxe%2Fuploads%2FtEj3VJhqqOlWbn0kNQlu%2FCreate11.png?alt=media&amp;token=5701cd15-986f-4f7a-8741-bec733eeb3fd" alt=""><figcaption></figcaption></figure>

**Step 11 (recommended):** Click on the extension icon at the top right of Google Chrome.

<figure><img src="https://3883897532-files.gitbook.io/~/files/v0/b/gitbook-x-prod.appspot.com/o/spaces%2F0mRE72CK4C3BU2yX3xxe%2Fuploads%2FaHzg3cL7x90jt2gRXBX6%2FCreate12.png?alt=media&amp;token=1249b431-29f4-48a4-b51a-7c4aa6548f7d" alt=""><figcaption></figcaption></figure>

**Step 12:** Click on the pin next to Talisman. This will ensure that you always have easy access to your Talisman extension.

## **Part 3 – Receive $AVAIL**

<figure><img src="https://3883897532-files.gitbook.io/~/files/v0/b/gitbook-x-prod.appspot.com/o/spaces%2F0mRE72CK4C3BU2yX3xxe%2Fuploads%2FeT3sODtTByCiF79Q8lUO%2FReceive1.png?alt=media&amp;token=1e6dcf0a-31cb-4c6c-89a1-b3b57c1aa3b2" alt=""><figcaption></figcaption></figure>

**Step 1:** On the Talisman overview page, click on **'Receive'**.

<figure><img src="https://3883897532-files.gitbook.io/~/files/v0/b/gitbook-x-prod.appspot.com/o/spaces%2F0mRE72CK4C3BU2yX3xxe%2Fuploads%2FGRO5Anbg9tUSGNCXScgr%2FReceive2.png?alt=media&amp;token=49391e0c-16d5-40d5-bb6d-146b887cf5d9" alt=""><figcaption></figcaption></figure>

**Step 2:** Click on the account on which you want to receive the $AVAIL.

<figure><img src="https://3883897532-files.gitbook.io/~/files/v0/b/gitbook-x-prod.appspot.com/o/spaces%2F0mRE72CK4C3BU2yX3xxe%2Fuploads%2F4vgKZOLm6NJVoLbGm3ED%2FReceive3.png?alt=media&amp;token=00a7baa4-ceb6-4e11-a581-5c0f3b5fa2b6" alt=""><figcaption></figcaption></figure>

**Step 3:** Type in AVAIL in the search field and click on the copy button next to the AVAIL result.

<figure><img src="https://3883897532-files.gitbook.io/~/files/v0/b/gitbook-x-prod.appspot.com/o/spaces%2F0mRE72CK4C3BU2yX3xxe%2Fuploads%2FbdmUIjXGYuTkrN5xus9H%2FReceive4.png?alt=media&amp;token=d5f80e4d-f6f8-46ac-9c2d-2c9c3cfaf6d2" alt=""><figcaption></figcaption></figure>

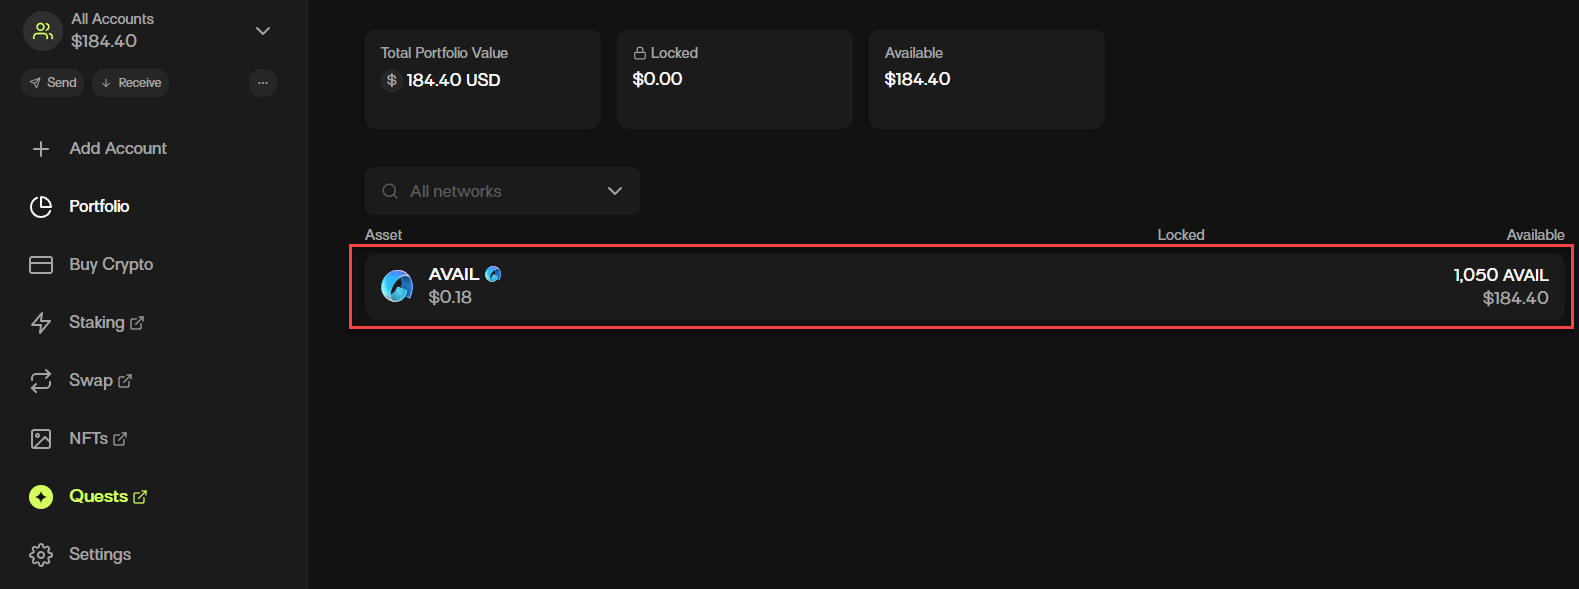
**Step 4:** After sending the $AVAIL to the address, you will see it reflected after a couple of minutes.

## **Part 4 – Connect to Avail staking page**

<figure><img src="https://3883897532-files.gitbook.io/~/files/v0/b/gitbook-x-prod.appspot.com/o/spaces%2F0mRE72CK4C3BU2yX3xxe%2Fuploads%2FgkdgdJ6BifU1baILPQpv%2FNominate1.png?alt=media&amp;token=8800b717-5677-4165-8291-dfa1fc92b406" alt=""><figcaption></figcaption></figure>

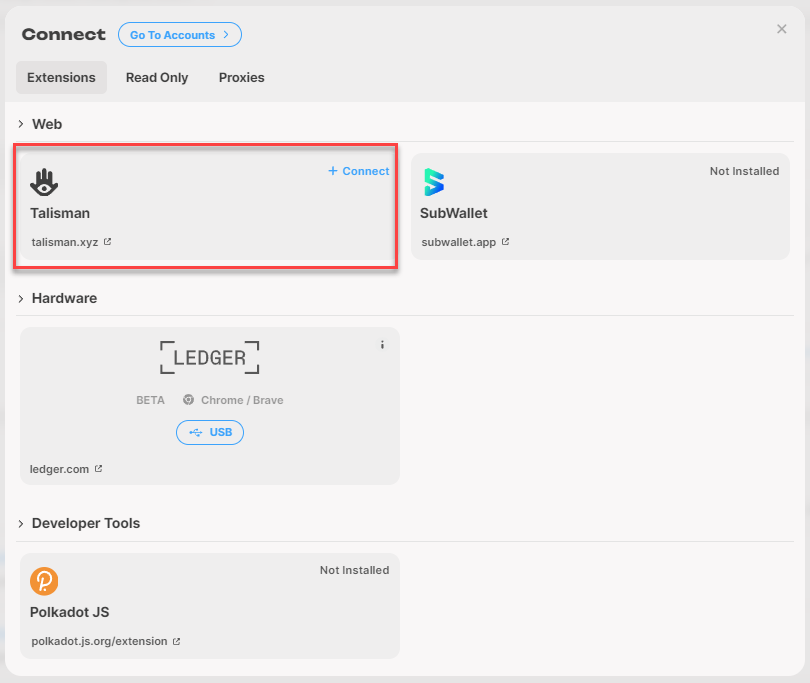
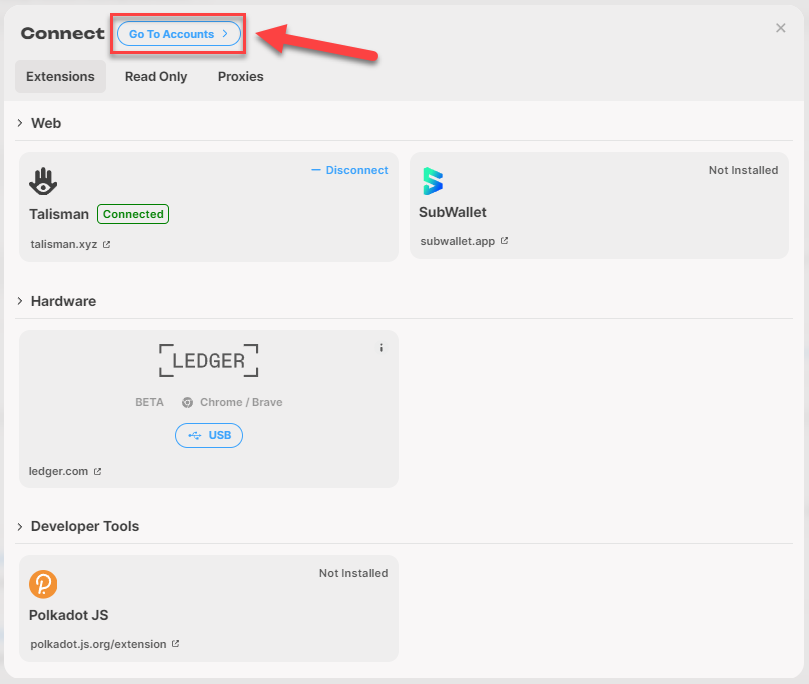
**Step 1:** Browse to the [Avail staking page](https://staking.availproject.org/) and click on **'Connect'** in the top right corner of the screen.

<figure><img src="https://3883897532-files.gitbook.io/~/files/v0/b/gitbook-x-prod.appspot.com/o/spaces%2F0mRE72CK4C3BU2yX3xxe%2Fuploads%2FUCiTCUOtY1FTAxEqIj49%2FNominate2.png?alt=media&amp;token=a1ee2749-2bae-4df9-b34e-74cdca454f78" alt=""><figcaption></figcaption></figure>

**Step 2:** Click on **'Talisman'**.

<figure><img src="https://3883897532-files.gitbook.io/~/files/v0/b/gitbook-x-prod.appspot.com/o/spaces%2F0mRE72CK4C3BU2yX3xxe%2Fuploads%2FJa2GUWANQM65U257DW56%2FNominate3.png?alt=media&amp;token=4cf117e8-e24e-4059-8119-10e46d3875bb" alt=""><figcaption></figcaption></figure>

**Step 3:** Select an account in the Talisman prompt and click on **'Connect 1'**.

<figure><img src="https://3883897532-files.gitbook.io/~/files/v0/b/gitbook-x-prod.appspot.com/o/spaces%2F0mRE72CK4C3BU2yX3xxe%2Fuploads%2Fj6wd6ENrYZr4z8tj7H2l%2FNominate4.png?alt=media&amp;token=5e22277d-f734-4c4c-ba46-c36f3da738fe" alt=""><figcaption></figcaption></figure>

**Step 4:** Click on **'Go To Accounts'**.

<figure><img src="https://3883897532-files.gitbook.io/~/files/v0/b/gitbook-x-prod.appspot.com/o/spaces%2F0mRE72CK4C3BU2yX3xxe%2Fuploads%2FtrjkAFBszdPJRfW7fn2x%2FNominate5.png?alt=media&amp;token=513ea2df-6535-4e10-b90b-c39dd836c8e3" alt=""><figcaption></figcaption></figure>

**Step 5:** Click on your account.

<figure><img src="https://3883897532-files.gitbook.io/~/files/v0/b/gitbook-x-prod.appspot.com/o/spaces%2F0mRE72CK4C3BU2yX3xxe%2Fuploads%2FAE73Sv23EyNMLIsjm4l9%2FNominate6.png?alt=media&amp;token=60b5a43b-158d-44b2-9f88-2bd4cc233759" alt=""><figcaption></figcaption></figure>

**Step 6:** You are now connected to the staking page. You will see details such as your address, your balance, whether you are nominating, and more.

## **Part 5 - Stake/Nominate your $AVAIL**

<figure><img src="https://3883897532-files.gitbook.io/~/files/v0/b/gitbook-x-prod.appspot.com/o/spaces%2F0mRE72CK4C3BU2yX3xxe%2Fuploads%2FzMvPBd3PcsaUECNCB8yx%2FNominate7.png?alt=media&amp;token=0fc49021-9403-41a4-85ec-6d205a549481" alt=""><figcaption></figcaption></figure>

**Step 1:** Click on **'Validators'** on the left side of the staking page.

<figure><img src="https://3883897532-files.gitbook.io/~/files/v0/b/gitbook-x-prod.appspot.com/o/spaces%2F0mRE72CK4C3BU2yX3xxe%2Fuploads%2FtnYw9l7pCaUig0VT805o%2FNominate8.png?alt=media&amp;token=cbbb7cd7-0801-4c39-ad9c-701e64ce343c" alt=""><figcaption></figcaption></figure>

**Step 2:** Click on **'Clear'**.

<figure><img src="https://3883897532-files.gitbook.io/~/files/v0/b/gitbook-x-prod.appspot.com/o/spaces%2F0mRE72CK4C3BU2yX3xxe%2Fuploads%2F9HFx4ZiRr80gWrHepwcL%2FNominate9.png?alt=media&amp;token=0217ffd4-81c6-4e6c-a65c-cbd6c606dd82" alt=""><figcaption></figcaption></figure>

**Step 3:** Search for **'speedy'** and click on the heart to add our validator to your favourites.

<figure><img src="https://3883897532-files.gitbook.io/~/files/v0/b/gitbook-x-prod.appspot.com/o/spaces%2F0mRE72CK4C3BU2yX3xxe%2Fuploads%2F1VTJJISs1eIG0bh3qzBh%2FNominate10.png?alt=media&amp;token=0b883b85-55d1-47ff-a525-f4cf9e0ba748" alt=""><figcaption></figcaption></figure>

**Step 4:** Click on **'Nominate'** on the left side of the staking page.

<figure><img src="https://3883897532-files.gitbook.io/~/files/v0/b/gitbook-x-prod.appspot.com/o/spaces%2F0mRE72CK4C3BU2yX3xxe%2Fuploads%2F8Y5iB4pb342WjfNZstBX%2FNominate11.png?alt=media&amp;token=90c93a4e-65b8-4840-bf44-6c6ce9ef425b" alt=""><figcaption></figcaption></figure>

**Step 5:** Click on **'Start nominating'**.

<figure><img src="https://3883897532-files.gitbook.io/~/files/v0/b/gitbook-x-prod.appspot.com/o/spaces%2F0mRE72CK4C3BU2yX3xxe%2Fuploads%2FUiW43pmw026Hux3tyy7C%2FNominate12.png?alt=media&amp;token=58ba076e-67c0-4107-896a-45f435e5402a" alt=""><figcaption></figcaption></figure>

**Step 6:** Select what you want to do with your rewards; compound, add them to your liquid account balance or add them to another account's liquid account balance. After that, click on **'Continue'**.

<figure><img src="https://3883897532-files.gitbook.io/~/files/v0/b/gitbook-x-prod.appspot.com/o/spaces%2F0mRE72CK4C3BU2yX3xxe%2Fuploads%2FBaG9A28kruwfJ7xtDShy%2FNominate13.png?alt=media&amp;token=6f70f89b-0461-4642-9733-8ba053ecc94a" alt=""><figcaption></figcaption></figure>

**Step 7:** Click on **'From Favorites'**.

<figure><img src="https://3883897532-files.gitbook.io/~/files/v0/b/gitbook-x-prod.appspot.com/o/spaces%2F0mRE72CK4C3BU2yX3xxe%2Fuploads%2FpOdgGsT2BGTaCWW6bPvD%2FNominate14.png?alt=media&amp;token=bdc3ae25-0fa2-4eec-a955-79cd564e88da" alt=""><figcaption></figcaption></figure>

**Step 8:** Our node will be added as a nominated validator. To ensure you receive staking rewards every ERA, select several **'High performance'** or **'Active'** validators. We'll add 4 in our example.

<figure><img src="https://3883897532-files.gitbook.io/~/files/v0/b/gitbook-x-prod.appspot.com/o/spaces%2F0mRE72CK4C3BU2yX3xxe%2Fuploads%2FIZ2CeuxNlDTEm1TgERSw%2FNominate15.png?alt=media&amp;token=d4224c53-aaae-4b11-9735-f3ec27314fab" alt=""><figcaption></figcaption></figure>

**Step 9:** Click on **'Continue'**.

<figure><img src="https://3883897532-files.gitbook.io/~/files/v0/b/gitbook-x-prod.appspot.com/o/spaces%2F0mRE72CK4C3BU2yX3xxe%2Fuploads%2FYUf8HefvITNg0hrZg7Qb%2FNominate16.png?alt=media&amp;token=75ca7275-ecdf-4682-a4ae-f88e1a737e21" alt=""><figcaption></figcaption></figure>

**Step 10:** Fill in the amount of $AVAIL you want to nominate (at least 1000) and click on **'Continue'**.

<figure><img src="https://3883897532-files.gitbook.io/~/files/v0/b/gitbook-x-prod.appspot.com/o/spaces%2F0mRE72CK4C3BU2yX3xxe%2Fuploads%2FP7GQq0zQGW9NqJjHggG1%2FNominate17.png?alt=media&amp;token=ae907bb4-2d58-422d-a27d-60f3afc35d73" alt=""><figcaption></figcaption></figure>

**Step 11:** Check if all details are correct under **'Summary'** and click on **'Start Nominating'**.

<figure><img src="https://3883897532-files.gitbook.io/~/files/v0/b/gitbook-x-prod.appspot.com/o/spaces%2F0mRE72CK4C3BU2yX3xxe%2Fuploads%2FYjmZSPHlXna3Z9dSCEbQ%2FNominate18.png?alt=media&amp;token=3806315d-c440-4491-9263-25c83033421a" alt=""><figcaption></figcaption></figure>

**Step 12:** Click on **'Approve'** in the Talisman prompt.

<figure><img src="https://3883897532-files.gitbook.io/~/files/v0/b/gitbook-x-prod.appspot.com/o/spaces%2F0mRE72CK4C3BU2yX3xxe%2Fuploads%2FRWi9OTedVtYbrDuLhJes%2FNominate19.png?alt=media&amp;token=7e28ce0a-69f8-45ad-8fe4-23133cc61987" alt=""><figcaption></figcaption></figure>

**Step 13:** You have now successfully nominated your $AVAIL. You will receive your first rewards after 1-2 ERAs and every ERA after that.


# Talisman - Installation

<figure><img src="https://3883897532-files.gitbook.io/~/files/v0/b/gitbook-x-prod.appspot.com/o/spaces%2F0mRE72CK4C3BU2yX3xxe%2Fuploads%2FhNRd9Nne2zz6VnNkYL3E%2FInstall1.png?alt=media&amp;token=bb2db014-e367-44d4-924a-e9fd68beb7e0" alt=""><figcaption></figcaption></figure>

**Step 1:** Navigate to the [Talisman website](https://talisman.xyz) and click '**Get Started**'.

<figure><img src="https://3883897532-files.gitbook.io/~/files/v0/b/gitbook-x-prod.appspot.com/o/spaces%2F0mRE72CK4C3BU2yX3xxe%2Fuploads%2F3UZIBMhQtTstCRa11HMj%2FInstall2.png?alt=media&amp;token=3df503b4-edea-4cd3-88c3-efa7c5eca59f" alt=""><figcaption></figcaption></figure>

**Step 2:** Click on **'Add to Chrome'**.

<figure><img src="https://3883897532-files.gitbook.io/~/files/v0/b/gitbook-x-prod.appspot.com/o/spaces%2F0mRE72CK4C3BU2yX3xxe%2Fuploads%2F6nZ5CpJJ3QSKEOTkzsU8%2FInstall3.png?alt=media&amp;token=b05b600c-1c76-4e62-9101-cae87aae3f3d" alt=""><figcaption></figcaption></figure>

**Step 3:** Click on **'Add extension'**.


# Talisman - Create Wallet

<figure><img src="https://3883897532-files.gitbook.io/~/files/v0/b/gitbook-x-prod.appspot.com/o/spaces%2F0mRE72CK4C3BU2yX3xxe%2Fuploads%2FmIAehqvhHJTJwMWm7ih4%2FCreate1.png?alt=media&amp;token=ce68d330-1201-4a3f-9548-012878a5eda8" alt=""><figcaption></figcaption></figure>

**Step 1:** After installing the extension, you will be redirected to the getting started page. Click on **'Get Started'**.

<figure><img src="https://3883897532-files.gitbook.io/~/files/v0/b/gitbook-x-prod.appspot.com/o/spaces%2F0mRE72CK4C3BU2yX3xxe%2Fuploads%2Fe0QQKy2mhrLEMIkmFz5z%2FCreate2.png?alt=media&amp;token=4d17a3b4-aaea-4ba4-9c67-c65a0714580a" alt=""><figcaption></figcaption></figure>

**Step 2:** Choose a strong password, fill it in twice and click on **'Continue'**.

<figure><img src="https://3883897532-files.gitbook.io/~/files/v0/b/gitbook-x-prod.appspot.com/o/spaces%2F0mRE72CK4C3BU2yX3xxe%2Fuploads%2FR1zBabbsE4U8bYruG02m%2FCreate3.png?alt=media&amp;token=7002a5ec-1c6a-4415-a621-719224e30f6f" alt=""><figcaption></figcaption></figure>

**Step 3:** Choose whether you want to share anonymous usage information with Talisman and proceed by clicking on either **'No thanks'** or **'I agree'**.

<figure><img src="https://3883897532-files.gitbook.io/~/files/v0/b/gitbook-x-prod.appspot.com/o/spaces%2F0mRE72CK4C3BU2yX3xxe%2Fuploads%2FWXUWb6BPDkX1xvodLVRq%2FCreate4.png?alt=media&amp;token=9e23e6aa-a929-450f-8b4b-1fc0218f2405" alt=""><figcaption></figcaption></figure>

**Step 4:** Make sure **'New'** is selected and click on **'New Polkadot Account'**.

<figure><img src="https://3883897532-files.gitbook.io/~/files/v0/b/gitbook-x-prod.appspot.com/o/spaces%2F0mRE72CK4C3BU2yX3xxe%2Fuploads%2F6UIuMYG770BDvCPaNJtq%2FCreate5.png?alt=media&amp;token=564d012d-c443-4694-a8e1-5274fbd74a77" alt=""><figcaption></figcaption></figure>

**Step 5:** Make sure **'Polkadot'** is selected, fill in a name for your account under **'Account name'** and click on **'Create'**.

<figure><img src="https://3883897532-files.gitbook.io/~/files/v0/b/gitbook-x-prod.appspot.com/o/spaces%2F0mRE72CK4C3BU2yX3xxe%2Fuploads%2FHULPyZx8uwEifWqUezNB%2FCreate6.png?alt=media&amp;token=a10f0366-9a78-4177-a346-d4f11d9d5c3c" alt=""><figcaption></figcaption></figure>

**Step 6:** Click on **'Acknowledge and Continue'**.

<figure><img src="https://3883897532-files.gitbook.io/~/files/v0/b/gitbook-x-prod.appspot.com/o/spaces%2F0mRE72CK4C3BU2yX3xxe%2Fuploads%2Febh7mv7THkaXUpnNVCxa%2FCreate7.png?alt=media&amp;token=5ead827f-ba4a-4c01-b8f6-02f317ae5e83" alt=""><figcaption></figcaption></figure>

**Step 7:** Select either **'12-word'** or **'24-word'**, ***save the recovery phrase words shown somewhere safe***, check the checkbox, and click on **'Verify recovery phrase'**.

<figure><img src="https://3883897532-files.gitbook.io/~/files/v0/b/gitbook-x-prod.appspot.com/o/spaces%2F0mRE72CK4C3BU2yX3xxe%2Fuploads%2FUsUaNqPV2saJgLZU4Dsm%2FCreate8.png?alt=media&amp;token=dde7aed1-5cf7-44b7-a7c0-6d04efd41f55" alt=""><figcaption></figcaption></figure>

**Step 8:** Click on the words of your recovery phrase in the correct order until all of them are filled in and click on **'Complete Verification'**.

<figure><img src="https://3883897532-files.gitbook.io/~/files/v0/b/gitbook-x-prod.appspot.com/o/spaces%2F0mRE72CK4C3BU2yX3xxe%2Fuploads%2FOwBuMzsZG8kGSTCD00Xb%2FCreate9.png?alt=media&amp;token=c369cd48-9e7a-432b-9d92-04a6e3fad7b4" alt=""><figcaption></figcaption></figure>

**Step 9:** Click on **'Done'**.

<figure><img src="https://3883897532-files.gitbook.io/~/files/v0/b/gitbook-x-prod.appspot.com/o/spaces%2F0mRE72CK4C3BU2yX3xxe%2Fuploads%2Fsk17Di3Kpb3HDaUZx2zf%2FCreate10.png?alt=media&amp;token=ebebf278-0c2a-4801-82bb-ecc28038c948" alt=""><figcaption></figcaption></figure>

**Step 10:** Click on **'Enter Talisman'**.

<figure><img src="https://3883897532-files.gitbook.io/~/files/v0/b/gitbook-x-prod.appspot.com/o/spaces%2F0mRE72CK4C3BU2yX3xxe%2Fuploads%2FtEj3VJhqqOlWbn0kNQlu%2FCreate11.png?alt=media&amp;token=5701cd15-986f-4f7a-8741-bec733eeb3fd" alt=""><figcaption></figcaption></figure>

**Step 11 (recommended):** Click on the extension icon at the top right of Google Chrome.

<figure><img src="https://3883897532-files.gitbook.io/~/files/v0/b/gitbook-x-prod.appspot.com/o/spaces%2F0mRE72CK4C3BU2yX3xxe%2Fuploads%2FaHzg3cL7x90jt2gRXBX6%2FCreate12.png?alt=media&amp;token=1249b431-29f4-48a4-b51a-7c4aa6548f7d" alt=""><figcaption></figcaption></figure>

**Step 12:** Click on the pin next to Talisman. This will ensure that you always have easy access to your Talisman extension.


# Talisman - Receive $AVAIL

<figure><img src="https://3883897532-files.gitbook.io/~/files/v0/b/gitbook-x-prod.appspot.com/o/spaces%2F0mRE72CK4C3BU2yX3xxe%2Fuploads%2FeT3sODtTByCiF79Q8lUO%2FReceive1.png?alt=media&amp;token=1e6dcf0a-31cb-4c6c-89a1-b3b57c1aa3b2" alt=""><figcaption></figcaption></figure>

**Step 1:** On the Talisman overview page, click on **'Receive'**.

<figure><img src="https://3883897532-files.gitbook.io/~/files/v0/b/gitbook-x-prod.appspot.com/o/spaces%2F0mRE72CK4C3BU2yX3xxe%2Fuploads%2FGRO5Anbg9tUSGNCXScgr%2FReceive2.png?alt=media&amp;token=49391e0c-16d5-40d5-bb6d-146b887cf5d9" alt=""><figcaption></figcaption></figure>

**Step 2:** Click on the account on which you want to receive the $AVAIL.

<figure><img src="https://3883897532-files.gitbook.io/~/files/v0/b/gitbook-x-prod.appspot.com/o/spaces%2F0mRE72CK4C3BU2yX3xxe%2Fuploads%2F4vgKZOLm6NJVoLbGm3ED%2FReceive3.png?alt=media&amp;token=00a7baa4-ceb6-4e11-a581-5c0f3b5fa2b6" alt=""><figcaption></figcaption></figure>

**Step 3:** Type in AVAIL in the search field and click on the copy button next to the AVAIL result.

<figure><img src="https://3883897532-files.gitbook.io/~/files/v0/b/gitbook-x-prod.appspot.com/o/spaces%2F0mRE72CK4C3BU2yX3xxe%2Fuploads%2FbdmUIjXGYuTkrN5xus9H%2FReceive4.png?alt=media&amp;token=d5f80e4d-f6f8-46ac-9c2d-2c9c3cfaf6d2" alt=""><figcaption></figcaption></figure>

**Step 4:** After sending the $AVAIL to the address, you will see it reflected after a couple of minutes.


# Talisman - Connect to Avail staking page

<figure><img src="https://3883897532-files.gitbook.io/~/files/v0/b/gitbook-x-prod.appspot.com/o/spaces%2F0mRE72CK4C3BU2yX3xxe%2Fuploads%2FgkdgdJ6BifU1baILPQpv%2FNominate1.png?alt=media&amp;token=8800b717-5677-4165-8291-dfa1fc92b406" alt=""><figcaption></figcaption></figure>

**Step 1:** Browse to the [Avail staking page](https://staking.availproject.org/) and click on **'Connect'** in the top right corner of the screen.

<figure><img src="https://3883897532-files.gitbook.io/~/files/v0/b/gitbook-x-prod.appspot.com/o/spaces%2F0mRE72CK4C3BU2yX3xxe%2Fuploads%2FUCiTCUOtY1FTAxEqIj49%2FNominate2.png?alt=media&amp;token=a1ee2749-2bae-4df9-b34e-74cdca454f78" alt=""><figcaption></figcaption></figure>

**Step 2:** Click on **'Talisman'**.

<figure><img src="https://3883897532-files.gitbook.io/~/files/v0/b/gitbook-x-prod.appspot.com/o/spaces%2F0mRE72CK4C3BU2yX3xxe%2Fuploads%2FJa2GUWANQM65U257DW56%2FNominate3.png?alt=media&amp;token=4cf117e8-e24e-4059-8119-10e46d3875bb" alt=""><figcaption></figcaption></figure>

**Step 3:** Select an account in the Talisman prompt and click on **'Connect 1'**.

<figure><img src="https://3883897532-files.gitbook.io/~/files/v0/b/gitbook-x-prod.appspot.com/o/spaces%2F0mRE72CK4C3BU2yX3xxe%2Fuploads%2Fj6wd6ENrYZr4z8tj7H2l%2FNominate4.png?alt=media&amp;token=5e22277d-f734-4c4c-ba46-c36f3da738fe" alt=""><figcaption></figcaption></figure>

**Step 4:** Click on **'Go To Accounts'**.

<figure><img src="https://3883897532-files.gitbook.io/~/files/v0/b/gitbook-x-prod.appspot.com/o/spaces%2F0mRE72CK4C3BU2yX3xxe%2Fuploads%2FtrjkAFBszdPJRfW7fn2x%2FNominate5.png?alt=media&amp;token=513ea2df-6535-4e10-b90b-c39dd836c8e3" alt=""><figcaption></figcaption></figure>

**Step 5:** Click on your account.

<figure><img src="https://3883897532-files.gitbook.io/~/files/v0/b/gitbook-x-prod.appspot.com/o/spaces%2F0mRE72CK4C3BU2yX3xxe%2Fuploads%2FAE73Sv23EyNMLIsjm4l9%2FNominate6.png?alt=media&amp;token=60b5a43b-158d-44b2-9f88-2bd4cc233759" alt=""><figcaption></figcaption></figure>

**Step 6:** You are now connected to the staking page. You will see details such as your address, your balance, whether you are nominating, and more.


# Talisman - Stake/Nominate your $AVAIL

<figure><img src="https://3883897532-files.gitbook.io/~/files/v0/b/gitbook-x-prod.appspot.com/o/spaces%2F0mRE72CK4C3BU2yX3xxe%2Fuploads%2FzMvPBd3PcsaUECNCB8yx%2FNominate7.png?alt=media&amp;token=0fc49021-9403-41a4-85ec-6d205a549481" alt=""><figcaption></figcaption></figure>

**Step 1:** Click on **'Validators'** on the left side of the staking page.

<figure><img src="https://3883897532-files.gitbook.io/~/files/v0/b/gitbook-x-prod.appspot.com/o/spaces%2F0mRE72CK4C3BU2yX3xxe%2Fuploads%2FtnYw9l7pCaUig0VT805o%2FNominate8.png?alt=media&amp;token=cbbb7cd7-0801-4c39-ad9c-701e64ce343c" alt=""><figcaption></figcaption></figure>

**Step 2:** Click on **'Clear'**.

<figure><img src="https://3883897532-files.gitbook.io/~/files/v0/b/gitbook-x-prod.appspot.com/o/spaces%2F0mRE72CK4C3BU2yX3xxe%2Fuploads%2F9HFx4ZiRr80gWrHepwcL%2FNominate9.png?alt=media&amp;token=0217ffd4-81c6-4e6c-a65c-cbd6c606dd82" alt=""><figcaption></figcaption></figure>

**Step 3:** Search for **'speedy'** and click on the heart to add our validator to your favourites.

<figure><img src="https://3883897532-files.gitbook.io/~/files/v0/b/gitbook-x-prod.appspot.com/o/spaces%2F0mRE72CK4C3BU2yX3xxe%2Fuploads%2F1VTJJISs1eIG0bh3qzBh%2FNominate10.png?alt=media&amp;token=0b883b85-55d1-47ff-a525-f4cf9e0ba748" alt=""><figcaption></figcaption></figure>

**Step 4:** Click on **'Nominate'** on the left side of the staking page.

<figure><img src="https://3883897532-files.gitbook.io/~/files/v0/b/gitbook-x-prod.appspot.com/o/spaces%2F0mRE72CK4C3BU2yX3xxe%2Fuploads%2F8Y5iB4pb342WjfNZstBX%2FNominate11.png?alt=media&amp;token=90c93a4e-65b8-4840-bf44-6c6ce9ef425b" alt=""><figcaption></figcaption></figure>

**Step 5:** Click on **'Start nominating'**.

<figure><img src="https://3883897532-files.gitbook.io/~/files/v0/b/gitbook-x-prod.appspot.com/o/spaces%2F0mRE72CK4C3BU2yX3xxe%2Fuploads%2FUiW43pmw026Hux3tyy7C%2FNominate12.png?alt=media&amp;token=58ba076e-67c0-4107-896a-45f435e5402a" alt=""><figcaption></figcaption></figure>

**Step 6:** Select what you want to do with your rewards; compound, add them to your liquid account balance or add them to another account's liquid account balance. After that, click on **'Continue'**.

<figure><img src="https://3883897532-files.gitbook.io/~/files/v0/b/gitbook-x-prod.appspot.com/o/spaces%2F0mRE72CK4C3BU2yX3xxe%2Fuploads%2FBaG9A28kruwfJ7xtDShy%2FNominate13.png?alt=media&amp;token=6f70f89b-0461-4642-9733-8ba053ecc94a" alt=""><figcaption></figcaption></figure>

**Step 7:** Click on **'From Favorites'**.

<figure><img src="https://3883897532-files.gitbook.io/~/files/v0/b/gitbook-x-prod.appspot.com/o/spaces%2F0mRE72CK4C3BU2yX3xxe%2Fuploads%2FpOdgGsT2BGTaCWW6bPvD%2FNominate14.png?alt=media&amp;token=bdc3ae25-0fa2-4eec-a955-79cd564e88da" alt=""><figcaption></figcaption></figure>

**Step 8:** Our node will be added as a nominated validator. To ensure you receive staking rewards every ERA, select several **'High performance'** or **'Active'** validators. We'll add 4 in our example.

<figure><img src="https://3883897532-files.gitbook.io/~/files/v0/b/gitbook-x-prod.appspot.com/o/spaces%2F0mRE72CK4C3BU2yX3xxe%2Fuploads%2FIZ2CeuxNlDTEm1TgERSw%2FNominate15.png?alt=media&amp;token=d4224c53-aaae-4b11-9735-f3ec27314fab" alt=""><figcaption></figcaption></figure>

**Step 9:** Click on **'Continue'**.

<figure><img src="https://3883897532-files.gitbook.io/~/files/v0/b/gitbook-x-prod.appspot.com/o/spaces%2F0mRE72CK4C3BU2yX3xxe%2Fuploads%2FYUf8HefvITNg0hrZg7Qb%2FNominate16.png?alt=media&amp;token=75ca7275-ecdf-4682-a4ae-f88e1a737e21" alt=""><figcaption></figcaption></figure>

**Step 10:** Fill in the amount of $AVAIL you want to nominate (at least 1000) and click on **'Continue'**.

<figure><img src="https://3883897532-files.gitbook.io/~/files/v0/b/gitbook-x-prod.appspot.com/o/spaces%2F0mRE72CK4C3BU2yX3xxe%2Fuploads%2FP7GQq0zQGW9NqJjHggG1%2FNominate17.png?alt=media&amp;token=ae907bb4-2d58-422d-a27d-60f3afc35d73" alt=""><figcaption></figcaption></figure>

**Step 11:** Check if all details are correct under **'Summary'** and click on **'Start Nominating'**.

<figure><img src="https://3883897532-files.gitbook.io/~/files/v0/b/gitbook-x-prod.appspot.com/o/spaces%2F0mRE72CK4C3BU2yX3xxe%2Fuploads%2FYjmZSPHlXna3Z9dSCEbQ%2FNominate18.png?alt=media&amp;token=3806315d-c440-4491-9263-25c83033421a" alt=""><figcaption></figcaption></figure>

**Step 12:** Click on **'Approve'** in the Talisman prompt.

<figure><img src="https://3883897532-files.gitbook.io/~/files/v0/b/gitbook-x-prod.appspot.com/o/spaces%2F0mRE72CK4C3BU2yX3xxe%2Fuploads%2FRWi9OTedVtYbrDuLhJes%2FNominate19.png?alt=media&amp;token=7e28ce0a-69f8-45ad-8fe4-23133cc61987" alt=""><figcaption></figcaption></figure>

**Step 13:** You have now successfully nominated your $AVAIL. You will receive your first rewards after 1-2 ERAs and every ERA after that.


# The Basics

<figure><img src="https://3883897532-files.gitbook.io/~/files/v0/b/gitbook-x-prod.appspot.com/o/spaces%2F0mRE72CK4C3BU2yX3xxe%2Fuploads%2FcBHMnCvVbz5kfzm4vFgv%2Fgitbook-kcc.png?alt=media&amp;token=ac6901ca-94b3-4175-80b1-cab59dbb6e3f" alt=""><figcaption></figcaption></figure>

## **Introduction**

KCC 1.0 is built on the Ethereum source code and is compatible with EVM smart contracts. It seeks to solve Ethereum’s dual problem of low performance and high cost. Millions of blocks have been produced, while the number of active addresses on the chain has exceeded hundreds of thousands.

**EVM Compatible**

KCC is EVM compatible. Deploy and run your dApps on KCC with your favourite tooling for Ethereum.

**Fast Finality**

The average block time of KCC is 3 seconds. A typical transaction can be included in a block in less than 6 seconds. This block is finalized if more than half of all validators add their blocks after it.

**Low Cost**

The gas fee is paid in $KCS. Transfer your tokens around the world with a fraction of a cent.

**Safe and Secure**

Each block is validated by trusted validators with their identities and KCS as stakes.

## **Staking**

There are currently 15 out of a maximum of 22 active validators(producing blocks and earning rewards). Validators are onboarded manually. Network-wide APY can fluctuate between 1 and 20%, dependent mainly on KuCoin’s (the exchange) activity. This is because the staking APY is fuelled by a share of KuCoin's trading fees. Staking Rewards accrue continuously but do NOT auto-compound - you will have to claim and delegate manually. Unstaking takes 3 days, during which you will NOT earn rewards.

### **Safety/Security**

Your tokens will stay in your custody when staking $KCS with a validator. This means you can, at any point, undelegate, even when a validator goes offline or becomes inactive. The worst thing that would happen is that you wouldn’t receive any new rewards, so choosing the proper validator is essential. There is no slashing active on KCC.

## **Useful Links**

### **Explorers**

[KCC Explorer](https://explorer.kcc.io/en) | [KCC Scan](https://scan.kcc.io/)

### **Wallets**

[**UniPass**](https://unipass.id/) **|** [**Changex**](https://changex.io/) **|** [**Halo Wallet**](https://halo.social/) **|** [**MetaMask**](https://metamask.io/) **|** [**TrustWallet**](https://trustwallet.com/) **|** [**TokenPocket**](https://www.tokenpocket.pro/) **|** [**BitGet Wallet**](https://web3.bitget.com/en/) **|** [**Coin98**](https://coin98.com/) **|** [**MathWallet**](https://mathwallet.org/) **|** [**Rabby Wallet**](https://rabby.io/) **|** [**Ledger**](https://www.ledger.com/) **|** [**Infinity Wallet**](https://infinitywallet.io/asset/kucointoken) **|** [**Nabox**](https://nabox.io/) **|** [**SafePal**](https://www.safepal.com/) **|** [**Ambire Wallet**](https://www.ambire.com/) **|** [**Astrone**](http://astrone.io/) **|** [**Shield Protocol**](https://shieldprotocol.org/) **|** [**Fox Wallet**](https://foxwallet.com/) **|** [**ONTO Wallet**](https://onto.app/)

### **Official KCC resources**

[**Website**](https://www.kcc.io/) **|** [**Documentation**](https://docs.kcc.io/) **|** [**Ecosystem**](https://www.kcc.io/apps) **|** [**GitHub**](https://github.com/kcc-community) **|** [**Staking Website**](https://staking.kcc.io/)

**Social Media**

[Twitter](https://twitter.com/KCCOfficialTW) | [Medium ](https://kccofficial.medium.com/)| [Discord](https://discord.com/invite/H5ucJydSyd) | [Telegram](https://t.me/KCCOfficialEnglishCommunity)


# MetaMask - $KCS Staking Guide

## **Part 1 – Receive $KCS On Your MetaMask Wallet**

**Step 1:** Install and set up a MetaMask wallet if you haven't yet: [**CLICK HERE**](https://metamask.io/download/)

<figure><img src="https://3883897532-files.gitbook.io/~/files/v0/b/gitbook-x-prod.appspot.com/o/spaces%2F0mRE72CK4C3BU2yX3xxe%2Fuploads%2FV7cSh08JrgtFWBVzlV6U%2Freceive1.png?alt=media&amp;token=71f677bb-3ed9-4502-bcc1-06af3c2dfbbc" alt=""><figcaption></figcaption></figure>

**Step 2:** Copy your wallet address. You will withdraw your $KCS to this address when you, for example, withdraw from the KuCoin exchange.

## **Part 2 – Stake Your $KCS**

<figure><img src="https://3883897532-files.gitbook.io/~/files/v0/b/gitbook-x-prod.appspot.com/o/spaces%2F0mRE72CK4C3BU2yX3xxe%2Fuploads%2F3XwxPjwHuJQ1CKjwgAxk%2Fstake1.png?alt=media&amp;token=ded00484-ae60-47ff-a965-dd82bf26c5af" alt=""><figcaption></figcaption></figure>

**Step 1:** Navigate to the KCC staking page [**HERE**](https://staking.kcc.io/staking) and click '**Connect Wallet**'.

<figure><img src="https://3883897532-files.gitbook.io/~/files/v0/b/gitbook-x-prod.appspot.com/o/spaces%2F0mRE72CK4C3BU2yX3xxe%2Fuploads%2FFVEi6CzGfaoRaAMhH6bM%2Fstake2.png?alt=media&amp;token=29a5c66d-e4cd-435b-8bc3-96fadd36c289" alt=""><figcaption></figcaption></figure>

**Step 2:** Click on '**MetaMask**'.

<figure><img src="https://3883897532-files.gitbook.io/~/files/v0/b/gitbook-x-prod.appspot.com/o/spaces%2F0mRE72CK4C3BU2yX3xxe%2Fuploads%2FGhan5bQ86PUzzGYhsDVD%2Fstake3.png?alt=media&amp;token=e8e5bb3c-5b5d-4959-ab99-359f5acfe39e" alt=""><figcaption></figcaption></figure>

**Step 3:** Select the account you want to connect and click on '**Next**' in the MetaMask extension prompt.

<figure><img src="https://3883897532-files.gitbook.io/~/files/v0/b/gitbook-x-prod.appspot.com/o/spaces%2F0mRE72CK4C3BU2yX3xxe%2Fuploads%2FoQQ0NQUSoQx08YnCXN6b%2Fstake4.png?alt=media&amp;token=db1decb9-fb71-41a5-879a-4ede59291d78" alt=""><figcaption></figcaption></figure>

**Step 4:** Click on '**Connect**'.

<figure><img src="https://3883897532-files.gitbook.io/~/files/v0/b/gitbook-x-prod.appspot.com/o/spaces%2F0mRE72CK4C3BU2yX3xxe%2Fuploads%2FTEvWeu0eAOOgk96UUtr3%2Fstake5.png?alt=media&amp;token=f43974b8-53af-49dc-8a31-78b67ebce88a" alt=""><figcaption></figcaption></figure>

**Step 5:** Click '**Delegate**' next to the validator you want to stake with (**For example, Speedy Staking**).

<figure><img src="https://3883897532-files.gitbook.io/~/files/v0/b/gitbook-x-prod.appspot.com/o/spaces%2F0mRE72CK4C3BU2yX3xxe%2Fuploads%2FryyN6NMy7iObUtwhfwUi%2Fstake6.png?alt=media&amp;token=9726a244-92ed-489e-a6de-faf5cf0a7680" alt=""><figcaption></figcaption></figure>

**Step 6:** Fill in the amount of $KCS you want to stake under '**Delegate**' and click on '**Delegate**'.

{% hint style="warning" %}
**IMPORTANT: Don’t stake all of your $KCS, as you will need some $KCS left to unstake your tokens in the future.**
{% endhint %}

<figure><img src="https://3883897532-files.gitbook.io/~/files/v0/b/gitbook-x-prod.appspot.com/o/spaces%2F0mRE72CK4C3BU2yX3xxe%2Fuploads%2FyCovX6zK3aGra4HFiWys%2Fstake7.png?alt=media&amp;token=7fd427bc-0f8d-47d6-9f9c-e30c4a2db742" alt=""><figcaption></figcaption></figure>

**Step 7:** Click on '**Confirm**' in the MetaMask extension prompt.

<figure><img src="https://3883897532-files.gitbook.io/~/files/v0/b/gitbook-x-prod.appspot.com/o/spaces%2F0mRE72CK4C3BU2yX3xxe%2Fuploads%2FmJbmJDfrInSfIoKTXjKc%2Fstake8.png?alt=media&amp;token=a50bccf0-ba15-4e51-9385-427bd736261a" alt=""><figcaption></figcaption></figure>

**Step 8:** Congratulations! You have successfully staked! Click on '**Check My Delegate**'.

<figure><img src="https://3883897532-files.gitbook.io/~/files/v0/b/gitbook-x-prod.appspot.com/o/spaces%2F0mRE72CK4C3BU2yX3xxe%2Fuploads%2FFcsgfGBYRC2bOMM2JsIo%2Fstake9.png?alt=media&amp;token=41c0fb9a-ef53-47e9-8de6-81009e1e2212" alt=""><figcaption></figcaption></figure>

**Step 9:** You will find all information about your stake here. You will see your current staked $KCS and can claim your rewards here.


# The Basics

<figure><img src="https://3883897532-files.gitbook.io/~/files/v0/b/gitbook-x-prod.appspot.com/o/spaces%2F0mRE72CK4C3BU2yX3xxe%2Fuploads%2FGTQFkd7ctlm9fUKGYPk6%2Fgitbook-haqq.png?alt=media&amp;token=860c8669-94de-4d70-b949-de01457b69d2" alt=""><figcaption></figcaption></figure>

## **Introduction**

**HOME OF ETHICAL WEB3**

Ethics-first network that welcomes sustainability-centered developers, validators and open source contributors as well as Muslim innovators in sustainable Finance.

Islamic Coin($ISLM) is the native currency of HAQQ Network.

&#x20;

**ABOUT HAQQ**\
HAQQ brings together the most reputable actors in ethical finance to promote community-driven decentralized technologies worldwide.

\
HAQQ is an EVM-equivalent chain based on Cosmos SDK. The technology behind HAQQ makes it possible for any smart contract created on other EVM chains to be deployed onto the new network without any changes needed.

**MISSION**

> Crypto has lost its path – grid-driven practices in crypto prevent mass adoption. HAQQ’s mission is to make Web3 projects accessible to everyone.

**VISION**

> HAQQ is balancing Shariah-compliant philosophy and cutting-edge technology to create a fairer, more sustainable financial system. Muslims and ESG powered change throughout the world, and HAQQ is leading it.

## **Staking**

There are currently 95 active validators(producing blocks and earning rewards). Network-wide APR can fluctuate and is currently around 7.8%. Staking Rewards accrue continuously but do NOT auto-compound - you will have to claim and delegate manually. Unstaking takes 21 days, during which you will NOT earn rewards.

### **Safety/Security**

Your tokens will stay in your custody when staking $ISLM with a validator. This means you can, at any point, undelegate, even when a validator goes offline or becomes inactive. The worst thing that would happen is that you wouldn’t receive any new rewards, so choosing the proper validator is essential. There is no slashing active on Haqq.

## **Useful Links**

### **Explorers**

[HAQQ Mainnet Explorer](https://explorer.haqq.network/) | [NodeStake](https://explorer.nodestake.org/haqq) | [Nodes.Guru](https://haqq.explorers.guru/)

### **Wallets**

[**MetaMask**](https://metamask.io/) **|** [**TokenPocket**](https://www.tokenpocket.pro/) **|** [**Ledger**](https://www.ledger.com/) **|** [**Keystone**](https://keyst.one/) **|** [**Safe**](https://safe.global/)

### **Official Resources**

**Haqq Network**

[**Haqq Website**](https://haqq.network/) **|** [**Documentation**](https://docs.haqq.network/) **|** [**Ecosystem**](https://haqq.network/ecosystem) **|** [**GitHub**](https://github.com/haqq-network) **|** [**Staking Website**](https://shell.haqq.network/) **|** [**Haqq Wallet**](https://haqq.network/wallet)

**Islamic Coin**

[**IslamicCoin Website**](https://islamiccoin.net/)

**Social Media**

**Haqq Network**

[Twitter](https://twitter.com/The_HaqqNetwork) | [Discord](https://discord.gg/CDtXuQG3Vd)

**Islamic Coin**

[**Twitter**](https://twitter.com/Islamic_coin) **|** [**Medium**](https://medium.com/islamic-coin) **|** [**Discord**](https://discord.gg/islamiccoin) **|** [**Telegram**](https://t.me/islamiccoin_int) **|** [**LinkedIn**](https://www.linkedin.com/company/islamiccoin) **|** [**Youtube**](https://www.youtube.com/channel/UCTjvOCTDeO9H67y_6btF1NA)


# Bem-vindo

<figure><picture><source srcset="/files/clp7rSHoWraNsJVtn3qA" media="(prefers-color-scheme: dark)"><img src="https://1664556276-files.gitbook.io/~/files/v0/b/gitbook-x-prod.appspot.com/o/spaces%2FT9giP5rmW2oFnVxj0Rgo%2Fuploads%2FgJRakT27Aep5brRPpoXc%2F%5BPNG%5D%20Speedy%20Staking%20-%20dark.png?alt=media&amp;token=29da6d5f-20e5-4f1e-930c-45bb8187dcb4" alt=""></picture><figcaption></figcaption></figure>

<figure><picture><source srcset="/files/ZqBgPaKj5tsal4laMtDl" media="(prefers-color-scheme: dark)"><img src="https://content.gitbook.com/content/T9giP5rmW2oFnVxj0Rgo/blobs/Zc1uXb2XswA5aZVAeD5h/VSP%20staking%20rewards2.png" alt=""></picture><figcaption></figcaption></figure>

Bem-vindo à base de dados da Speedy Staking - para todos os seus tutoriais e informações de staking.

Se ainda tiver dúvidas sobre staking ou necessitar de outras informações, poderá entrar no nosso grupo no Telegram, enviar-nos um e-mail, participar no live chat no nosso site, ou enviar-nos uma mensagem directa no Twitter!

* [Website (Livechat)](https://speedystaking.io)
* [Envia-nos um mail](mailto:info@speedystaking.io)
* [Twitter](https://twitter.com/speedystaking)
* [Grupo Telegram](https://https://t.me/speedystaking)
* [Perfil Staking Rewards](https://www.stakingrewards.com/provider/speedy-staking)


# Staking - O Básico

## **O que significa o termo Staking?**

Numa blockchain Proof–of–Stake (PoS), os utilizadores podem fazer "stake" das suas moedas para obter uma parte das recompensas da rede. Essas recompensas geralmente vêm de uma parte das taxas de transacção da rede e de novas moedas criadas a cada novo bloco. Através do staking, os utilizadores podem ganhar juros sobre suas participações e ajudar a proteger a rede. O "staking" é uma maneira mais eficiente em termos de energia para proteger uma rede blockchain do que o processo de mineração intensivo em energia usada numa blockchain Proof–of–Work (PoW).

## **Como posso fazer Stake?**

O staking descentralizado (que o Speedy Staking oferece através de seus serviços de validador) requer o uso de uma carteira que possa interagir com a Rede em que deseja fazer staking e ter tokens da Rede. Pode ser necessário fazer o staking de uma quantidade mínima, e deve pagar taxas de transacção para fazer o staking e o unstake. É crucial nunca fazer staking de todos os seus tokens, pois não terá o suficiente para fazer o unstake mais tarde. As Redes geralmente exigem que um certo período de tempo passe antes que seus tokens sejam desactivados; isso pode variar de 14 horas em algumas redes até 28 dias em outras. É essencial lembrar-nos antes de começar a fazer staking e unstaking. As recompensas geralmente não são ganhas durante esse período de desativação. Incluiremos sempre essas informações na documentação específica da rede na nossa Base de dados.

## **É seguro?**

Ao contrário das CEXs (Exchanges Centralizadas) e outras plataformas, a Speedy Staking oferece apenas serviços de staking descentralizados. Nunca tomaremos a custódia ou o controle de seus tokens quando os coloca em staking nos nossos nodes, e sempre decidirá o que e quando fazer staking e unstaking. Acreditamos que é fundamental que os utilizadores tenham autocustódia dos seus tokens, pois esses tokens pertencem aos utilizadores e a mais ninguém. E devemos lembrar o famoso ditado no mundo cripto: "Se as chaves não são suas, as cripto também não são suas".

Algumas redes terão slashing ativo, onde validadores (e, com eles, stakers) podem ter o seu stake (ou tokens) reduzido se não se comportarem adequadamente e, consequentemente, pode perder tokens. A segurança para  os validadores contra isso é possível e comum em redes onde o slashing está ativo. Speedy Staking atualmente não está ativo como validador em redes onde o slashing está ativo.

O último aspecto tem a ver com a auto-custódia. Devido à natureza descentralizada da auto-custódia, geralmente não há como recuperar o acesso a uma carteira além da chave privada (ou seedphrase). Se perder isso, NÃO terá acesso aos seus tokens. O mesmo ocorre quando alguém obtém acesso à sua chave privada; essa pessoa terá controlo TOTAL sobre sua carteira. Uma chave privada não pode ser alterada, portanto, é necessário criar uma nova carteira uma vez que ela esteja comprometida. É essencial manter sua chave privada armazenada com segurança, não compartilhá-la com outros e saber quais as transações você está a assinar.

## **Porque Devo Fazer Staking com a Speedy Staking?**

A Speedy Staking consiste numa equipa altamente qualificada e educada com anos de experiência em blockchain e DevOps. Os nossos validadores são executados com hardware de alta performance usando 100% de energia renovável, e ajudamos a apoiar projetos Gold Standard. Fornecemos suporte 24/7 no nosso grupo no Telegram e apoiamos a comunidade de staking com informações e guias úteis. Participamos activamente em eventos de blockchain e ajudamos a apoiar pequenos projectos através de parcerias e patrocínios. Somos [verificados com um rating AA](https://www.stakingrewards.com/provider/speedy-staking) pela Staking Rewards !


# O Básico

<figure><img src="https://content.gitbook.com/content/T9giP5rmW2oFnVxj0Rgo/blobs/Mjd5G9NTQOPjySFaz3V1/gitbook-casper.png" alt=""><figcaption></figcaption></figure>

## **Introdução**

A Casper é uma rede blockchain proof-of-stake optimizada para adopção por empresas e desenvolvedores. A Casper Network é a primeira blockchain ao vivo construída com base na especificação Correct-by-Construction (CBC), permitindo que a rede crie novos mercados sustentáveis e desbloqueie valor tokenizando quase qualquer activo sem comprometer o desempenho ou a segurança. A actividade na Casper é governada pelo CSPR, o token nativo da rede, através do [governance portal](https://members-staging.casper.network/validator-selection-tool/10) que será lançado em breve. A Casper lançou sua mainnet em 31 de março de 2021.

&#x20;

**Casper Labs**

*“Casper Labs é uma AG baseada na Suíça que começou a trabalhar no código da blockchain Casper em outubro de 2018 e lançou o Casper Testnet ao longo de 2020 e 2021 até o lançamento da mainnet. Enquanto os engenheiros da Casper Labs contribuem com novos recursos para a base de código da blockchain Casper, a Casper Labs também é uma empresa de consultadoria totalmente equipada, fornecendo suporte e serviços para seus clientes empresariais que constroem na Casper”*

&#x20;

**Casper Association**

*“A Casper Association é uma organização sem fins lucrativos, com sede na Suíça, responsável por supervisionar a rede e apoiar sua evolução orgânica e descentralização contínua. Os membros da Associação são validadores independentes que operam nodes na Rede Casper.”*&#x20;

## **Tokenomics**

A Casper começou com um fornecimento Gênesis de 10.000.000.000 (ou 10 biliões) de tokens. Actualmente, há uma inflação anual de 8%, o que significa que o fornecimento total aumenta na mesma porcentagem. Este número está sujeito a mudanças no futuro. A inflação é usada exclusivamente para recompensar validadores e delegadores. As taxas de transacção vão para o validador que propôs o bloco, e essas taxas não são compartilhadas com os delegadores. O fornecimento total actual é cerca de 12 bilhões de CSPR.

### **A Venda dos Tokens**

A venda de tokens da Casper foi realizada na CoinList de 23 de março de 2021 a 28 de março de 2021, com uma venda extra para a comunidade em 7 de abril de 2021. Todos os tokens da venda pública e dos validadores foram libertados e estão em circulação.

### **Staking**

Existem actualmente 100 validadores ativos (produzindo blocos e ganhando recompensas), mas há planos para aumentar esse número no futuro (possivelmente para 200 ou 250). O APY da rede depende de quanto CSPR do fornecimento total está em staking; 100% do fornecimento total em staking significaria 8% de APY, e geralmente está em torno de \~10% de APY. Suas primeiras recompensas de staking irão surgir após \~4 horas. O Unstaking leva de 7 a 8 ERAs ou 14 a 16 horas, durante as quais NÃO ganhará recompensas.

&#x20;

### **Segurança**

Ao delegar CSPR com um validador, os seus tokens permanecerão sob sua custódia. Isso significa que o utilizador pode, a qualquer momento, cancelar a delegação, mesmo quando um validador ficar offline ou inactivo. A pior coisa que pode acontecer é não receber novas recompensas, então escolher o validador adequado é essencial. Não há penalização activa na Casper.

&#x20;

### **Situações a considerar quando selecciona um Validador:**

* **Comissão** – Quanto de comissão o validador cobra? Quanto maior esse número, menores serão as recompensas que o utilizador ganha.
* **Node Uptime** – O Node uptime está o mais próximo possível de 100%? O tempo de actividade pode afetar suas recompensas..
* **Confiança**– É um validador transparente? Eu sei quem eles são? Eu sei o que eles representam? Eles são verificados de forma independente? É crucial que o validador esteja presente a longo prazo e comprometido com a confiabilidade e segurança. Você não quer que um node fique offline sem perceber; irá ganhar 0 recompensas!
* **Contacto** – O quão é fácil alcançar o validador? Eles têm um grupo de apoio? Caso precise de ajuda com qualquer situação relacionada com o staking, deve sempre conseguir entrar em contacto com o validador facilmente.
* **Communicação** – Eles comunicam problemas, actualizações importantes e mudanças futuras?
* **Extras** – Quais outros serviços que eles oferecem? Eles apoiam projectos no ecossistema da Casper através de parcerias e patrocínios? Eles fornecem material educacional, como tutoriais? Eles organizam eventos e sorteios? Extras podem fazer a diferença entre um validador bom e um excelente.

## **Links Úteis**

### **Exploradores**

[CSPR.live](http://cspr.live/) | [scansper.com](https://speedystaking.io/docs/casper-network/scansper.com) | [div3.in](http://div3.in/) | [Casperstats](http://casperstats.io/)

&#x20;

### **Carteiras**

[Ledger](https://docs.casperlabs.io/workflow/users/ledger-setup/) – Hardware wallet; deve ser utilizado com, por exemplo, CSPR.live ou CasperHolders.io Suporte completo para Ledger Live será disponibilizado posteriormente.

[Casper Wallet](http://casperwallet.io/) – Carteira oficial da Casper; Pode ser utilizada com o CSPR.live ou de forma independente, disponível no Brave/Chrome/Edge/Firefox/Safari e em Android e iOS.

[CasperDash](https://casperdash.io/) – Carteira descentralizada disponibilizada como uma extensão de navegador para navegadores baseados em Chromium (como Chrome, Brave e Edge) e como um aplicativo para Android e iOS

[Torus Wallet](http://casper.tor.us/) –Carteira que suporta logins sociais

[Burrito Wallet](https://burritowallet.com/en) – Carteira móvel originalmente comercializada no mercado coreano

&#x20;

### **Validadores**

[Visão geral](http://cspr.live/validators) – visão geral de todos os validadores activos no CSPR.live

Speedy Staking – [Node 1](https://cspr.live/validator/0111b3519efa63942e57a9470f55b62d9c4a59ff44df7c65eaefbd1489b7a93a5b) | [Node 2](https://cspr.live/validator/01541af7c1a41912be691fd76849b59c6ea3af38bdcff4db8cad633be4294cc38d)

&#x20;

### **Fontes Oficiais da Casper**

[Casper Network](https://casper.network/) | [CasperLabs](https://casperlabs.io/) | [Casper Twitter](https://twitter.com/Casper_Network) | [CasperLabs Twitter](https://twitter.com/Casper_Labs) |  [Casper Documentation](https://docs.casperlabs.io/) | [Casper Governance Portal](https://members-staging.casper.network/) | [Casper Telegram](http://t.me/casperblockchain) | [Casper Announcements Telegram](https://t.me/casperofficialann) | [Casper Staking Telegram](https://t.me/casperblockchainstaking) | [Casper Discord](http://discord.gg/casperblockchain) | [Casper Youtube](https://www.youtube.com/c/CasperNetwork) | [Casper Ecosystem](https://casperecosystem.io/) | [Casper GitHub](https://github.com/casper-network)

&#x20;

### **Grupos Casper nas diversas Línguas**

[India](https://t.me/casperblockchainindia) | [Spain](https://t.me/casperblockchainspanish) | [Russia](https://t.me/casperblockchainrussia) | [Poland](https://t.me/casperblockchainpoland) | [Turkey](https://t.me/casperblockchainturkey) | [France](https://t.me/casperblockchainfrench) | [Vietnam](https://t.me/casperblockchainvietnam) | [South Korea](https://t.me/casperblockchainkorea) | [The Netherlands](https://t.me/casperblockchainnetherlands) | [Italy](https://t.me/casperblockchainitaly) | [Germany](https://t.me/casperblockchaindeutsch) | [China](https://t.me/casperblockchainchinese)


# Casper Wallet

<figure><img src="https://content.gitbook.com/content/T9giP5rmW2oFnVxj0Rgo/blobs/6zEiKv3cx94m5N5VkD5l/gitbook-cw.png" alt=""><figcaption></figcaption></figure>

* [Official Website](https://casperwallet.io)
* Download on [Chrome](https://chrome.google.com/webstore/detail/casper-wallet/abkahkcbhngaebpcgfmhkoioedceoigp) | [Firefox](https://addons.mozilla.org/en-US/firefox/addon/casper-wallet/) | [Safari](https://apps.apple.com/us/app/casper-wallet/id6446363274)
* Download on [iOS](https://apps.apple.com/app/apple-store/id6446363274?pt=125226123\&ct=Website\&mt=8) | [Android](https://play.google.com/store/apps/details?id=io.casperwallet.app\&hl=en\&gl=US)
* [Official guides](https://www.casperwallet.io/user-guide)
* [Twitter](https://twitter.com/Casper_Wallet)
* [Telegram group](https://t.me/CSPRhub)


# Casper Wallet - Guia Completo

## **Parte 1 – Instalar Casper Wallet e Configurar a Carteira**

<figure><img src="https://1664556276-files.gitbook.io/~/files/v0/b/gitbook-x-prod.appspot.com/o/spaces%2FT9giP5rmW2oFnVxj0Rgo%2Fuploads%2Ffjz2As4JvjO6mEJqVhVG%2FStep1.png?alt=media&amp;token=58799a90-b4e6-4422-9689-080204d2f53d" alt=""><figcaption></figcaption></figure>

**Passo 1:** Navegar no [website Casper Wallet](https://casperwallet.io) e clique em ´**Download´**.

<figure><img src="https://1664556276-files.gitbook.io/~/files/v0/b/gitbook-x-prod.appspot.com/o/spaces%2FT9giP5rmW2oFnVxj0Rgo%2Fuploads%2FzrOlcO3Hdaw5GaG7BCma%2FStep2.png?alt=media&amp;token=44ec6a79-1ab5-43c0-a6c9-53a2b861d0b1" alt=""><figcaption></figcaption></figure>

**Passo 2:** Este passo o levará para a Chrome Store (ou equivalente em outros navegadores); clique em '**Adicionar ao Chrome**' (ou equivalente em outros navegadores).

<figure><img src="https://1664556276-files.gitbook.io/~/files/v0/b/gitbook-x-prod.appspot.com/o/spaces%2FT9giP5rmW2oFnVxj0Rgo%2Fuploads%2F1fSfHXf3orphXWoBPAfk%2FStep3.png?alt=media&amp;token=9434013b-a670-4771-904f-9cb5a5c86c11" alt=""><figcaption></figcaption></figure>

**Passo 3:** Clique em **´Adicionar extensão´**

<figure><img src="https://1664556276-files.gitbook.io/~/files/v0/b/gitbook-x-prod.appspot.com/o/spaces%2FT9giP5rmW2oFnVxj0Rgo%2Fuploads%2F3GIM5CxkC8CiKffEP182%2FStep4.png?alt=media&amp;token=b49d84ef-2246-4c22-8234-d9dde5d06474" alt=""><figcaption></figcaption></figure>

**Step 4:** Após adicionar a extensão Casper Wallet, uma nova aba será aberta no seu navegador para a configuração; clique em '**Get started**'.

<figure><img src="https://1664556276-files.gitbook.io/~/files/v0/b/gitbook-x-prod.appspot.com/o/spaces%2FT9giP5rmW2oFnVxj0Rgo%2Fuploads%2F2gd2H0TvVG9d5SaDtJgX%2FStep5.png?alt=media&amp;token=423bfe57-837e-4e9d-bcc6-60b257edcb54" alt=""><figcaption></figcaption></figure>

**Passo 5:**  Pense numa senha segura, preencha-a duas vezes, marque a caixa de selecção e clique em '**Create password**'.

<figure><img src="https://1664556276-files.gitbook.io/~/files/v0/b/gitbook-x-prod.appspot.com/o/spaces%2FT9giP5rmW2oFnVxj0Rgo%2Fuploads%2FFs7fNpq2XKw4J0aEZQai%2FStep6.png?alt=media&amp;token=6e7ee434-0be4-41ed-8484-016d611a2943" alt=""><figcaption></figcaption></figure>

**Passo 6:** Clique em  '**Create my secret recovery phrase**'.

<figure><img src="https://1664556276-files.gitbook.io/~/files/v0/b/gitbook-x-prod.appspot.com/o/spaces%2FT9giP5rmW2oFnVxj0Rgo%2Fuploads%2FdNN8jfz4iHX6f8tNBn8e%2FStep7.png?alt=media&amp;token=5c9e0950-a973-4eab-9a61-a7b56630fe26" alt=""><figcaption></figcaption></figure>

**Passo 7:** Marque a caixa de selecção e clique em '**Next**'.

<figure><img src="https://1664556276-files.gitbook.io/~/files/v0/b/gitbook-x-prod.appspot.com/o/spaces%2FT9giP5rmW2oFnVxj0Rgo%2Fuploads%2F3vKE1apYAGKt34hBvDe9%2FStep8.png?alt=media&amp;token=0fac7e96-088e-45ac-ba45-02737502a877" alt=""><figcaption></figcaption></figure>

**Passo 8:** Grave a sua frase secreta de recuperação num lugar seguro, marque a caixa de selecção e clique em '**Next**'.

<figure><img src="https://1664556276-files.gitbook.io/~/files/v0/b/gitbook-x-prod.appspot.com/o/spaces%2FT9giP5rmW2oFnVxj0Rgo%2Fuploads%2Fmx3y4aRGgSN7znmUPwBB%2FStep9.png?alt=media&amp;token=c441fe3f-bdf1-43a4-af9d-2bbb0ff5cfd5" alt=""><figcaption></figcaption></figure>

**Passo 9:** Preencha as palavras que faltam da sua frase secreta de recuperação correctamente e clique em '**Confirm**'.

<figure><img src="https://1664556276-files.gitbook.io/~/files/v0/b/gitbook-x-prod.appspot.com/o/spaces%2FT9giP5rmW2oFnVxj0Rgo%2Fuploads%2FuUuBfqRzwIdLYW9E2EfF%2FStep10.png?alt=media&amp;token=b2ebe519-4194-4104-a333-d36b7f01f087" alt=""><figcaption></figcaption></figure>

**Passo 10:** Clique em '**Done**'.

<figure><img src="https://1664556276-files.gitbook.io/~/files/v0/b/gitbook-x-prod.appspot.com/o/spaces%2FT9giP5rmW2oFnVxj0Rgo%2Fuploads%2Fna6Fia50iYW58VlbfqX8%2FStep11.png?alt=media&amp;token=8ad32c5b-c1cc-4c53-876e-9e15312555d0" alt=""><figcaption></figcaption></figure>

**Passo 11:** Clique em '**Got it**'.

<figure><img src="https://1664556276-files.gitbook.io/~/files/v0/b/gitbook-x-prod.appspot.com/o/spaces%2FT9giP5rmW2oFnVxj0Rgo%2Fuploads%2FgWHCU7dyLczX2k6D55CC%2FStep12.png?alt=media&amp;token=bf5592c4-f57e-4a59-a863-873ef4746ae3" alt=""><figcaption></figcaption></figure>

**Passo 12 (recomendado):** Vá para o ícone da extensão no canto superior direito do Google Chrome, clique nele e clique no alfinete ao lado do Casper Wallet. Desta forma, terá sempre fácil acesso à extensão do Casper Wallet.

## **Parte 2 –Conecte a Carteira Casper com o Explorador de Blockchain CSPR.Live**

<figure><img src="https://1664556276-files.gitbook.io/~/files/v0/b/gitbook-x-prod.appspot.com/o/spaces%2FT9giP5rmW2oFnVxj0Rgo%2Fuploads%2F2xEXYAJknes5fvp8SZgQ%2FStep13.png?alt=media&amp;token=d648e766-3321-489b-b30e-e4a748525c6e" alt=""><figcaption></figcaption></figure>

**Passo 1:** Aceda o site CSPR.live e clique em '**Sign in**' no canto superior direito da tela.

<figure><img src="https://1664556276-files.gitbook.io/~/files/v0/b/gitbook-x-prod.appspot.com/o/spaces%2FT9giP5rmW2oFnVxj0Rgo%2Fuploads%2FT7Q7HQp3owAyZMjUeX92%2FStep14.png?alt=media&amp;token=fe8b29fb-7436-4532-af98-9d405d34f3aa" alt=""><figcaption></figcaption></figure>

**Passo 2:** Clique em '**Casper Wallet**'.

<figure><img src="https://1664556276-files.gitbook.io/~/files/v0/b/gitbook-x-prod.appspot.com/o/spaces%2FT9giP5rmW2oFnVxj0Rgo%2Fuploads%2F4T0I8Vg7UP7ps3YyNFMU%2FStep15.png?alt=media&amp;token=228e13a2-4c2f-43fd-bd85-6a82f8b8fba7" alt=""><figcaption></figcaption></figure>

**Passo 3:** Marque a caixa de seleção ao lado da conta que deseja conectar e clique em '**Next**'.

<figure><img src="https://1664556276-files.gitbook.io/~/files/v0/b/gitbook-x-prod.appspot.com/o/spaces%2FT9giP5rmW2oFnVxj0Rgo%2Fuploads%2FjHe3fohRph3MB4GqyEBl%2FStep16.png?alt=media&amp;token=ee610d4c-cfad-435d-abc4-01069eff404c" alt=""><figcaption></figcaption></figure>

**Passo 4:** Clique em '**Connect to 1 account**'.

## **Parte 3 – Receber $CSPR Na Chave Pública Criada na Sua Casper Wallet**

<figure><img src="https://1664556276-files.gitbook.io/~/files/v0/b/gitbook-x-prod.appspot.com/o/spaces%2FT9giP5rmW2oFnVxj0Rgo%2Fuploads%2FXsXYgmzXsSDqGefNyMpR%2FStep17.png?alt=media&amp;token=dbfdcb7c-3f45-47fb-b087-c1c49e0cdaf3" alt=""><figcaption></figcaption></figure>

**Passo 1:** Passe o cursor sobre sua chave pública no canto superior direito e selecione '**View Account**'.

<figure><img src="https://1664556276-files.gitbook.io/~/files/v0/b/gitbook-x-prod.appspot.com/o/spaces%2FT9giP5rmW2oFnVxj0Rgo%2Fuploads%2FGQQGjlW41obrRGa524FH%2FStep18.png?alt=media&amp;token=ceefd138-0f14-4251-9c5f-474682a1d5e8" alt=""><figcaption></figcaption></figure>

**Passo 2:** A sua Chave Pública (endereço da carteira) está no topo. Este é o endereço que usa para enviar $CSPR.

## **Parte 4a – Transferir $CSPR Usando a Casper Wallet Juntamente com CSPR.Live**

<figure><img src="https://1664556276-files.gitbook.io/~/files/v0/b/gitbook-x-prod.appspot.com/o/spaces%2FT9giP5rmW2oFnVxj0Rgo%2Fuploads%2FIyUCqm8TidKgF8fL8qnJ%2FStep19.png?alt=media&amp;token=0fdf8e76-fb05-41da-86e3-631ecc8bb9a7" alt=""><figcaption></figcaption></figure>

**Passo 1:** Passe o cursor sobre '**Carteira**' no canto superior direito e selecione **\`Transfer CSPR´**.

<figure><img src="https://1664556276-files.gitbook.io/~/files/v0/b/gitbook-x-prod.appspot.com/o/spaces%2FT9giP5rmW2oFnVxj0Rgo%2Fuploads%2FT6rw3kzpY4LQsoIiyFZG%2FStep20.png?alt=media&amp;token=8d6c82a5-0e29-4a17-86a9-bfb8972b962f" alt=""><figcaption></figcaption></figure>

**Passo 2:** Preencha a chave pública para onde deseja enviar o seu $CSPR em '**Destinatário**', o valor de $CSPR que deseja enviar em '**Amount**' e preencha um ID de Transferência específico se desejar/precisar em '**Transfer ID (Memo)**'. Isso às vezes é necessário se enviar $CSPR para uma exchange. Se não for necessário, você pode usar '**0**'. Depois disso, clique em '**Next**'.

<figure><img src="https://1664556276-files.gitbook.io/~/files/v0/b/gitbook-x-prod.appspot.com/o/spaces%2FT9giP5rmW2oFnVxj0Rgo%2Fuploads%2FGgM0V7vvhyzKu7LnyUpi%2FStep21.png?alt=media&amp;token=286afdd3-0322-40cc-862b-d41036199958" alt=""><figcaption></figcaption></figure>

**Passo 3:** Verifique se as informações estão correctas e clique em '**Confirm and transfer**'.

<figure><img src="https://1664556276-files.gitbook.io/~/files/v0/b/gitbook-x-prod.appspot.com/o/spaces%2FT9giP5rmW2oFnVxj0Rgo%2Fuploads%2Fd13xt6RyvbpzcRTWaS3j%2FStep22-1.png?alt=media&amp;token=bc783508-02e2-4567-a9fa-f89b3b1698e4" alt=""><figcaption></figcaption></figure>

**Passo 4:** Agora mostrará todas as informações sobre sua transacção, e pode clicar em  '**Sign with Casper Wallet**'.

<figure><img src="https://1664556276-files.gitbook.io/~/files/v0/b/gitbook-x-prod.appspot.com/o/spaces%2FT9giP5rmW2oFnVxj0Rgo%2Fuploads%2FaQhIocdwmCojgZBTl4nE%2FStep22.png?alt=media&amp;token=fee2e2da-5fa8-49fb-aaa6-1694e9dd0f77" alt=""><figcaption></figcaption></figure>

**Passo 5:** Clique em '**Sign**' no prompt da extensão Casper Wallet.

<figure><img src="https://1664556276-files.gitbook.io/~/files/v0/b/gitbook-x-prod.appspot.com/o/spaces%2FT9giP5rmW2oFnVxj0Rgo%2Fuploads%2FwISqhuery9l1lLR4SFE7%2FStep23.png?alt=media&amp;token=87284e8c-e65b-44a5-a2e5-f27aec128b2a" alt=""><figcaption></figcaption></figure>

**Passo 6:** Você verá os detalhes da transferência bem sucedida.

## **Parte 4b – Transferir $CSPR Utilizando Casper Wallet**

<figure><img src="https://1664556276-files.gitbook.io/~/files/v0/b/gitbook-x-prod.appspot.com/o/spaces%2FT9giP5rmW2oFnVxj0Rgo%2Fuploads%2F8wR8T0tTJ4oA9X1ntmdR%2FSend1.png?alt=media&amp;token=12e0c0ec-177d-4dc0-8340-463bfaad8834" alt=""><figcaption></figcaption></figure>

**Passo 1:** Clique em '**Send**' na extensão Casper Wallet.

<figure><img src="https://1664556276-files.gitbook.io/~/files/v0/b/gitbook-x-prod.appspot.com/o/spaces%2FT9giP5rmW2oFnVxj0Rgo%2Fuploads%2Fnwp5HiN8GVc6lU4MKjW8%2FSend2.png?alt=media&amp;token=6233664b-2138-4fe0-9e02-dc36a055aa2e" alt=""><figcaption></figcaption></figure>

**Passo 2:** Preencha a chave pública para onde deseja enviar seus $CSPR no campo '**To** **recipient**' e clique em '**Next**'.&#x20;

<figure><img src="https://1664556276-files.gitbook.io/~/files/v0/b/gitbook-x-prod.appspot.com/o/spaces%2FT9giP5rmW2oFnVxj0Rgo%2Fuploads%2FnJqZHEXltNaXO0Ctp11f%2FSend3.png?alt=media&amp;token=4e14e0f2-2397-4e31-aecb-529d8a00005f" alt=""><figcaption></figcaption></figure>

**Passo 3:** Preencha a quantidade de $CSPR que deseja enviar em '**Amount**' e preencha um ID de Transferência específico, se desejar/necessário, em '**Transfer ID (memo)**'. Isto às vezes é necessário se enviar $CSPR para uma exchange. Se não for necessário, pode usar '**0**'. Após isso, clique em '**Next**'.

<figure><img src="https://1664556276-files.gitbook.io/~/files/v0/b/gitbook-x-prod.appspot.com/o/spaces%2FT9giP5rmW2oFnVxj0Rgo%2Fuploads%2FphJnyngMKQQzZPrdiJv7%2FSend4.png?alt=media&amp;token=cbdd4a7d-23df-440b-8855-31cad0150d48" alt=""><figcaption></figcaption></figure>

**Passo 4:** Clique em '**Send**'.

<figure><img src="https://1664556276-files.gitbook.io/~/files/v0/b/gitbook-x-prod.appspot.com/o/spaces%2FT9giP5rmW2oFnVxj0Rgo%2Fuploads%2FjlEK2cyrsKaq3E9Oxdnz%2FSend5.png?alt=media&amp;token=9e025b76-5848-4d40-bb74-069f232e05bc" alt=""><figcaption></figcaption></figure>

**Passo 5:** Enviou a transacção de transferência com sucesso. Clique em '**Done**'.

## **Parte 5a – Delegar $CSPR utilizando Casper Wallet e CSPR.Live**

<figure><img src="https://1664556276-files.gitbook.io/~/files/v0/b/gitbook-x-prod.appspot.com/o/spaces%2FT9giP5rmW2oFnVxj0Rgo%2Fuploads%2F3ciER1Gt1uQd35uEoQbn%2FStep24.png?alt=media&amp;token=1cd5b483-c963-446c-a59e-10ae534e834a" alt=""><figcaption></figcaption></figure>

**Passo 1:** Passe o cursor sobre '**Wallet**'no canto superior direito e selecione '**Delegate Stake**'.

<figure><img src="https://1664556276-files.gitbook.io/~/files/v0/b/gitbook-x-prod.appspot.com/o/spaces%2FT9giP5rmW2oFnVxj0Rgo%2Fuploads%2F469EM6AC9LYwUp17OJKn%2FStep25.png?alt=media&amp;token=6ffd6615-bbb3-4249-8477-25737dfd9f1c" alt=""><figcaption></figcaption></figure>

**Passo 2:** Escolha um validador em '**Validator**' (**Por exemplo, Speedy Staking**) e a quantidade de $CSPR que deseja delegar em '**Amount**'. Depois disso, clique em '**Next**'.

<figure><img src="https://1664556276-files.gitbook.io/~/files/v0/b/gitbook-x-prod.appspot.com/o/spaces%2FT9giP5rmW2oFnVxj0Rgo%2Fuploads%2FVRXAWjbaCpMKBPNfueCF%2FStep26.png?alt=media&amp;token=197b1cfd-9de2-4a13-b800-ffe52d17d58c" alt=""><figcaption></figcaption></figure>

**Passo 3:** Verifique se as informações estão corretas e clique em '**Confirm and delegate stake**'.

<figure><img src="https://1664556276-files.gitbook.io/~/files/v0/b/gitbook-x-prod.appspot.com/o/spaces%2FT9giP5rmW2oFnVxj0Rgo%2Fuploads%2FbTIwNVErM39SoQOxK1p5%2FStep27.png?alt=media&amp;token=2ebfd3ef-2d08-483f-9fbf-063df0097e1a" alt=""><figcaption></figcaption></figure>

**Passo 4:** Agora, mostrará todas as informações sobre sua transacção, e pode clicar  '**Sign with Casper Wallet**'.

<figure><img src="https://1664556276-files.gitbook.io/~/files/v0/b/gitbook-x-prod.appspot.com/o/spaces%2FT9giP5rmW2oFnVxj0Rgo%2Fuploads%2Fr1CSpSMXlpyYE1jSarYK%2FStep28.png?alt=media&amp;token=733360cb-3639-4da9-a28e-f6e7e919ad66" alt=""><figcaption></figcaption></figure>

**Passo 5:** Clique em '**Sign**'.

<figure><img src="https://1664556276-files.gitbook.io/~/files/v0/b/gitbook-x-prod.appspot.com/o/spaces%2FT9giP5rmW2oFnVxj0Rgo%2Fuploads%2F8IbGLo7mmiD0moEPOuft%2FStep29.png?alt=media&amp;token=b5f3503f-b745-440d-8916-42d086ca7edf" alt=""><figcaption></figcaption></figure>

**Passo 6:** Verá os detalhes da delegação bem-sucedida. Você irá começar a receber Recompensas de Staking após \~4 horas. Depois, receberá Recompensas de Staking a cada ERA (\~2 horas).

## **Parte 5b – Delegar $CSPR utilizando Casper Wallet**

<figure><img src="https://1664556276-files.gitbook.io/~/files/v0/b/gitbook-x-prod.appspot.com/o/spaces%2FT9giP5rmW2oFnVxj0Rgo%2Fuploads%2FEXypKvbP20cHaiGigvsv%2FStep30.png?alt=media&amp;token=69ae5d1b-5d24-4aa4-9f7f-24fdda1a755d" alt=""><figcaption></figcaption></figure>

**Passo 1:** Clique em '**More**' na extensão Casper Wallet.

<figure><img src="https://1664556276-files.gitbook.io/~/files/v0/b/gitbook-x-prod.appspot.com/o/spaces%2FT9giP5rmW2oFnVxj0Rgo%2Fuploads%2FCfwud2SR0M2Sxcc6kZBh%2FStep31.png?alt=media&amp;token=417e43ef-7d77-4589-a719-f9944bd8f95e" alt=""><figcaption></figcaption></figure>

**Passo 2:** Clique em '**Delegate**'.

<figure><img src="https://1664556276-files.gitbook.io/~/files/v0/b/gitbook-x-prod.appspot.com/o/spaces%2FT9giP5rmW2oFnVxj0Rgo%2Fuploads%2FcXV34LovBzSi9UjPiUeD%2FStep32.png?alt=media&amp;token=c959a125-ff83-46d1-a0ff-24432824d1f5" alt=""><figcaption></figcaption></figure>

**Passo 3:** Seleccione um validador em '**To validator**'  (Por exemplo, Speedy Staking) e clique em '**Next**'.

<figure><img src="https://1664556276-files.gitbook.io/~/files/v0/b/gitbook-x-prod.appspot.com/o/spaces%2FT9giP5rmW2oFnVxj0Rgo%2Fuploads%2FJ2HP3ciAPxS6HyIidJmq%2FStep33.png?alt=media&amp;token=21ab236a-5732-4340-bebe-2723d34dd7f1" alt=""><figcaption></figcaption></figure>

**Passo 4:** Preencha o valor de $CSPR que deseja delegar em '**Amount**' e clique em '**Next**'.

<figure><img src="https://1664556276-files.gitbook.io/~/files/v0/b/gitbook-x-prod.appspot.com/o/spaces%2FT9giP5rmW2oFnVxj0Rgo%2Fuploads%2FMvb8iR72aHS6M7sdEm7N%2FStep34.png?alt=media&amp;token=c4a8bda4-30b4-46cd-9ea8-8f0405b1e3e5" alt=""><figcaption></figcaption></figure>

**Passo 5:** Clique em '**Confirm delegation**'.

<figure><img src="https://1664556276-files.gitbook.io/~/files/v0/b/gitbook-x-prod.appspot.com/o/spaces%2FT9giP5rmW2oFnVxj0Rgo%2Fuploads%2FvxIcYCb0h7ZLKOO5P2QS%2FStep35.png?alt=media&amp;token=8927ae14-9057-4d61-8a92-58ac46c5252b" alt=""><figcaption></figcaption></figure>

**Passo 6:** Enviou a transacção de delegação com sucesso. Clique em '**Done**'. Irá a receber Recompensas de Staking após \~4 horas. Irá receberá então Recompensas de Staking a cada ERA (\~2 horas).


# Casper Wallet - Instalação e Setup

<figure><img src="https://1664556276-files.gitbook.io/~/files/v0/b/gitbook-x-prod.appspot.com/o/spaces%2FT9giP5rmW2oFnVxj0Rgo%2Fuploads%2Ffjz2As4JvjO6mEJqVhVG%2FStep1.png?alt=media&amp;token=58799a90-b4e6-4422-9689-080204d2f53d" alt=""><figcaption></figcaption></figure>

**Passo 1:** Navegar no [website Casper Wallet](https://casperwallet.io) e clique em ´**Download´**.

<figure><img src="https://1664556276-files.gitbook.io/~/files/v0/b/gitbook-x-prod.appspot.com/o/spaces%2FT9giP5rmW2oFnVxj0Rgo%2Fuploads%2FzrOlcO3Hdaw5GaG7BCma%2FStep2.png?alt=media&amp;token=44ec6a79-1ab5-43c0-a6c9-53a2b861d0b1" alt=""><figcaption></figcaption></figure>

**Passo 2:** Este passo o levará para a Chrome Store (ou equivalente em outros navegadores); clique em '**Adicionar ao Chrome**' (ou equivalente em outros navegadores).

<figure><img src="https://1664556276-files.gitbook.io/~/files/v0/b/gitbook-x-prod.appspot.com/o/spaces%2FT9giP5rmW2oFnVxj0Rgo%2Fuploads%2F1fSfHXf3orphXWoBPAfk%2FStep3.png?alt=media&amp;token=9434013b-a670-4771-904f-9cb5a5c86c11" alt=""><figcaption></figcaption></figure>

**Passo 3:** Clique em **´Adicionar extensão´**

<figure><img src="https://1664556276-files.gitbook.io/~/files/v0/b/gitbook-x-prod.appspot.com/o/spaces%2FT9giP5rmW2oFnVxj0Rgo%2Fuploads%2F3GIM5CxkC8CiKffEP182%2FStep4.png?alt=media&amp;token=b49d84ef-2246-4c22-8234-d9dde5d06474" alt=""><figcaption></figcaption></figure>

**Step 4:** Após adicionar a extensão Casper Wallet, uma nova aba será aberta no seu navegador para a configuração; clique em '**Get started**'.

<figure><img src="https://1664556276-files.gitbook.io/~/files/v0/b/gitbook-x-prod.appspot.com/o/spaces%2FT9giP5rmW2oFnVxj0Rgo%2Fuploads%2F2gd2H0TvVG9d5SaDtJgX%2FStep5.png?alt=media&amp;token=423bfe57-837e-4e9d-bcc6-60b257edcb54" alt=""><figcaption></figcaption></figure>

**Passo 5:**  Pense numa senha segura, preencha-a duas vezes, marque a caixa de selecção e clique em '**Create password**'.

<figure><img src="https://1664556276-files.gitbook.io/~/files/v0/b/gitbook-x-prod.appspot.com/o/spaces%2FT9giP5rmW2oFnVxj0Rgo%2Fuploads%2FFs7fNpq2XKw4J0aEZQai%2FStep6.png?alt=media&amp;token=6e7ee434-0be4-41ed-8484-016d611a2943" alt=""><figcaption></figcaption></figure>

**Passo 6:** Clique em  '**Create my secret recovery phrase**'.

<figure><img src="https://1664556276-files.gitbook.io/~/files/v0/b/gitbook-x-prod.appspot.com/o/spaces%2FT9giP5rmW2oFnVxj0Rgo%2Fuploads%2FdNN8jfz4iHX6f8tNBn8e%2FStep7.png?alt=media&amp;token=5c9e0950-a973-4eab-9a61-a7b56630fe26" alt=""><figcaption></figcaption></figure>

**Passo 7:** Marque a caixa de selecção e clique em '**Next**'.

<figure><img src="https://1664556276-files.gitbook.io/~/files/v0/b/gitbook-x-prod.appspot.com/o/spaces%2FT9giP5rmW2oFnVxj0Rgo%2Fuploads%2F3vKE1apYAGKt34hBvDe9%2FStep8.png?alt=media&amp;token=0fac7e96-088e-45ac-ba45-02737502a877" alt=""><figcaption></figcaption></figure>

**Passo 8:** Grave a sua frase secreta de recuperação num lugar seguro, marque a caixa de selecção e clique em '**Next**'.

<figure><img src="https://1664556276-files.gitbook.io/~/files/v0/b/gitbook-x-prod.appspot.com/o/spaces%2FT9giP5rmW2oFnVxj0Rgo%2Fuploads%2Fmx3y4aRGgSN7znmUPwBB%2FStep9.png?alt=media&amp;token=c441fe3f-bdf1-43a4-af9d-2bbb0ff5cfd5" alt=""><figcaption></figcaption></figure>

**Passo 9:** Preencha as palavras que faltam da sua frase secreta de recuperação correctamente e clique em '**Confirm**'.

<figure><img src="https://1664556276-files.gitbook.io/~/files/v0/b/gitbook-x-prod.appspot.com/o/spaces%2FT9giP5rmW2oFnVxj0Rgo%2Fuploads%2FuUuBfqRzwIdLYW9E2EfF%2FStep10.png?alt=media&amp;token=b2ebe519-4194-4104-a333-d36b7f01f087" alt=""><figcaption></figcaption></figure>

**Passo 10:** Clique em '**Done**'.

<figure><img src="https://1664556276-files.gitbook.io/~/files/v0/b/gitbook-x-prod.appspot.com/o/spaces%2FT9giP5rmW2oFnVxj0Rgo%2Fuploads%2Fna6Fia50iYW58VlbfqX8%2FStep11.png?alt=media&amp;token=8ad32c5b-c1cc-4c53-876e-9e15312555d0" alt=""><figcaption></figcaption></figure>

**Passo 11:** Clique em '**Got it**'.

<figure><img src="https://1664556276-files.gitbook.io/~/files/v0/b/gitbook-x-prod.appspot.com/o/spaces%2FT9giP5rmW2oFnVxj0Rgo%2Fuploads%2FgWHCU7dyLczX2k6D55CC%2FStep12.png?alt=media&amp;token=bf5592c4-f57e-4a59-a863-873ef4746ae3" alt=""><figcaption></figcaption></figure>

**Passo 12 (recomendado):** Vá para o ícone da extensão no canto superior direito do Google Chrome, clique nele e clique no alfinete ao lado do Casper Wallet. Desta forma, terá sempre fácil acesso à extensão do Casper Wallet.


# Casper Wallet - Conectar Casper Wallet com CSPR.live

<figure><img src="https://1664556276-files.gitbook.io/~/files/v0/b/gitbook-x-prod.appspot.com/o/spaces%2FT9giP5rmW2oFnVxj0Rgo%2Fuploads%2F2xEXYAJknes5fvp8SZgQ%2FStep13.png?alt=media&amp;token=d648e766-3321-489b-b30e-e4a748525c6e" alt=""><figcaption></figcaption></figure>

**Passo 1:** Aceda o site CSPR.live e clique em '**Sign in**' no canto superior direito da tela.

<figure><img src="https://1664556276-files.gitbook.io/~/files/v0/b/gitbook-x-prod.appspot.com/o/spaces%2FT9giP5rmW2oFnVxj0Rgo%2Fuploads%2FT7Q7HQp3owAyZMjUeX92%2FStep14.png?alt=media&amp;token=fe8b29fb-7436-4532-af98-9d405d34f3aa" alt=""><figcaption></figcaption></figure>

**Passo 2:** Clique em '**Casper Wallet**'.

<figure><img src="https://1664556276-files.gitbook.io/~/files/v0/b/gitbook-x-prod.appspot.com/o/spaces%2FT9giP5rmW2oFnVxj0Rgo%2Fuploads%2F4T0I8Vg7UP7ps3YyNFMU%2FStep15.png?alt=media&amp;token=228e13a2-4c2f-43fd-bd85-6a82f8b8fba7" alt=""><figcaption></figcaption></figure>

**Passo 3:** Marque a caixa de seleção ao lado da conta que deseja conectar e clique em '**Next**'.

<figure><img src="https://1664556276-files.gitbook.io/~/files/v0/b/gitbook-x-prod.appspot.com/o/spaces%2FT9giP5rmW2oFnVxj0Rgo%2Fuploads%2FjHe3fohRph3MB4GqyEBl%2FStep16.png?alt=media&amp;token=ee610d4c-cfad-435d-abc4-01069eff404c" alt=""><figcaption></figcaption></figure>

**Passo 4:** Clique em '**Connect to 1 account**'.


# Casper Wallet - Receber $CSPR

<figure><img src="https://1664556276-files.gitbook.io/~/files/v0/b/gitbook-x-prod.appspot.com/o/spaces%2FT9giP5rmW2oFnVxj0Rgo%2Fuploads%2FXsXYgmzXsSDqGefNyMpR%2FStep17.png?alt=media&amp;token=dbfdcb7c-3f45-47fb-b087-c1c49e0cdaf3" alt=""><figcaption></figcaption></figure>

**Passo 1:** Passe o cursor sobre sua chave pública no canto superior direito e selecione '**View Account**'.

<figure><img src="https://1664556276-files.gitbook.io/~/files/v0/b/gitbook-x-prod.appspot.com/o/spaces%2FT9giP5rmW2oFnVxj0Rgo%2Fuploads%2FGQQGjlW41obrRGa524FH%2FStep18.png?alt=media&amp;token=ceefd138-0f14-4251-9c5f-474682a1d5e8" alt=""><figcaption></figcaption></figure>

**Passo 2:** A sua Chave Pública (endereço da carteira) está no topo. Este é o endereço que usa para enviar $CSPR.


# Casper Wallet - Transferir $CSPR (CSPR.live)

<figure><img src="https://1664556276-files.gitbook.io/~/files/v0/b/gitbook-x-prod.appspot.com/o/spaces%2FT9giP5rmW2oFnVxj0Rgo%2Fuploads%2FIyUCqm8TidKgF8fL8qnJ%2FStep19.png?alt=media&amp;token=0fdf8e76-fb05-41da-86e3-631ecc8bb9a7" alt=""><figcaption></figcaption></figure>

**Passo 1:** Passe o cursor sobre '**Carteira**' no canto superior direito e selecione **\`Transfer CSPR´**.

<figure><img src="https://1664556276-files.gitbook.io/~/files/v0/b/gitbook-x-prod.appspot.com/o/spaces%2FT9giP5rmW2oFnVxj0Rgo%2Fuploads%2FT6rw3kzpY4LQsoIiyFZG%2FStep20.png?alt=media&amp;token=8d6c82a5-0e29-4a17-86a9-bfb8972b962f" alt=""><figcaption></figcaption></figure>

**Passo 2:** Preencha a chave pública para onde deseja enviar o seu $CSPR em '**Destinatário**', o valor de $CSPR que deseja enviar em '**Amount**' e preencha um ID de Transferência específico se desejar/precisar em '**Transfer ID (Memo)**'. Isso às vezes é necessário se enviar $CSPR para uma exchange. Se não for necessário, você pode usar '**0**'. Depois disso, clique em '**Next**'.

<figure><img src="https://1664556276-files.gitbook.io/~/files/v0/b/gitbook-x-prod.appspot.com/o/spaces%2FT9giP5rmW2oFnVxj0Rgo%2Fuploads%2FGgM0V7vvhyzKu7LnyUpi%2FStep21.png?alt=media&amp;token=286afdd3-0322-40cc-862b-d41036199958" alt=""><figcaption></figcaption></figure>

**Passo 3:** Verifique se as informações estão correctas e clique em '**Confirm and transfer**'.

<figure><img src="https://1664556276-files.gitbook.io/~/files/v0/b/gitbook-x-prod.appspot.com/o/spaces%2FT9giP5rmW2oFnVxj0Rgo%2Fuploads%2Fd13xt6RyvbpzcRTWaS3j%2FStep22-1.png?alt=media&amp;token=bc783508-02e2-4567-a9fa-f89b3b1698e4" alt=""><figcaption></figcaption></figure>

**Passo 4:** Agora mostrará todas as informações sobre sua transacção, e pode clicar em  '**Sign with Casper Wallet**'.

<figure><img src="https://1664556276-files.gitbook.io/~/files/v0/b/gitbook-x-prod.appspot.com/o/spaces%2FT9giP5rmW2oFnVxj0Rgo%2Fuploads%2FaQhIocdwmCojgZBTl4nE%2FStep22.png?alt=media&amp;token=fee2e2da-5fa8-49fb-aaa6-1694e9dd0f77" alt=""><figcaption></figcaption></figure>

**Passo 5:** Clique em '**Sign**' no prompt da extensão Casper Wallet.

<figure><img src="https://1664556276-files.gitbook.io/~/files/v0/b/gitbook-x-prod.appspot.com/o/spaces%2FT9giP5rmW2oFnVxj0Rgo%2Fuploads%2FwISqhuery9l1lLR4SFE7%2FStep23.png?alt=media&amp;token=87284e8c-e65b-44a5-a2e5-f27aec128b2a" alt=""><figcaption></figcaption></figure>

**Passo 6:** Você verá os detalhes da transferência bem sucedida.


# Casper Wallet - Transferir $CSPR (In-App)

<figure><img src="https://1664556276-files.gitbook.io/~/files/v0/b/gitbook-x-prod.appspot.com/o/spaces%2FT9giP5rmW2oFnVxj0Rgo%2Fuploads%2F8wR8T0tTJ4oA9X1ntmdR%2FSend1.png?alt=media&amp;token=12e0c0ec-177d-4dc0-8340-463bfaad8834" alt=""><figcaption></figcaption></figure>

**Passo 1:** Clique em '**Send**' na extensão Casper Wallet.

<figure><img src="https://1664556276-files.gitbook.io/~/files/v0/b/gitbook-x-prod.appspot.com/o/spaces%2FT9giP5rmW2oFnVxj0Rgo%2Fuploads%2Fnwp5HiN8GVc6lU4MKjW8%2FSend2.png?alt=media&amp;token=6233664b-2138-4fe0-9e02-dc36a055aa2e" alt=""><figcaption></figcaption></figure>

**Passo 2:** Preencha a chave pública para onde deseja enviar seus $CSPR no campo '**To** **recipient**' e clique em '**Next**'.&#x20;

<figure><img src="https://1664556276-files.gitbook.io/~/files/v0/b/gitbook-x-prod.appspot.com/o/spaces%2FT9giP5rmW2oFnVxj0Rgo%2Fuploads%2FnJqZHEXltNaXO0Ctp11f%2FSend3.png?alt=media&amp;token=4e14e0f2-2397-4e31-aecb-529d8a00005f" alt=""><figcaption></figcaption></figure>

**Passo 3:** Preencha a quantidade de $CSPR que deseja enviar em '**Amount**' e preencha um ID de Transferência específico, se desejar/necessário, em '**Transfer ID (memo)**'. Isto às vezes é necessário se enviar $CSPR para uma exchange. Se não for necessário, pode usar '**0**'. Após isso, clique em '**Next**'.

<figure><img src="https://1664556276-files.gitbook.io/~/files/v0/b/gitbook-x-prod.appspot.com/o/spaces%2FT9giP5rmW2oFnVxj0Rgo%2Fuploads%2FphJnyngMKQQzZPrdiJv7%2FSend4.png?alt=media&amp;token=cbdd4a7d-23df-440b-8855-31cad0150d48" alt=""><figcaption></figcaption></figure>

**Passo 4:** Clique em '**Send**'.

<figure><img src="https://1664556276-files.gitbook.io/~/files/v0/b/gitbook-x-prod.appspot.com/o/spaces%2FT9giP5rmW2oFnVxj0Rgo%2Fuploads%2FjlEK2cyrsKaq3E9Oxdnz%2FSend5.png?alt=media&amp;token=9e025b76-5848-4d40-bb74-069f232e05bc" alt=""><figcaption></figcaption></figure>

**Passo 5:** Enviou a transacção de transferência com sucesso. Clique em '**Done**'.


# Casper Wallet - Delegar (Stake) $CSPR (CSPR.live)

<figure><img src="https://1664556276-files.gitbook.io/~/files/v0/b/gitbook-x-prod.appspot.com/o/spaces%2FT9giP5rmW2oFnVxj0Rgo%2Fuploads%2F3ciER1Gt1uQd35uEoQbn%2FStep24.png?alt=media&amp;token=1cd5b483-c963-446c-a59e-10ae534e834a" alt=""><figcaption></figcaption></figure>

**Passo 1:** Passe o cursor sobre '**Wallet**'no canto superior direito e selecione '**Delegate Stake**'.

<figure><img src="https://1664556276-files.gitbook.io/~/files/v0/b/gitbook-x-prod.appspot.com/o/spaces%2FT9giP5rmW2oFnVxj0Rgo%2Fuploads%2F469EM6AC9LYwUp17OJKn%2FStep25.png?alt=media&amp;token=6ffd6615-bbb3-4249-8477-25737dfd9f1c" alt=""><figcaption></figcaption></figure>

**Passo 2:** Escolha um validador em '**Validator**' (**Por exemplo, Speedy Staking**) e a quantidade de $CSPR que deseja delegar em '**Amount**'. Depois disso, clique em '**Next**'.

<figure><img src="https://1664556276-files.gitbook.io/~/files/v0/b/gitbook-x-prod.appspot.com/o/spaces%2FT9giP5rmW2oFnVxj0Rgo%2Fuploads%2FVRXAWjbaCpMKBPNfueCF%2FStep26.png?alt=media&amp;token=197b1cfd-9de2-4a13-b800-ffe52d17d58c" alt=""><figcaption></figcaption></figure>

**Passo 3:** Verifique se as informações estão corretas e clique em '**Confirm and delegate stake**'.

<figure><img src="https://1664556276-files.gitbook.io/~/files/v0/b/gitbook-x-prod.appspot.com/o/spaces%2FT9giP5rmW2oFnVxj0Rgo%2Fuploads%2FbTIwNVErM39SoQOxK1p5%2FStep27.png?alt=media&amp;token=2ebfd3ef-2d08-483f-9fbf-063df0097e1a" alt=""><figcaption></figcaption></figure>

**Passo 4:** Agora, mostrará todas as informações sobre sua transacção, e pode clicar  '**Sign with Casper Wallet**'.

<figure><img src="https://1664556276-files.gitbook.io/~/files/v0/b/gitbook-x-prod.appspot.com/o/spaces%2FT9giP5rmW2oFnVxj0Rgo%2Fuploads%2Fr1CSpSMXlpyYE1jSarYK%2FStep28.png?alt=media&amp;token=733360cb-3639-4da9-a28e-f6e7e919ad66" alt=""><figcaption></figcaption></figure>

**Passo 5:** Clique em '**Sign**'.

<figure><img src="https://1664556276-files.gitbook.io/~/files/v0/b/gitbook-x-prod.appspot.com/o/spaces%2FT9giP5rmW2oFnVxj0Rgo%2Fuploads%2F8IbGLo7mmiD0moEPOuft%2FStep29.png?alt=media&amp;token=b5f3503f-b745-440d-8916-42d086ca7edf" alt=""><figcaption></figcaption></figure>

**Passo 6:** Verá os detalhes da delegação bem-sucedida. Você irá começar a receber Recompensas de Staking após \~4 horas. Depois, receberá Recompensas de Staking a cada ERA (\~2 horas).


# Casper Wallet - Delegar (Stake) $CSPR (In-App)

<figure><img src="https://1664556276-files.gitbook.io/~/files/v0/b/gitbook-x-prod.appspot.com/o/spaces%2FT9giP5rmW2oFnVxj0Rgo%2Fuploads%2FEXypKvbP20cHaiGigvsv%2FStep30.png?alt=media&amp;token=69ae5d1b-5d24-4aa4-9f7f-24fdda1a755d" alt=""><figcaption></figcaption></figure>

**Passo 1:** Clique em '**More**' na extensão Casper Wallet.

<figure><img src="https://1664556276-files.gitbook.io/~/files/v0/b/gitbook-x-prod.appspot.com/o/spaces%2FT9giP5rmW2oFnVxj0Rgo%2Fuploads%2FCfwud2SR0M2Sxcc6kZBh%2FStep31.png?alt=media&amp;token=417e43ef-7d77-4589-a719-f9944bd8f95e" alt=""><figcaption></figcaption></figure>

**Passo 2:** Clique em '**Delegate**'.

<figure><img src="https://1664556276-files.gitbook.io/~/files/v0/b/gitbook-x-prod.appspot.com/o/spaces%2FT9giP5rmW2oFnVxj0Rgo%2Fuploads%2FcXV34LovBzSi9UjPiUeD%2FStep32.png?alt=media&amp;token=c959a125-ff83-46d1-a0ff-24432824d1f5" alt=""><figcaption></figcaption></figure>

**Passo 3:** Seleccione um validador em '**To validator**'  (Por exemplo, Speedy Staking) e clique em '**Next**'.

<figure><img src="https://1664556276-files.gitbook.io/~/files/v0/b/gitbook-x-prod.appspot.com/o/spaces%2FT9giP5rmW2oFnVxj0Rgo%2Fuploads%2FJ2HP3ciAPxS6HyIidJmq%2FStep33.png?alt=media&amp;token=21ab236a-5732-4340-bebe-2723d34dd7f1" alt=""><figcaption></figcaption></figure>

**Passo 4:** Preencha o valor de $CSPR que deseja delegar em '**Amount**' e clique em '**Next**'.

<figure><img src="https://1664556276-files.gitbook.io/~/files/v0/b/gitbook-x-prod.appspot.com/o/spaces%2FT9giP5rmW2oFnVxj0Rgo%2Fuploads%2FMvb8iR72aHS6M7sdEm7N%2FStep34.png?alt=media&amp;token=c4a8bda4-30b4-46cd-9ea8-8f0405b1e3e5" alt=""><figcaption></figcaption></figure>

**Passo 5:** Clique em '**Confirm delegation**'.

<figure><img src="https://1664556276-files.gitbook.io/~/files/v0/b/gitbook-x-prod.appspot.com/o/spaces%2FT9giP5rmW2oFnVxj0Rgo%2Fuploads%2FvxIcYCb0h7ZLKOO5P2QS%2FStep35.png?alt=media&amp;token=8927ae14-9057-4d61-8a92-58ac46c5252b" alt=""><figcaption></figcaption></figure>

**Passo 6:** Enviou a transacção de delegação com sucesso. Clique em '**Done**'. Irá a receber Recompensas de Staking após \~4 horas. Irá receberá então Recompensas de Staking a cada ERA (\~2 horas).


# MetaMask

<figure><img src="https://content.gitbook.com/content/T9giP5rmW2oFnVxj0Rgo/blobs/GucrJ9Q8WXK4lhBHtmNB/gitbook-mm.png" alt=""><figcaption></figcaption></figure>

* [Official Website](https://metamask.io/)
* [Download Casper Snap](https://snaps.metamask.io/snap/npm/casper-manager/)
* [Twitter](https://twitter.com/MetaMask)


# MetaMask - Guia Completo

## **Parte 1 – Configurar a MetaMask para o Uso com Casper**

**Passo 1:** Instale e configure uma carteira MetaMask se ainda não o fez: [**CLICK HERE**](https://metamask.io/download/)

<figure><img src="https://1664556276-files.gitbook.io/~/files/v0/b/gitbook-x-prod.appspot.com/o/spaces%2FT9giP5rmW2oFnVxj0Rgo%2Fuploads%2FHP1BPZR7MRqqOaCtF0mI%2FStep1.png?alt=media&amp;token=c50ceccd-18a2-4340-95f7-9e33bd9cb1b9" alt=""><figcaption></figcaption></figure>

**Passo 2:** Instale o Casper MetaMask Snap clicando em '**Add to MetaMask**': [**CLICK HERE**](https://snaps.metamask.io/snap/npm/casper-manager/)

<figure><img src="https://1664556276-files.gitbook.io/~/files/v0/b/gitbook-x-prod.appspot.com/o/spaces%2FT9giP5rmW2oFnVxj0Rgo%2Fuploads%2FfTmrFabpU2l1VkPL9usg%2FStep2.png?alt=media&amp;token=9ee74fa2-48d2-4753-b20f-127bc0675e0c" alt=""><figcaption></figcaption></figure>

**Passo 3:** Clique em '**Accept**' no prompt do MetaMask extension.

<figure><img src="https://1664556276-files.gitbook.io/~/files/v0/b/gitbook-x-prod.appspot.com/o/spaces%2FT9giP5rmW2oFnVxj0Rgo%2Fuploads%2FSEXW0pk2qm60ehkdaRNl%2FStep3.png?alt=media&amp;token=2c783fd1-1f24-442b-b278-0eae2e82c38c" alt=""><figcaption></figcaption></figure>

**Passo 4:** Clique em '**Connect**' na extensão MetaMask.

<figure><img src="https://1664556276-files.gitbook.io/~/files/v0/b/gitbook-x-prod.appspot.com/o/spaces%2FT9giP5rmW2oFnVxj0Rgo%2Fuploads%2FGWgwxUFO9qRz7YRXYS75%2FStep4.png?alt=media&amp;token=a30f9ad1-7c0c-4256-94e2-34ec34087c2a" alt=""><figcaption></figcaption></figure>

**Passo 5:** Clique em '**Install**' na extensão MetaMask.

<figure><img src="https://1664556276-files.gitbook.io/~/files/v0/b/gitbook-x-prod.appspot.com/o/spaces%2FT9giP5rmW2oFnVxj0Rgo%2Fuploads%2FEzmNgSq4sYDTAnbanlBR%2FStep5.png?alt=media&amp;token=3d1017a0-4492-4a6a-82ac-b4c9d0866a7e" alt=""><figcaption></figcaption></figure>

**Passo 6:** Marque a caixa de seleção e clique'**Confirm**' na extensão MetaMask.

<figure><img src="https://1664556276-files.gitbook.io/~/files/v0/b/gitbook-x-prod.appspot.com/o/spaces%2FT9giP5rmW2oFnVxj0Rgo%2Fuploads%2FZu4OThaNQ2SZTwKwvgQe%2FStep6.png?alt=media&amp;token=dbe67e38-4b73-44e5-a4de-c65d96523f6e" alt=""><figcaption></figcaption></figure>

**Passo 7:** Clique em '**OK**' na extensão MetaMask após a conclusão da instalação.

## **Parte 2 – Conectar a MetaMask com o Explorador de Blockchain CSPR.Live**&#x20;

<figure><img src="https://1664556276-files.gitbook.io/~/files/v0/b/gitbook-x-prod.appspot.com/o/spaces%2FT9giP5rmW2oFnVxj0Rgo%2Fuploads%2FINbVxO8GP56u5o1tsbTI%2FStep7.png?alt=media&amp;token=375fc5f4-a6ba-44aa-8bbc-a513ff064929" alt=""><figcaption></figcaption></figure>

**Passo 1:** Vá para [CSPR.live](https://cspr.live/) e clique em'**Sign in**' no canto superior direito do ecrã.

<figure><img src="https://1664556276-files.gitbook.io/~/files/v0/b/gitbook-x-prod.appspot.com/o/spaces%2FT9giP5rmW2oFnVxj0Rgo%2Fuploads%2FVscn3vn2iYihFSnDfv9u%2FStep8.png?alt=media&amp;token=c843a26a-8df8-46c4-a23c-fa9d787b94b9" alt=""><figcaption></figcaption></figure>

**Passo 2:** Clique em '**Metamask**'.

<figure><img src="https://1664556276-files.gitbook.io/~/files/v0/b/gitbook-x-prod.appspot.com/o/spaces%2FT9giP5rmW2oFnVxj0Rgo%2Fuploads%2FHW2VZdHtZYnhYEIOOic8%2FStep9.png?alt=media&amp;token=6a34d946-633d-42e6-ae30-b2c6e52b3e9d" alt=""><figcaption></figcaption></figure>

**Passo 3:** Clique em '**Connect**' no prompt da extensão MetaMask.

<figure><img src="https://1664556276-files.gitbook.io/~/files/v0/b/gitbook-x-prod.appspot.com/o/spaces%2FT9giP5rmW2oFnVxj0Rgo%2Fuploads%2FXIuKkaVC7nd1F2DBdwIt%2FStep10.png?alt=media&amp;token=e137a4e4-42fd-45df-bc0a-f2d0f67ac5d6" alt=""><figcaption></figcaption></figure>

**Passo 4:** Selecione um dos endereços que visualiza no CSPR.live; pode escolher o primeiro para facilitar.

## **Parte 3 – Receber $CSPR Na Sua Chave Pública Criada na MetaMask**&#x20;

<figure><img src="https://1664556276-files.gitbook.io/~/files/v0/b/gitbook-x-prod.appspot.com/o/spaces%2FT9giP5rmW2oFnVxj0Rgo%2Fuploads%2FI0zUwuslw8nhhW5sucKy%2FStep11.png?alt=media&amp;token=1c90a76b-98f0-4359-ab80-2fdfb8e50716" alt=""><figcaption></figcaption></figure>

**Passo 1:** Passe o cursor sobre sua chave pública no canto superior direito e selecione '**View Account**'.

<figure><img src="https://1664556276-files.gitbook.io/~/files/v0/b/gitbook-x-prod.appspot.com/o/spaces%2FT9giP5rmW2oFnVxj0Rgo%2Fuploads%2FIgi8Eoa4ZU68SBLKOeUI%2FStep12.png?alt=media&amp;token=0c93e4d1-3a0a-41cc-ba2a-2dd9aa23470d" alt=""><figcaption></figcaption></figure>

**Passo 2:** Verá a sua Chave Pública (também chamada de endereço da carteira) no topo. Este é o endereço que irá usar para enviar $CSPR.

## **Parte 4 – Transferir $CSPR Utilizando a MetaMask e CSPR.Live**

<figure><img src="https://1664556276-files.gitbook.io/~/files/v0/b/gitbook-x-prod.appspot.com/o/spaces%2FT9giP5rmW2oFnVxj0Rgo%2Fuploads%2FcuGGZ7ywUvTlfhJ9pAGm%2FStep13.png?alt=media&amp;token=2c912a2d-c55d-46b5-9cf1-22f72e730f8a" alt=""><figcaption></figcaption></figure>

**Passo 1:** Passe o rato sobre '**Wallet**' no canto superior direito e selecione '**Transfer CSPR**'.

<figure><img src="https://1664556276-files.gitbook.io/~/files/v0/b/gitbook-x-prod.appspot.com/o/spaces%2FT9giP5rmW2oFnVxj0Rgo%2Fuploads%2FbCESiutXuE5aHPg2bfoe%2FStep14.png?alt=media&amp;token=8db22709-3ea4-4d82-b796-5e2970073536" alt=""><figcaption></figcaption></figure>

**Passo 2:** Preencha a chave pública do local para onde deseja enviar seu $CSPR em '**Recipient**', o valor de $CSPR que deseja enviar em  '**Amount**' e preencha um ID de Transferência específico se desejar/for necessário em '**Transfer ID (Memo)**'. Isso às vezes é necessário se enviar $CSPR para uma exchange. Se não for necessário, você pode usar '**0**'. Após isso, clique em '**Next**'.

<figure><img src="https://1664556276-files.gitbook.io/~/files/v0/b/gitbook-x-prod.appspot.com/o/spaces%2FT9giP5rmW2oFnVxj0Rgo%2Fuploads%2FaO4f2kiqMtt1PhkCy1kg%2FStep15.png?alt=media&amp;token=59a579dd-a337-4293-9a16-bf0b5cca0171" alt=""><figcaption></figcaption></figure>

**Passo 3:** Verifique se as informações estão corretas e clique '**Confirm and transfer**'.

<figure><img src="https://1664556276-files.gitbook.io/~/files/v0/b/gitbook-x-prod.appspot.com/o/spaces%2FT9giP5rmW2oFnVxj0Rgo%2Fuploads%2FMlR14w1HBcxHfL7OT6X8%2FStep16.png?alt=media&amp;token=e174e857-2337-42dc-8048-e08bb5b33de4" alt=""><figcaption></figcaption></figure>

**Passo 4:** Agora, todas as informações sobre sua transação serão exibidas, e pode clicar '**Sign with Metamask**'.

<figure><img src="https://1664556276-files.gitbook.io/~/files/v0/b/gitbook-x-prod.appspot.com/o/spaces%2FT9giP5rmW2oFnVxj0Rgo%2Fuploads%2FMlR14w1HBcxHfL7OT6X8%2FStep16.png?alt=media&amp;token=e174e857-2337-42dc-8048-e08bb5b33de4" alt=""><figcaption></figcaption></figure>

**Passo 5:** Deslize para baixo e clique '**Approve**' na mensagem de solicitação da extensão MetaMask.

<figure><img src="https://1664556276-files.gitbook.io/~/files/v0/b/gitbook-x-prod.appspot.com/o/spaces%2FT9giP5rmW2oFnVxj0Rgo%2Fuploads%2Fx6YPyRXx8Kt2ayrCPFJl%2FStep17.png?alt=media&amp;token=721d067d-d21d-4396-9b08-ece89b15f32b" alt=""><figcaption></figcaption></figure>

**Passo 6:** Você verá os detalhes da transferência bem sucedida.

## **Parte 5 – Delegar $CSPR Utilizando MetaMask e CSPR.Live**

<figure><img src="https://1664556276-files.gitbook.io/~/files/v0/b/gitbook-x-prod.appspot.com/o/spaces%2FT9giP5rmW2oFnVxj0Rgo%2Fuploads%2FEHLIxJvECA9wDWZYueef%2FStep19.png?alt=media&amp;token=209b56c3-de2f-4314-9e4c-98a464fa3ece" alt=""><figcaption></figcaption></figure>

**Passo 1:** Passe o rato sobre '**Wallet**' No canto superior direito, selecione '**Delegate Stake**'.

<figure><img src="https://1664556276-files.gitbook.io/~/files/v0/b/gitbook-x-prod.appspot.com/o/spaces%2FT9giP5rmW2oFnVxj0Rgo%2Fuploads%2Fw0ZpOB5iVYmqsTNciYSh%2FStep20.png?alt=media&amp;token=63e266c6-4a43-4d0e-953e-de0380e8ecb4" alt=""><figcaption></figcaption></figure>

**Passo 2:** Escolha um validador em '**Validator**' (**por exemplo, Speedy Staking**) e o valor de $CSPR que deseja delegar em '**Amount**'. Depois disso, clique em '**Next**'.

{% hint style="warning" %}
**\*\*IMPORTANTE: Não delegue todos os seus CSPR, pois precisará de alguns CSPR restantes para remover a delegação dos seus tokens no futuro.**
{% endhint %}

<figure><img src="https://1664556276-files.gitbook.io/~/files/v0/b/gitbook-x-prod.appspot.com/o/spaces%2FT9giP5rmW2oFnVxj0Rgo%2Fuploads%2FIsGXQBYcspDQBwjXuqPJ%2FStep21.png?alt=media&amp;token=1ce61aa0-1f35-4985-bf6f-c8632ebf2774" alt=""><figcaption></figcaption></figure>

**Passo 3:** Verifique se as informações estão corretas e clique '**Confirm and delegate stake**'.

<figure><img src="https://1664556276-files.gitbook.io/~/files/v0/b/gitbook-x-prod.appspot.com/o/spaces%2FT9giP5rmW2oFnVxj0Rgo%2Fuploads%2FyjruOhfjQg9NflYDX3nI%2FStep22.png?alt=media&amp;token=81edc5cc-33bc-4f5e-ac2e-f39763d1a11f" alt=""><figcaption></figcaption></figure>

**Passo 4:** Agora, mostrará todas as informações sobre sua transação, e você pode clicar '**Sign with Metamask**'.

<figure><img src="https://1664556276-files.gitbook.io/~/files/v0/b/gitbook-x-prod.appspot.com/o/spaces%2FT9giP5rmW2oFnVxj0Rgo%2Fuploads%2FZ2LDQOekYdIJRVQJzusO%2FStep23.png?alt=media&amp;token=308441d8-e419-4b3f-98df-309235e91630" alt=""><figcaption></figcaption></figure>

**Passo 5:** Deslize a página para baixo e clique '**Approve**' no prompt da extensão MetaMask.

<figure><img src="https://1664556276-files.gitbook.io/~/files/v0/b/gitbook-x-prod.appspot.com/o/spaces%2FT9giP5rmW2oFnVxj0Rgo%2Fuploads%2FeIOM6eBXbAjfdtmtBGjI%2FStep24.png?alt=media&amp;token=8c26e998-b6d8-4590-9c91-6ddded369bcb" alt=""><figcaption></figcaption></figure>

**Passo 6:** Verá os detalhes da delegação bem-sucedida. Começará a receber Recompensas de Staking após aproximadamente 4 horas. Você então receberá Recompensas de Staking a cada ERA (aproximadamente 2 horas).


# MetaMask - Setup

**Passo 1:** Instale e configure uma carteira MetaMask se ainda não o fez: [**CLICK HERE**](https://metamask.io/download/)

<figure><img src="https://1664556276-files.gitbook.io/~/files/v0/b/gitbook-x-prod.appspot.com/o/spaces%2FT9giP5rmW2oFnVxj0Rgo%2Fuploads%2FHP1BPZR7MRqqOaCtF0mI%2FStep1.png?alt=media&amp;token=c50ceccd-18a2-4340-95f7-9e33bd9cb1b9" alt=""><figcaption></figcaption></figure>

**Passo 2:** Instale o Casper MetaMask Snap clicando em '**Add to MetaMask**': [**CLICK HERE**](https://snaps.metamask.io/snap/npm/casper-manager/)

<figure><img src="https://1664556276-files.gitbook.io/~/files/v0/b/gitbook-x-prod.appspot.com/o/spaces%2FT9giP5rmW2oFnVxj0Rgo%2Fuploads%2FfTmrFabpU2l1VkPL9usg%2FStep2.png?alt=media&amp;token=9ee74fa2-48d2-4753-b20f-127bc0675e0c" alt=""><figcaption></figcaption></figure>

**Passo 3:** Clique em '**Accept**' no prompt do MetaMask extension.

<figure><img src="https://1664556276-files.gitbook.io/~/files/v0/b/gitbook-x-prod.appspot.com/o/spaces%2FT9giP5rmW2oFnVxj0Rgo%2Fuploads%2FSEXW0pk2qm60ehkdaRNl%2FStep3.png?alt=media&amp;token=2c783fd1-1f24-442b-b278-0eae2e82c38c" alt=""><figcaption></figcaption></figure>

**Passo 4:** Clique em '**Connect**' na extensão MetaMask.

<figure><img src="https://1664556276-files.gitbook.io/~/files/v0/b/gitbook-x-prod.appspot.com/o/spaces%2FT9giP5rmW2oFnVxj0Rgo%2Fuploads%2FGWgwxUFO9qRz7YRXYS75%2FStep4.png?alt=media&amp;token=a30f9ad1-7c0c-4256-94e2-34ec34087c2a" alt=""><figcaption></figcaption></figure>

**Passo 5:** Clique em '**Install**' na extensão MetaMask.

<figure><img src="https://1664556276-files.gitbook.io/~/files/v0/b/gitbook-x-prod.appspot.com/o/spaces%2FT9giP5rmW2oFnVxj0Rgo%2Fuploads%2FEzmNgSq4sYDTAnbanlBR%2FStep5.png?alt=media&amp;token=3d1017a0-4492-4a6a-82ac-b4c9d0866a7e" alt=""><figcaption></figcaption></figure>

**Passo 6:** Marque a caixa de seleção e clique'**Confirm**' na extensão MetaMask.

<figure><img src="https://1664556276-files.gitbook.io/~/files/v0/b/gitbook-x-prod.appspot.com/o/spaces%2FT9giP5rmW2oFnVxj0Rgo%2Fuploads%2FZu4OThaNQ2SZTwKwvgQe%2FStep6.png?alt=media&amp;token=dbe67e38-4b73-44e5-a4de-c65d96523f6e" alt=""><figcaption></figcaption></figure>

**Passo 7:** Clique em '**OK**' na extensão MetaMask após a conclusão da instalação.


# MetaMask - Conectar MetaMask with CSPR.live

<figure><img src="https://1664556276-files.gitbook.io/~/files/v0/b/gitbook-x-prod.appspot.com/o/spaces%2FT9giP5rmW2oFnVxj0Rgo%2Fuploads%2FINbVxO8GP56u5o1tsbTI%2FStep7.png?alt=media&amp;token=375fc5f4-a6ba-44aa-8bbc-a513ff064929" alt=""><figcaption></figcaption></figure>

**Passo 1:** Vá para [CSPR.live](https://cspr.live/) e clique em'**Sign in**' no canto superior direito do ecrã.

<figure><img src="https://1664556276-files.gitbook.io/~/files/v0/b/gitbook-x-prod.appspot.com/o/spaces%2FT9giP5rmW2oFnVxj0Rgo%2Fuploads%2FVscn3vn2iYihFSnDfv9u%2FStep8.png?alt=media&amp;token=c843a26a-8df8-46c4-a23c-fa9d787b94b9" alt=""><figcaption></figcaption></figure>

**Passo 2:** Clique em '**Metamask**'.

<figure><img src="https://1664556276-files.gitbook.io/~/files/v0/b/gitbook-x-prod.appspot.com/o/spaces%2FT9giP5rmW2oFnVxj0Rgo%2Fuploads%2FHW2VZdHtZYnhYEIOOic8%2FStep9.png?alt=media&amp;token=6a34d946-633d-42e6-ae30-b2c6e52b3e9d" alt=""><figcaption></figcaption></figure>

**Passo 3:** Clique em '**Connect**' no prompt da extensão MetaMask.

<figure><img src="https://1664556276-files.gitbook.io/~/files/v0/b/gitbook-x-prod.appspot.com/o/spaces%2FT9giP5rmW2oFnVxj0Rgo%2Fuploads%2FXIuKkaVC7nd1F2DBdwIt%2FStep10.png?alt=media&amp;token=e137a4e4-42fd-45df-bc0a-f2d0f67ac5d6" alt=""><figcaption></figcaption></figure>

**Passo 4:** Selecione um dos endereços que visualiza no CSPR.live; pode escolher o primeiro para facilitar.


# MetaMask - Receber $CSPR

<figure><img src="https://1664556276-files.gitbook.io/~/files/v0/b/gitbook-x-prod.appspot.com/o/spaces%2FT9giP5rmW2oFnVxj0Rgo%2Fuploads%2FI0zUwuslw8nhhW5sucKy%2FStep11.png?alt=media&amp;token=1c90a76b-98f0-4359-ab80-2fdfb8e50716" alt=""><figcaption></figcaption></figure>

**Passo 1:** Passe o cursor sobre sua chave pública no canto superior direito e selecione '**View Account**'.

<figure><img src="https://1664556276-files.gitbook.io/~/files/v0/b/gitbook-x-prod.appspot.com/o/spaces%2FT9giP5rmW2oFnVxj0Rgo%2Fuploads%2FIgi8Eoa4ZU68SBLKOeUI%2FStep12.png?alt=media&amp;token=0c93e4d1-3a0a-41cc-ba2a-2dd9aa23470d" alt=""><figcaption></figcaption></figure>

**Passo 2:** Verá a sua Chave Pública (também chamada de endereço da carteira) no topo. Este é o endereço que irá usar para enviar $CSPR.


# MetaMask - Transferir $CSPR

<figure><img src="https://1664556276-files.gitbook.io/~/files/v0/b/gitbook-x-prod.appspot.com/o/spaces%2FT9giP5rmW2oFnVxj0Rgo%2Fuploads%2FcuGGZ7ywUvTlfhJ9pAGm%2FStep13.png?alt=media&amp;token=2c912a2d-c55d-46b5-9cf1-22f72e730f8a" alt=""><figcaption></figcaption></figure>

**Passo 1:** Passe o rato sobre '**Wallet**' no canto superior direito e selecione '**Transfer CSPR**'.

<figure><img src="https://1664556276-files.gitbook.io/~/files/v0/b/gitbook-x-prod.appspot.com/o/spaces%2FT9giP5rmW2oFnVxj0Rgo%2Fuploads%2FbCESiutXuE5aHPg2bfoe%2FStep14.png?alt=media&amp;token=8db22709-3ea4-4d82-b796-5e2970073536" alt=""><figcaption></figcaption></figure>

**Passo 2:** Preencha a chave pública do local para onde deseja enviar seu $CSPR em '**Recipient**', o valor de $CSPR que deseja enviar em  '**Amount**' e preencha um ID de Transferência específico se desejar/for necessário em '**Transfer ID (Memo)**'. Isso às vezes é necessário se enviar $CSPR para uma exchange. Se não for necessário, você pode usar '**0**'. Após isso, clique em '**Next**'.

<figure><img src="https://1664556276-files.gitbook.io/~/files/v0/b/gitbook-x-prod.appspot.com/o/spaces%2FT9giP5rmW2oFnVxj0Rgo%2Fuploads%2FaO4f2kiqMtt1PhkCy1kg%2FStep15.png?alt=media&amp;token=59a579dd-a337-4293-9a16-bf0b5cca0171" alt=""><figcaption></figcaption></figure>

**Passo 3:** Verifique se as informações estão corretas e clique '**Confirm and transfer**'.

<figure><img src="https://1664556276-files.gitbook.io/~/files/v0/b/gitbook-x-prod.appspot.com/o/spaces%2FT9giP5rmW2oFnVxj0Rgo%2Fuploads%2FMlR14w1HBcxHfL7OT6X8%2FStep16.png?alt=media&amp;token=e174e857-2337-42dc-8048-e08bb5b33de4" alt=""><figcaption></figcaption></figure>

**Passo 4:** Agora, todas as informações sobre sua transação serão exibidas, e pode clicar '**Sign with Metamask**'.

<figure><img src="https://1664556276-files.gitbook.io/~/files/v0/b/gitbook-x-prod.appspot.com/o/spaces%2FT9giP5rmW2oFnVxj0Rgo%2Fuploads%2FMlR14w1HBcxHfL7OT6X8%2FStep16.png?alt=media&amp;token=e174e857-2337-42dc-8048-e08bb5b33de4" alt=""><figcaption></figcaption></figure>

**Passo 5:** Deslize para baixo e clique '**Approve**' na mensagem de solicitação da extensão MetaMask.

<figure><img src="https://1664556276-files.gitbook.io/~/files/v0/b/gitbook-x-prod.appspot.com/o/spaces%2FT9giP5rmW2oFnVxj0Rgo%2Fuploads%2Fx6YPyRXx8Kt2ayrCPFJl%2FStep17.png?alt=media&amp;token=721d067d-d21d-4396-9b08-ece89b15f32b" alt=""><figcaption></figcaption></figure>

**Passo 6:** Você verá os detalhes da transferência bem sucedida.


# MetaMask - Delegar (Stake) $CSPR

<figure><img src="https://1664556276-files.gitbook.io/~/files/v0/b/gitbook-x-prod.appspot.com/o/spaces%2FT9giP5rmW2oFnVxj0Rgo%2Fuploads%2FEHLIxJvECA9wDWZYueef%2FStep19.png?alt=media&amp;token=209b56c3-de2f-4314-9e4c-98a464fa3ece" alt=""><figcaption></figcaption></figure>

**Passo 1:** Passe o rato sobre '**Wallet**' No canto superior direito, selecione '**Delegate Stake**'.

<figure><img src="https://1664556276-files.gitbook.io/~/files/v0/b/gitbook-x-prod.appspot.com/o/spaces%2FT9giP5rmW2oFnVxj0Rgo%2Fuploads%2Fw0ZpOB5iVYmqsTNciYSh%2FStep20.png?alt=media&amp;token=63e266c6-4a43-4d0e-953e-de0380e8ecb4" alt=""><figcaption></figcaption></figure>

**Passo 2:** Escolha um validador em '**Validator**' (**por exemplo, Speedy Staking**) e o valor de $CSPR que deseja delegar em '**Amount**'. Depois disso, clique em '**Next**'.

{% hint style="warning" %}
**\*\*IMPORTANTE: Não delegue todos os seus CSPR, pois precisará de alguns CSPR restantes para remover a delegação dos seus tokens no futuro.**
{% endhint %}

<figure><img src="https://1664556276-files.gitbook.io/~/files/v0/b/gitbook-x-prod.appspot.com/o/spaces%2FT9giP5rmW2oFnVxj0Rgo%2Fuploads%2FIsGXQBYcspDQBwjXuqPJ%2FStep21.png?alt=media&amp;token=1ce61aa0-1f35-4985-bf6f-c8632ebf2774" alt=""><figcaption></figcaption></figure>

**Passo 3:** Verifique se as informações estão corretas e clique '**Confirm and delegate stake**'.

<figure><img src="https://1664556276-files.gitbook.io/~/files/v0/b/gitbook-x-prod.appspot.com/o/spaces%2FT9giP5rmW2oFnVxj0Rgo%2Fuploads%2FyjruOhfjQg9NflYDX3nI%2FStep22.png?alt=media&amp;token=81edc5cc-33bc-4f5e-ac2e-f39763d1a11f" alt=""><figcaption></figcaption></figure>

**Passo 4:** Agora, mostrará todas as informações sobre sua transação, e você pode clicar '**Sign with Metamask**'.

<figure><img src="https://1664556276-files.gitbook.io/~/files/v0/b/gitbook-x-prod.appspot.com/o/spaces%2FT9giP5rmW2oFnVxj0Rgo%2Fuploads%2FZ2LDQOekYdIJRVQJzusO%2FStep23.png?alt=media&amp;token=308441d8-e419-4b3f-98df-309235e91630" alt=""><figcaption></figcaption></figure>

**Passo 5:** Deslize a página para baixo e clique '**Approve**' no prompt da extensão MetaMask.

<figure><img src="https://1664556276-files.gitbook.io/~/files/v0/b/gitbook-x-prod.appspot.com/o/spaces%2FT9giP5rmW2oFnVxj0Rgo%2Fuploads%2FeIOM6eBXbAjfdtmtBGjI%2FStep24.png?alt=media&amp;token=8c26e998-b6d8-4590-9c91-6ddded369bcb" alt=""><figcaption></figcaption></figure>

**Passo 6:** Verá os detalhes da delegação bem-sucedida. Começará a receber Recompensas de Staking após aproximadamente 4 horas. Você então receberá Recompensas de Staking a cada ERA (aproximadamente 2 horas).


# O Básico

<figure><img src="https://1664556276-files.gitbook.io/~/files/v0/b/gitbook-x-prod.appspot.com/o/spaces%2FT9giP5rmW2oFnVxj0Rgo%2Fuploads%2F0e65EaVk4kDSqD8zi35A%2Fgitbook-avail.png?alt=media&amp;token=044c3592-12a0-4381-aca2-71566d0dc546" alt=""><figcaption></figcaption></figure>

## **Introdução**

O ecossistema da Avail é projetado para oferecer uma experiência superior tanto para usuários quanto para desenvolvedores, equilibrando os elementos essenciais de escalabilidade, interoperabilidade e segurança sem comprometer a qualidade. A estrutura da plataforma está ancorada em três camadas principais:

1. **Camada de Disponibilidade de Dados (DA):** Uma camada fundamental focada exclusivamente em DA, formando a base para cadeias modulares abundantemente escaláveis. A camada DA é uma camada de baixo nível altamente otimizada, especificamente [disponibilidade de dados (abre num novo separador)](https://blog.availproject.org/data-availability-what-is-it/) . Esta é a camada blockchain mais profunda, com a funcionalidade mínima necessária para construir a interoperabilidade entre ecossistemas.  O Avail DA utiliza provas de validade para garantir que os programadores podem verificar a disponibilidade dos seus dados sem confiar nas afirmações da Avail.
2. **Camada Nexus:** O Nexus é um rollup zk de agregação de provas e seleção de sequenciadores leve, mas poderoso, para além do Avail DA. O Avail Nexus atua como um hub de verificação sem permissão que unificará os rollups (não apenas os construídos dentro do ecossistema Avail), aproveitando o Avail DA como a raiz da confiança.
3. **Camada de segurança de Fusão:** Melhora a segurança geral da rede Avail agrupando diferentes tokens, incluindo tokens estabelecidos e tokens emergentes. A Fusão também ajudará a trazer e bloquear mais liquidez de outras blockchains para o ecossistema Avail.\
   Esta abordagem irá reforçar progressivamente a segurança criptoeconómica da Avail e marca um dos primeiros casos em que tokens estrangeiros como o ETH e o BTC são utilizados para impulsionar o consenso numa blockchain diferente.

Estas camadas visam coletivamente dissolver a fragmentação do mercado, fornecendo uma plataforma unificada para utilizadores e desenvolvedores de vários ecossistemas.

<figure><img src="https://1664556276-files.gitbook.io/~/files/v0/b/gitbook-x-prod.appspot.com/o/spaces%2FT9giP5rmW2oFnVxj0Rgo%2Fuploads%2FYDAaPrqc67R0SWOUp96h%2Funification-layer-graphic-updated.png?alt=media&amp;token=ddb4c228-bedf-4fa3-9456-88fd55500a93" alt=""><figcaption></figcaption></figure>

## **Staking/Nomeação**

Atualmente existem menos de 100 validadores ativos (a produzir blocos e a ganhar recompensas). A APR em toda a rede pode flutuar, mas atualmente ronda os 15%. As recompensas de staking são acumuladas a cada ERA (1 dia), e pode optar por ter as recompensas compostas automaticamente, enviadas para o saldo líquido da sua conta ou para o saldo líquido de uma conta totalmente diferente. O unstake demora 28 dias, durante os quais NÃO ganhará recompensas.

## **Segurança**

Os seus tokens permanecerão sob a sua custódia quando nomear $AVAIL com um validador. Isto significa que pode, a qualquer momento, cancelar a delegação. O corte está ativo no Avail. O corte pode ocorrer nas seguintes condições:

* Equivocação - produzir dois blocos no mesmo slot. No GRANDPA, envia mensagens de pré-votação ou pré-commit para duas cadeias que entram em conflito entre si na mesma ronda. Isto reduzirá o **validador e os nomeadores**
* .Se mais de 10% dos validadores ficarem simultaneamente offline e forem arrefecidos numa epoch, todos esses **validadores (não os nomeadores)** serão eliminados.

Isto significa que é importante nomear validadores em quem possa confiar!

## **Links Úteis**

### **Exploradores**

[**Avail Explorer**](https://explorer.avail.so) **|** [**Subscan**](https://avail.subscan.io/)

### **Carteiras**

[**Talisman**](https://talisman.xyz/) **|** [**Avail Space**](https://www.availspace.app/) **|** [**Nova Wallet**](https://novawallet.io/) **|** [**Bitget Wallet**](https://web3.bitget.com/en) **|** [**dWallet**](https://dwallet.io/) **|** [**SubWallet**](https://www.subwallet.app/) **|** [**Klever**](https://klever.io/) **|** [**Ledger**](https://www.ledger.com/)

### **Recursos Oficiais**

[**Website**](https://availproject.org/) **|** [**Documentation**](https://docs.availproject.org/) **|** [**Ecosystem**](https://www.availproject.org/ecosystem) **|** [**GitHub**](https://github.com/availproject) **|** [**Staking Website**](https://staking.availproject.org/)

**Canais Sociais**

[**Twitter**](https://x.com/AvailProject) **|** [**Discord**](https://discord.gg/y6fHnxZQX8) **|** [**Blog**](https://blog.availproject.org/) **|** [**Telegram**](https://t.me/AvailCommunity) **|** [**LinkedIn**](https://www.linkedin.com/company/availproject/)


# Talisman

<figure><img src="https://1664556276-files.gitbook.io/~/files/v0/b/gitbook-x-prod.appspot.com/o/spaces%2FT9giP5rmW2oFnVxj0Rgo%2Fuploads%2FhaQQ1ycqDtOOM1gQdTQG%2Fgitbook-talisman.png?alt=media&amp;token=4986cdcc-c389-4f36-8dbe-fed7322afe3f" alt=""><figcaption></figcaption></figure>

* [Website Oficial](https://talisman.xyz/)
* Descarregue em [Chrome](https://chromewebstore.google.com/detail/talisman-ethereum-and-pol/fijngjgcjhjmmpcmkeiomlglpeiijkld) | [Firefox](https://addons.mozilla.org/en-US/firefox/addon/talisman-wallet-extension/)&#x20;
* [Documentação Oficial](https://docs.talisman.xyz/talisman)
* [Twitter](https://twitter.com/wearetalisman)
* [Discord](http://discord.gg/talisman)


# Talisman - Guia Completo

## **Parte 1 – Instalação do Talisman**

<figure><img src="https://1664556276-files.gitbook.io/~/files/v0/b/gitbook-x-prod.appspot.com/o/spaces%2FT9giP5rmW2oFnVxj0Rgo%2Fuploads%2FbtvzJgqQkZFpg5HOHZwI%2FInstall1.png?alt=media&amp;token=e64f9afa-22df-4ff0-ac54-c49ebc4c005f" alt=""><figcaption></figcaption></figure>

**Passo 1:** Navegue até ao [site do Talisman](https://talisman.xyz/) e clique em **‘Começar’**.

<figure><img src="https://1664556276-files.gitbook.io/~/files/v0/b/gitbook-x-prod.appspot.com/o/spaces%2FT9giP5rmW2oFnVxj0Rgo%2Fuploads%2F9jKbrdp8cSLHGeXEh6Bq%2FInstall2.png?alt=media&amp;token=ad2ba8d8-2f29-4ad1-bf9b-af28482f80f7" alt=""><figcaption></figcaption></figure>

**Passo 2:** Clique em **'adicionar no Chrome'**.

<figure><img src="https://1664556276-files.gitbook.io/~/files/v0/b/gitbook-x-prod.appspot.com/o/spaces%2FT9giP5rmW2oFnVxj0Rgo%2Fuploads%2FXFhWncyDyzxMXjk0SrYw%2FInstall3.png?alt=media&amp;token=8d647a5a-7aaf-4160-8184-a63109a9d308" alt=""><figcaption></figcaption></figure>

**Passo 3:** Clique em **'Adicionar extension'**.

## **Parte 2 – Criar Carteira**

<figure><img src="https://1664556276-files.gitbook.io/~/files/v0/b/gitbook-x-prod.appspot.com/o/spaces%2FT9giP5rmW2oFnVxj0Rgo%2Fuploads%2FOHjr0XeBo5vxdMkGR20u%2FCreate1.png?alt=media&amp;token=66a4e00d-818e-4dcc-a8a8-c442aaaa94a5" alt=""><figcaption></figcaption></figure>

**Passo 1:** Após instalar a extensão, será redirecionado para a página de primeiros passos. Clique em **'Get Started'**.

<figure><img src="https://1664556276-files.gitbook.io/~/files/v0/b/gitbook-x-prod.appspot.com/o/spaces%2FT9giP5rmW2oFnVxj0Rgo%2Fuploads%2FJttwC9gupjFNZ5cMARxk%2FCreate2.png?alt=media&amp;token=8d994460-0e8e-4980-a333-da1484fa9e39" alt=""><figcaption></figcaption></figure>

**Passo 2:**&#x45;scolha uma palavra-passe forte, preencha duas vezes e clique em **‘Continue’.**

<figure><img src="https://1664556276-files.gitbook.io/~/files/v0/b/gitbook-x-prod.appspot.com/o/spaces%2FT9giP5rmW2oFnVxj0Rgo%2Fuploads%2Fw1L19ikFEmXfKBF64r4Z%2FCreate3.png?alt=media&amp;token=9af6db12-8d9d-4c41-bc9d-f61629a27397" alt=""><figcaption></figcaption></figure>

**Passo 3:** Escolha se pretende partilhar informações de utilização anónimas com o Talisman e prossiga clicando em **'No thanks'** ou **'I agree'**.

<figure><img src="https://1664556276-files.gitbook.io/~/files/v0/b/gitbook-x-prod.appspot.com/o/spaces%2FT9giP5rmW2oFnVxj0Rgo%2Fuploads%2FFRsNEhDVth7WG1MuHpRz%2FCreate4.png?alt=media&amp;token=50edd243-476d-4d28-9613-b0d83a21abf1" alt=""><figcaption></figcaption></figure>

**Passo 4:** Certifique-se de que **‘New’** está selecionado e clique em **‘New Polkadot account’**.

<figure><img src="https://1664556276-files.gitbook.io/~/files/v0/b/gitbook-x-prod.appspot.com/o/spaces%2FT9giP5rmW2oFnVxj0Rgo%2Fuploads%2F3PO1NsQWhXWXweHSUomj%2FCreate5.png?alt=media&amp;token=35c450c4-5efc-4591-be9c-9609bb873fe1" alt=""><figcaption></figcaption></figure>

**Passo 5:** Certifique-se de que **‘Polkadot’** está selecionado, preencha um nome para a sua conta em **‘Account Name’** e clique em **‘Create’**.

<figure><img src="https://1664556276-files.gitbook.io/~/files/v0/b/gitbook-x-prod.appspot.com/o/spaces%2FT9giP5rmW2oFnVxj0Rgo%2Fuploads%2FOdyhJotqmLS7e3QqBc8B%2FCreate6.png?alt=media&amp;token=0a7a06af-adc6-40de-b6dc-6b01d00b62c1" alt=""><figcaption></figcaption></figure>

**Passo 6:** Clique em **'Acknowledge and Continue'**.

<figure><img src="https://1664556276-files.gitbook.io/~/files/v0/b/gitbook-x-prod.appspot.com/o/spaces%2FT9giP5rmW2oFnVxj0Rgo%2Fuploads%2F3cmrQbdC7TUaDqMrItJI%2FCreate7.png?alt=media&amp;token=c6a6ae17-dfcb-4ade-ae7a-6617c12596d5" alt=""><figcaption></figcaption></figure>

**Passo 7:** Selecione **'12 palavras'** ou **'24 palavras'**, ***guarde as palavras da frase de recuperação mostradas em algum lugar seguro***, marque a caixa de seleção e clique em **'Verify recovery phrase'**.

<figure><img src="https://1664556276-files.gitbook.io/~/files/v0/b/gitbook-x-prod.appspot.com/o/spaces%2FT9giP5rmW2oFnVxj0Rgo%2Fuploads%2Fk3xvCnK5VnWrfx7Ed111%2FCreate8.png?alt=media&amp;token=7b23ea9d-3f07-424e-a1b7-c4fadb88be08" alt=""><figcaption></figcaption></figure>

**Passo 8:** Clique nas palavras da sua frase de recuperação pela ordem correta até que todas estejam preenchidas e clique em **‘Complete Verification’**.

<figure><img src="https://1664556276-files.gitbook.io/~/files/v0/b/gitbook-x-prod.appspot.com/o/spaces%2FT9giP5rmW2oFnVxj0Rgo%2Fuploads%2FmCZ3ZLn5IaAg6vJ3qxIB%2FCreate9.png?alt=media&amp;token=3954bd59-9089-456d-96b0-69708c9a08e4" alt=""><figcaption></figcaption></figure>

**Passo 9:** Clique em **'Done'**.

<figure><img src="https://1664556276-files.gitbook.io/~/files/v0/b/gitbook-x-prod.appspot.com/o/spaces%2FT9giP5rmW2oFnVxj0Rgo%2Fuploads%2FyccCSfgX1hzuy9BGbm3H%2FCreate10.png?alt=media&amp;token=6a83ae49-cee1-4613-a38c-8d01e8ba6458" alt=""><figcaption></figcaption></figure>

**Passo 10:** Clique em **'Enter Talisman'**.

<figure><img src="https://1664556276-files.gitbook.io/~/files/v0/b/gitbook-x-prod.appspot.com/o/spaces%2FT9giP5rmW2oFnVxj0Rgo%2Fuploads%2F7gl2gn5ddXDtXJ7CMpSG%2FCreate11.png?alt=media&amp;token=7a3ef6ea-d04d-4f3d-9604-af69e2c1a669" alt=""><figcaption></figcaption></figure>

**Passo 11 (recomendado):** Clique no ícone da extensão no canto superior direito do Google Chrome.

<figure><img src="https://1664556276-files.gitbook.io/~/files/v0/b/gitbook-x-prod.appspot.com/o/spaces%2FT9giP5rmW2oFnVxj0Rgo%2Fuploads%2FPIf5CAd8aZwwuDgrA3ys%2FCreate12.png?alt=media&amp;token=9da8f23c-5411-4142-92a5-cfec7420ba0b" alt=""><figcaption></figcaption></figure>

**Passo 12:** Clique no pin ao lado do Talismã. Isto irá garantir que tem sempre acesso fácil à sua extensão Talisman.

## **Parte 3 – Receber $AVAIL**

<figure><img src="https://1664556276-files.gitbook.io/~/files/v0/b/gitbook-x-prod.appspot.com/o/spaces%2FT9giP5rmW2oFnVxj0Rgo%2Fuploads%2FiTxuLNCGBPvRC490K9gL%2FReceive1.png?alt=media&amp;token=6bcd1cc4-754a-46d0-ad99-512e466941ca" alt=""><figcaption></figcaption></figure>

**Passo 1:** Na página de visão geral do Talisman, clique em **'Receive'**.

<figure><img src="https://1664556276-files.gitbook.io/~/files/v0/b/gitbook-x-prod.appspot.com/o/spaces%2FT9giP5rmW2oFnVxj0Rgo%2Fuploads%2Fd9rwldgROhQ0DA7ctfFI%2FReceive2.png?alt=media&amp;token=94c9ae3a-de0d-4151-8f46-29325e293868" alt=""><figcaption></figcaption></figure>

**Passo 2:** Clique na conta na qual pretende receber o $AVAIL.

<figure><img src="https://1664556276-files.gitbook.io/~/files/v0/b/gitbook-x-prod.appspot.com/o/spaces%2FT9giP5rmW2oFnVxj0Rgo%2Fuploads%2F9zvOvRwxEaRCIf8dY6TL%2FReceive3.png?alt=media&amp;token=f606b46d-e848-42ff-9678-33619c65ad64" alt=""><figcaption></figcaption></figure>

**Passo 3:** Introduza AVAIL no campo de pesquisa e clique no botão copiar junto ao resultado AVAIL.

<figure><img src="https://1664556276-files.gitbook.io/~/files/v0/b/gitbook-x-prod.appspot.com/o/spaces%2FT9giP5rmW2oFnVxj0Rgo%2Fuploads%2FyXWffftreeV9kIjY8pg2%2FReceive4.png?alt=media&amp;token=f579ad61-ac4c-4625-859b-614dd6422d14" alt=""><figcaption></figcaption></figure>

**Passo 4:** Depois de enviar $AVAIL para o endereço, vê-lo-á refletido após alguns minutos.

## **Parte 4 –** Ligue-se à página de staking do Avail

<figure><img src="https://1664556276-files.gitbook.io/~/files/v0/b/gitbook-x-prod.appspot.com/o/spaces%2FT9giP5rmW2oFnVxj0Rgo%2Fuploads%2FNxIu65NddrK2DmBGO1z3%2FNominate1.png?alt=media&amp;token=577f9fda-9d9e-444b-b71b-cec1534bfd20" alt=""><figcaption></figcaption></figure>

**Passo 1:** Navegue até à [página de staking Avail](https://staking.availproject.org/#/overview) e clique em **‘Connect’** no canto superior direito do ecrã.

<figure><img src="https://1664556276-files.gitbook.io/~/files/v0/b/gitbook-x-prod.appspot.com/o/spaces%2FT9giP5rmW2oFnVxj0Rgo%2Fuploads%2F0xlE6aE4z6TWPQQyw1RO%2FNominate2.png?alt=media&amp;token=d43878b5-6697-4740-bffe-b1da1d0e4536" alt=""><figcaption></figcaption></figure>

**Passo 2:** Clique em **'Talisman'**.

<figure><img src="https://1664556276-files.gitbook.io/~/files/v0/b/gitbook-x-prod.appspot.com/o/spaces%2FT9giP5rmW2oFnVxj0Rgo%2Fuploads%2Fs6ry4tFjiYWHA8SkvIwV%2FNominate3.png?alt=media&amp;token=3222d3ca-29d1-45a7-ad9b-a54790cbf6f8" alt=""><figcaption></figcaption></figure>

**Passo 3:** Escolha uma conta no prompt do Talisman e clique em **'Connect 1'**.

<figure><img src="https://1664556276-files.gitbook.io/~/files/v0/b/gitbook-x-prod.appspot.com/o/spaces%2FT9giP5rmW2oFnVxj0Rgo%2Fuploads%2FJIl2FkS05uAp46zmEV3n%2FNominate4.png?alt=media&amp;token=deb40001-0676-4778-81ca-f85f2428599d" alt=""><figcaption></figcaption></figure>

**Passo 4:** Clique em **'Go To Accounts'**.

<figure><img src="https://1664556276-files.gitbook.io/~/files/v0/b/gitbook-x-prod.appspot.com/o/spaces%2FT9giP5rmW2oFnVxj0Rgo%2Fuploads%2Fcn72dlFxIO7guFMzuA4M%2FNominate5.png?alt=media&amp;token=0381d973-f79b-4ce0-b9d5-783832315494" alt=""><figcaption></figcaption></figure>

**Passo 5:** Clique na sua conta.

<figure><img src="https://1664556276-files.gitbook.io/~/files/v0/b/gitbook-x-prod.appspot.com/o/spaces%2FT9giP5rmW2oFnVxj0Rgo%2Fuploads%2FVZHQWc24xKmbHbkJY7Bo%2FNominate6.png?alt=media&amp;token=3750bcd8-c559-4107-ab86-cfbe3c633a20" alt=""><figcaption></figcaption></figure>

**Passo 6:** Agora está ligado à página de piquetagem. Verá detalhes como o seu endereço, o seu saldo, se está a nomear e muito mais.

## **Part 5 - Stake/Nomeie os seu $AVAIL**

<figure><img src="https://1664556276-files.gitbook.io/~/files/v0/b/gitbook-x-prod.appspot.com/o/spaces%2FT9giP5rmW2oFnVxj0Rgo%2Fuploads%2FamXDLxVvvXqyruA18VtT%2FNominate7.png?alt=media&amp;token=7224a67d-3d40-49aa-86a3-b900c75e1c45" alt=""><figcaption></figcaption></figure>

**Passo 1:** Clique em **'Validators'** no lado esquerdo da página de stake.

<figure><img src="https://1664556276-files.gitbook.io/~/files/v0/b/gitbook-x-prod.appspot.com/o/spaces%2FT9giP5rmW2oFnVxj0Rgo%2Fuploads%2FC7FURm6sX8zuGxgGIxu7%2FNominate8.png?alt=media&amp;token=c4d40639-f431-4903-b3c4-c9231468cf5d" alt=""><figcaption></figcaption></figure>

**Passo 2:** Clique em **'Clear'**.

<figure><img src="https://1664556276-files.gitbook.io/~/files/v0/b/gitbook-x-prod.appspot.com/o/spaces%2FT9giP5rmW2oFnVxj0Rgo%2Fuploads%2F8tLcsnDgMuQTgT6D2NBU%2FNominate9.png?alt=media&amp;token=c38e5223-1a12-4043-a07d-55f1b68bfb4e" alt=""><figcaption></figcaption></figure>

**Passo 3:** Pesquise por **'speedy'** e clique no coração para adicionar o nosso validador aos seus favoritos.

<figure><img src="https://1664556276-files.gitbook.io/~/files/v0/b/gitbook-x-prod.appspot.com/o/spaces%2FT9giP5rmW2oFnVxj0Rgo%2Fuploads%2F4stVib2tqYEmgi8l9zvf%2FNominate10.png?alt=media&amp;token=a40e93fa-f639-4d9e-a513-f24693932545" alt=""><figcaption></figcaption></figure>

**Passo 4:** Clique em **'Nominate'** no lado esquerdo da página de stake.

<figure><img src="https://1664556276-files.gitbook.io/~/files/v0/b/gitbook-x-prod.appspot.com/o/spaces%2FT9giP5rmW2oFnVxj0Rgo%2Fuploads%2FwVbp0J8MAyDTLG4McU3B%2FNominate11.png?alt=media&amp;token=974de04e-4d81-449e-bae0-7b48e405c3df" alt=""><figcaption></figcaption></figure>

**Passo 5:** Clique em **'Start nominating'**.

<figure><img src="https://1664556276-files.gitbook.io/~/files/v0/b/gitbook-x-prod.appspot.com/o/spaces%2FT9giP5rmW2oFnVxj0Rgo%2Fuploads%2F35mBXXwnBr91fHGnlsbk%2FNominate12.png?alt=media&amp;token=06f83242-91d8-4267-8f4a-01c5d7ddcd2f" alt=""><figcaption></figcaption></figure>

**Passo 6:** Selecione o que pretende fazer com as suas recompensas; composto, adicione-os ao saldo líquido da sua conta ou adicione-os ao saldo líquido da conta de outra conta. Depois disso, clique em **‘Continuar’**.

<figure><img src="https://1664556276-files.gitbook.io/~/files/v0/b/gitbook-x-prod.appspot.com/o/spaces%2FT9giP5rmW2oFnVxj0Rgo%2Fuploads%2F4HeG1sZxQrjX0tJOPUU8%2FNominate13.png?alt=media&amp;token=0e6fed06-b521-4ca1-b7eb-73f1c1966a71" alt=""><figcaption></figcaption></figure>

**Passo 7:** Clique on **'From Favorites'**.

<figure><img src="https://1664556276-files.gitbook.io/~/files/v0/b/gitbook-x-prod.appspot.com/o/spaces%2FT9giP5rmW2oFnVxj0Rgo%2Fuploads%2FlemOjtTsM2GbBhhdHUqk%2FNominate14.png?alt=media&amp;token=517294f9-16f3-4190-9a19-50121a609e4a" alt=""><figcaption></figcaption></figure>

**Passo 8:** O nosso nó será adicionado como validador nomeado. Para garantir que recebe recompensas de apostas em cada ERA, selecione vários validadores de **'High performance'** ou **'Active'.** Adicionaremos 4 no nosso exemplo.

<figure><img src="https://1664556276-files.gitbook.io/~/files/v0/b/gitbook-x-prod.appspot.com/o/spaces%2FT9giP5rmW2oFnVxj0Rgo%2Fuploads%2F3l9oe9x8MyfxedidiDPe%2FNominate15.png?alt=media&amp;token=6856e8f3-7388-4b06-a7a7-0764ef71a186" alt=""><figcaption></figcaption></figure>

**Passo 9:** Clique em **'Continue'**.

<figure><img src="https://1664556276-files.gitbook.io/~/files/v0/b/gitbook-x-prod.appspot.com/o/spaces%2FT9giP5rmW2oFnVxj0Rgo%2Fuploads%2F5LhoAWtPpKP7R6SCZje4%2FNominate16.png?alt=media&amp;token=e9dd1e1b-241b-4690-905f-f9f53a5b43b7" alt=""><figcaption></figcaption></figure>

**Passo 10:** Preencha o valor de $AVAIL que pretende indicar (pelo menos 1000) e clique em **‘Continue’**.

<figure><img src="https://1664556276-files.gitbook.io/~/files/v0/b/gitbook-x-prod.appspot.com/o/spaces%2FT9giP5rmW2oFnVxj0Rgo%2Fuploads%2FO7JW1bj7lbFNq7rUNoNV%2FNominate17.png?alt=media&amp;token=f24c5a41-d114-49a0-9147-810c737073ab" alt=""><figcaption></figcaption></figure>

**Passo 11:** Verifique se todos os detalhes estão corretos em **'Summary'** e clique em **'Start Nominating'**.

<figure><img src="https://1664556276-files.gitbook.io/~/files/v0/b/gitbook-x-prod.appspot.com/o/spaces%2FT9giP5rmW2oFnVxj0Rgo%2Fuploads%2Flcbo8GJl6YjZBJYA9J7K%2FNominate18.png?alt=media&amp;token=25220b93-4ec4-42d3-b3cc-4dc8b8537784" alt=""><figcaption></figcaption></figure>

**Passo 12:** Clique em **'Approve'** no prompt do Talisman.

<figure><img src="https://1664556276-files.gitbook.io/~/files/v0/b/gitbook-x-prod.appspot.com/o/spaces%2FT9giP5rmW2oFnVxj0Rgo%2Fuploads%2FNTKdoldOdHwGO9nzjD4k%2FNominate19.png?alt=media&amp;token=cecff45e-9f17-46b5-8dbb-b605ffee6b76" alt=""><figcaption></figcaption></figure>

**Passo 13:** Agora já nomeou com sucesso o seu $AVAIL. Receberá as suas primeiras recompensas após 1-2 ERAs e a cada ERA depois disso.


# Talisman - Instalação

<figure><img src="https://1664556276-files.gitbook.io/~/files/v0/b/gitbook-x-prod.appspot.com/o/spaces%2FT9giP5rmW2oFnVxj0Rgo%2Fuploads%2FLvJBEsWMG7adN4srivcO%2FInstall1.png?alt=media&amp;token=f9b75e77-2c1d-4e36-8a35-4c5600217574" alt=""><figcaption></figcaption></figure>

**Passo 1:** Navegue até ao [site do Talisman](https://talisman.xyz/) e clique em **‘Get Started’**.&#x20;

<figure><img src="https://1664556276-files.gitbook.io/~/files/v0/b/gitbook-x-prod.appspot.com/o/spaces%2FT9giP5rmW2oFnVxj0Rgo%2Fuploads%2F9jKbrdp8cSLHGeXEh6Bq%2FInstall2.png?alt=media&amp;token=ad2ba8d8-2f29-4ad1-bf9b-af28482f80f7" alt=""><figcaption></figcaption></figure>

**Passo 2:** Clique em **'Add to Chrome'**.

<figure><img src="https://1664556276-files.gitbook.io/~/files/v0/b/gitbook-x-prod.appspot.com/o/spaces%2FT9giP5rmW2oFnVxj0Rgo%2Fuploads%2FXFhWncyDyzxMXjk0SrYw%2FInstall3.png?alt=media&amp;token=8d647a5a-7aaf-4160-8184-a63109a9d308" alt=""><figcaption></figcaption></figure>

**Passo 3:** Clique em **'Add extension'**.


# Talisman - Criar Carteira

<figure><img src="https://1664556276-files.gitbook.io/~/files/v0/b/gitbook-x-prod.appspot.com/o/spaces%2FT9giP5rmW2oFnVxj0Rgo%2Fuploads%2FOHjr0XeBo5vxdMkGR20u%2FCreate1.png?alt=media&amp;token=66a4e00d-818e-4dcc-a8a8-c442aaaa94a5" alt=""><figcaption></figcaption></figure>

**Passo 1:** Após instalar a extensão, será redirecionado para a página de primeiros passos. Clique em **'Get Started'**.

<figure><img src="https://1664556276-files.gitbook.io/~/files/v0/b/gitbook-x-prod.appspot.com/o/spaces%2FT9giP5rmW2oFnVxj0Rgo%2Fuploads%2FJttwC9gupjFNZ5cMARxk%2FCreate2.png?alt=media&amp;token=8d994460-0e8e-4980-a333-da1484fa9e39" alt=""><figcaption></figcaption></figure>

**Passo 2:** Escolha uma palavra-passe forte, preencha duas vezes e clique em **‘Continue’.**

<figure><img src="https://1664556276-files.gitbook.io/~/files/v0/b/gitbook-x-prod.appspot.com/o/spaces%2FT9giP5rmW2oFnVxj0Rgo%2Fuploads%2Fw1L19ikFEmXfKBF64r4Z%2FCreate3.png?alt=media&amp;token=9af6db12-8d9d-4c41-bc9d-f61629a27397" alt=""><figcaption></figcaption></figure>

**Passo 3:** Escolha se pretende partilhar informações de utilização anónimas com o Talisman e prossiga clicando em **'No thanks'** ou **'I agree'**.

<figure><img src="https://1664556276-files.gitbook.io/~/files/v0/b/gitbook-x-prod.appspot.com/o/spaces%2FT9giP5rmW2oFnVxj0Rgo%2Fuploads%2FFRsNEhDVth7WG1MuHpRz%2FCreate4.png?alt=media&amp;token=50edd243-476d-4d28-9613-b0d83a21abf1" alt=""><figcaption></figcaption></figure>

**Passo 4:** Certifique-se de que **‘New’** está selecionado e clique em **‘New  Polkadot account’**.

<figure><img src="https://1664556276-files.gitbook.io/~/files/v0/b/gitbook-x-prod.appspot.com/o/spaces%2FT9giP5rmW2oFnVxj0Rgo%2Fuploads%2F3PO1NsQWhXWXweHSUomj%2FCreate5.png?alt=media&amp;token=35c450c4-5efc-4591-be9c-9609bb873fe1" alt=""><figcaption></figcaption></figure>

**Passo 5:** Certifique-se de que **‘Polkadot’** está selecionado, preencha um nome para a sua conta em **‘Account Name’** e clique em **‘Create’**.

<figure><img src="https://1664556276-files.gitbook.io/~/files/v0/b/gitbook-x-prod.appspot.com/o/spaces%2FT9giP5rmW2oFnVxj0Rgo%2Fuploads%2FOdyhJotqmLS7e3QqBc8B%2FCreate6.png?alt=media&amp;token=0a7a06af-adc6-40de-b6dc-6b01d00b62c1" alt=""><figcaption></figcaption></figure>

**Passo 6:** Clique em **'Acknowledge and Continue'**.

<figure><img src="https://1664556276-files.gitbook.io/~/files/v0/b/gitbook-x-prod.appspot.com/o/spaces%2FT9giP5rmW2oFnVxj0Rgo%2Fuploads%2F3cmrQbdC7TUaDqMrItJI%2FCreate7.png?alt=media&amp;token=c6a6ae17-dfcb-4ade-ae7a-6617c12596d5" alt=""><figcaption></figcaption></figure>

**Passo 7:** Selecione **'12 palavras'** ou **'24 palavras'**, ***guarde as palavras da frase de recuperação mostradas em algum lugar seguro***, marque a caixa de seleção e clique em **'Verify recovery phrase'**.

<figure><img src="https://1664556276-files.gitbook.io/~/files/v0/b/gitbook-x-prod.appspot.com/o/spaces%2FT9giP5rmW2oFnVxj0Rgo%2Fuploads%2Fk3xvCnK5VnWrfx7Ed111%2FCreate8.png?alt=media&amp;token=7b23ea9d-3f07-424e-a1b7-c4fadb88be08" alt=""><figcaption></figcaption></figure>

**Passo 8:** Clique nas palavras da sua frase de recuperação pela ordem correta até que todas estejam preenchidas e clique em **‘Complete Verification’**.

<figure><img src="https://1664556276-files.gitbook.io/~/files/v0/b/gitbook-x-prod.appspot.com/o/spaces%2FT9giP5rmW2oFnVxj0Rgo%2Fuploads%2FmCZ3ZLn5IaAg6vJ3qxIB%2FCreate9.png?alt=media&amp;token=3954bd59-9089-456d-96b0-69708c9a08e4" alt=""><figcaption></figcaption></figure>

**Passo 9:** Clique em **'Done'**.

<figure><img src="https://1664556276-files.gitbook.io/~/files/v0/b/gitbook-x-prod.appspot.com/o/spaces%2FT9giP5rmW2oFnVxj0Rgo%2Fuploads%2FyccCSfgX1hzuy9BGbm3H%2FCreate10.png?alt=media&amp;token=6a83ae49-cee1-4613-a38c-8d01e8ba6458" alt=""><figcaption></figcaption></figure>

**Passo 10:** Clique em **'Enter Talisman'**.

<figure><img src="https://1664556276-files.gitbook.io/~/files/v0/b/gitbook-x-prod.appspot.com/o/spaces%2FT9giP5rmW2oFnVxj0Rgo%2Fuploads%2F7gl2gn5ddXDtXJ7CMpSG%2FCreate11.png?alt=media&amp;token=7a3ef6ea-d04d-4f3d-9604-af69e2c1a669" alt=""><figcaption></figcaption></figure>

**Passo 11 (recomendado):** Clique no ícone da extensão no canto superior direito do Google Chrome.

<figure><img src="https://1664556276-files.gitbook.io/~/files/v0/b/gitbook-x-prod.appspot.com/o/spaces%2FT9giP5rmW2oFnVxj0Rgo%2Fuploads%2FPIf5CAd8aZwwuDgrA3ys%2FCreate12.png?alt=media&amp;token=9da8f23c-5411-4142-92a5-cfec7420ba0b" alt=""><figcaption></figcaption></figure>

**Passo 12:** Clique no pin ao lado do Talismã. Isto irá garantir que tem sempre acesso fácil à sua extensão Talisman.


# Talisman - Receber $AVAIL

<figure><img src="https://1664556276-files.gitbook.io/~/files/v0/b/gitbook-x-prod.appspot.com/o/spaces%2FT9giP5rmW2oFnVxj0Rgo%2Fuploads%2FiTxuLNCGBPvRC490K9gL%2FReceive1.png?alt=media&amp;token=6bcd1cc4-754a-46d0-ad99-512e466941ca" alt=""><figcaption></figcaption></figure>

**Passo 1:** Na página de visão geral do Talisman, clique em **'Receive'**.

<figure><img src="https://1664556276-files.gitbook.io/~/files/v0/b/gitbook-x-prod.appspot.com/o/spaces%2FT9giP5rmW2oFnVxj0Rgo%2Fuploads%2Fd9rwldgROhQ0DA7ctfFI%2FReceive2.png?alt=media&amp;token=94c9ae3a-de0d-4151-8f46-29325e293868" alt=""><figcaption></figcaption></figure>

**Passo 2:** Clique na conta na qual pretende receber o $AVAIL.

<figure><img src="https://1664556276-files.gitbook.io/~/files/v0/b/gitbook-x-prod.appspot.com/o/spaces%2FT9giP5rmW2oFnVxj0Rgo%2Fuploads%2F9zvOvRwxEaRCIf8dY6TL%2FReceive3.png?alt=media&amp;token=f606b46d-e848-42ff-9678-33619c65ad64" alt=""><figcaption></figcaption></figure>

**Passo 3:** Introduza AVAIL no campo de pesquisa e clique no botão copiar junto ao resultado AVAIL.

<figure><img src="https://1664556276-files.gitbook.io/~/files/v0/b/gitbook-x-prod.appspot.com/o/spaces%2FT9giP5rmW2oFnVxj0Rgo%2Fuploads%2FyXWffftreeV9kIjY8pg2%2FReceive4.png?alt=media&amp;token=f579ad61-ac4c-4625-859b-614dd6422d14" alt=""><figcaption></figcaption></figure>

**Passo 4:** Depois de enviar $AVAIL para o endereço, vê-lo-á refletido após alguns minutos.


# Talisman - Ligue-se à página de staking do Avail

<figure><img src="https://1664556276-files.gitbook.io/~/files/v0/b/gitbook-x-prod.appspot.com/o/spaces%2FT9giP5rmW2oFnVxj0Rgo%2Fuploads%2FNxIu65NddrK2DmBGO1z3%2FNominate1.png?alt=media&amp;token=577f9fda-9d9e-444b-b71b-cec1534bfd20" alt=""><figcaption></figcaption></figure>

**Passo 1:** Navegue até à [página de staking Avail](https://staking.availproject.org/#/overview) e clique em **‘Connect’** no canto superior direito do ecrã.

<figure><img src="https://1664556276-files.gitbook.io/~/files/v0/b/gitbook-x-prod.appspot.com/o/spaces%2FT9giP5rmW2oFnVxj0Rgo%2Fuploads%2F0xlE6aE4z6TWPQQyw1RO%2FNominate2.png?alt=media&amp;token=d43878b5-6697-4740-bffe-b1da1d0e4536" alt=""><figcaption></figcaption></figure>

**Passo 2:** Clique em **'Talisman'**.

<figure><img src="https://1664556276-files.gitbook.io/~/files/v0/b/gitbook-x-prod.appspot.com/o/spaces%2FT9giP5rmW2oFnVxj0Rgo%2Fuploads%2Fs6ry4tFjiYWHA8SkvIwV%2FNominate3.png?alt=media&amp;token=3222d3ca-29d1-45a7-ad9b-a54790cbf6f8" alt=""><figcaption></figcaption></figure>

**Passo 3:** Escolha uma conta no prompt do Talisman e clique em **'Connect 1'**.

<figure><img src="https://1664556276-files.gitbook.io/~/files/v0/b/gitbook-x-prod.appspot.com/o/spaces%2FT9giP5rmW2oFnVxj0Rgo%2Fuploads%2FJIl2FkS05uAp46zmEV3n%2FNominate4.png?alt=media&amp;token=deb40001-0676-4778-81ca-f85f2428599d" alt=""><figcaption></figcaption></figure>

**Passo 4:** Clique em **'Go To Accounts'**.

<figure><img src="https://1664556276-files.gitbook.io/~/files/v0/b/gitbook-x-prod.appspot.com/o/spaces%2FT9giP5rmW2oFnVxj0Rgo%2Fuploads%2Fcn72dlFxIO7guFMzuA4M%2FNominate5.png?alt=media&amp;token=0381d973-f79b-4ce0-b9d5-783832315494" alt=""><figcaption></figcaption></figure>

**Passo 5:** Clique na sua conta.

<figure><img src="https://1664556276-files.gitbook.io/~/files/v0/b/gitbook-x-prod.appspot.com/o/spaces%2FT9giP5rmW2oFnVxj0Rgo%2Fuploads%2FVZHQWc24xKmbHbkJY7Bo%2FNominate6.png?alt=media&amp;token=3750bcd8-c559-4107-ab86-cfbe3c633a20" alt=""><figcaption></figcaption></figure>

**Passo 6:** Agora está ligado à página de piquetagem. Verá detalhes como o seu endereço, o seu saldo, se está a nomear e muito mais.


# Talisman - Stake/Nomeie os seu $AVAIL

<figure><img src="https://1664556276-files.gitbook.io/~/files/v0/b/gitbook-x-prod.appspot.com/o/spaces%2FT9giP5rmW2oFnVxj0Rgo%2Fuploads%2FamXDLxVvvXqyruA18VtT%2FNominate7.png?alt=media&amp;token=7224a67d-3d40-49aa-86a3-b900c75e1c45" alt=""><figcaption></figcaption></figure>

**Passo 1:** Clique em **'Validators'** no lado esquerdo da página de stake.

<figure><img src="https://1664556276-files.gitbook.io/~/files/v0/b/gitbook-x-prod.appspot.com/o/spaces%2FT9giP5rmW2oFnVxj0Rgo%2Fuploads%2FC7FURm6sX8zuGxgGIxu7%2FNominate8.png?alt=media&amp;token=c4d40639-f431-4903-b3c4-c9231468cf5d" alt=""><figcaption></figcaption></figure>

**Passo 2:** Clique em **'Clear'**.

<figure><img src="https://1664556276-files.gitbook.io/~/files/v0/b/gitbook-x-prod.appspot.com/o/spaces%2FT9giP5rmW2oFnVxj0Rgo%2Fuploads%2F8tLcsnDgMuQTgT6D2NBU%2FNominate9.png?alt=media&amp;token=c38e5223-1a12-4043-a07d-55f1b68bfb4e" alt=""><figcaption></figcaption></figure>

**Passo 3:** Pesquise por **'speedy'** e clique no coração para adicionar o nosso validador aos seus favoritos.

<figure><img src="https://1664556276-files.gitbook.io/~/files/v0/b/gitbook-x-prod.appspot.com/o/spaces%2FT9giP5rmW2oFnVxj0Rgo%2Fuploads%2F4stVib2tqYEmgi8l9zvf%2FNominate10.png?alt=media&amp;token=a40e93fa-f639-4d9e-a513-f24693932545" alt=""><figcaption></figcaption></figure>

**Passo 4:** Clique em **'Nominate'** no lado esquerdo da página de stake.

<figure><img src="https://1664556276-files.gitbook.io/~/files/v0/b/gitbook-x-prod.appspot.com/o/spaces%2FT9giP5rmW2oFnVxj0Rgo%2Fuploads%2FwVbp0J8MAyDTLG4McU3B%2FNominate11.png?alt=media&amp;token=974de04e-4d81-449e-bae0-7b48e405c3df" alt=""><figcaption></figcaption></figure>

**Passo 5:** Clique em **'Start nominating'**.

<figure><img src="https://1664556276-files.gitbook.io/~/files/v0/b/gitbook-x-prod.appspot.com/o/spaces%2FT9giP5rmW2oFnVxj0Rgo%2Fuploads%2F35mBXXwnBr91fHGnlsbk%2FNominate12.png?alt=media&amp;token=06f83242-91d8-4267-8f4a-01c5d7ddcd2f" alt=""><figcaption></figcaption></figure>

**Passo 6:** Selecione o que pretende fazer com as suas recompensas; composto, adicione-os ao saldo líquido da sua conta ou adicione-os ao saldo líquido da conta de outra conta. Depois disso, clique em **‘Continuar’**.

<figure><img src="https://1664556276-files.gitbook.io/~/files/v0/b/gitbook-x-prod.appspot.com/o/spaces%2FT9giP5rmW2oFnVxj0Rgo%2Fuploads%2F4HeG1sZxQrjX0tJOPUU8%2FNominate13.png?alt=media&amp;token=0e6fed06-b521-4ca1-b7eb-73f1c1966a71" alt=""><figcaption></figcaption></figure>

**Passo 7:** Clique on **'From Favorites'**.

<figure><img src="https://1664556276-files.gitbook.io/~/files/v0/b/gitbook-x-prod.appspot.com/o/spaces%2FT9giP5rmW2oFnVxj0Rgo%2Fuploads%2FlemOjtTsM2GbBhhdHUqk%2FNominate14.png?alt=media&amp;token=517294f9-16f3-4190-9a19-50121a609e4a" alt=""><figcaption></figcaption></figure>

**Passo 8:** O nosso nó será adicionado como validador nomeado. Para garantir que recebe recompensas de apostas em cada ERA, selecione vários validadores de **'High performance'** ou **'Active'.** Adicionaremos 4 no nosso exemplo.

<figure><img src="https://1664556276-files.gitbook.io/~/files/v0/b/gitbook-x-prod.appspot.com/o/spaces%2FT9giP5rmW2oFnVxj0Rgo%2Fuploads%2F3l9oe9x8MyfxedidiDPe%2FNominate15.png?alt=media&amp;token=6856e8f3-7388-4b06-a7a7-0764ef71a186" alt=""><figcaption></figcaption></figure>

**Passo 9:** Clique em **'Continue'**.

<figure><img src="https://1664556276-files.gitbook.io/~/files/v0/b/gitbook-x-prod.appspot.com/o/spaces%2FT9giP5rmW2oFnVxj0Rgo%2Fuploads%2F5LhoAWtPpKP7R6SCZje4%2FNominate16.png?alt=media&amp;token=e9dd1e1b-241b-4690-905f-f9f53a5b43b7" alt=""><figcaption></figcaption></figure>

**Passo 10:** Preencha o valor de $AVAIL que pretende indicar (pelo menos 1000) e clique em **‘Continue’**.

<figure><img src="https://1664556276-files.gitbook.io/~/files/v0/b/gitbook-x-prod.appspot.com/o/spaces%2FT9giP5rmW2oFnVxj0Rgo%2Fuploads%2FO7JW1bj7lbFNq7rUNoNV%2FNominate17.png?alt=media&amp;token=f24c5a41-d114-49a0-9147-810c737073ab" alt=""><figcaption></figcaption></figure>

**Passo 11:** Verifique se todos os detalhes estão corretos em **'Summary'** e clique em **'Start Nominating'**.

<figure><img src="https://1664556276-files.gitbook.io/~/files/v0/b/gitbook-x-prod.appspot.com/o/spaces%2FT9giP5rmW2oFnVxj0Rgo%2Fuploads%2Flcbo8GJl6YjZBJYA9J7K%2FNominate18.png?alt=media&amp;token=25220b93-4ec4-42d3-b3cc-4dc8b8537784" alt=""><figcaption></figcaption></figure>

**Passo 12:** Clique em **'Approve'** no prompt do Talisman.

<figure><img src="https://1664556276-files.gitbook.io/~/files/v0/b/gitbook-x-prod.appspot.com/o/spaces%2FT9giP5rmW2oFnVxj0Rgo%2Fuploads%2FNTKdoldOdHwGO9nzjD4k%2FNominate19.png?alt=media&amp;token=cecff45e-9f17-46b5-8dbb-b605ffee6b76" alt=""><figcaption></figcaption></figure>

**Passo 13:** Agora já nomeou com sucesso o seu $AVAIL. Receberá as suas primeiras recompensas após 1-2 ERAs e a cada ERA depois disso.


# O Básico

<figure><img src="https://content.gitbook.com/content/T9giP5rmW2oFnVxj0Rgo/blobs/Ng3Y7ytFxWnbDLV9ytjy/gitbook-kcc.png" alt=""><figcaption></figcaption></figure>

## **Introdução**

KCC 1.0 is built on the Ethereum source code and is compatible with EVM smart contracts. It seeks to solve Ethereum’s dual problem of low performance and high cost. Millions of blocks have been produced, while the number of active addresses on the chain has exceeded hundreds of thousands.

KCC 1.0 é construído com o código-fonte do Ethereum e é compatível com contratos inteligentes EVM. Procura resolver o duplo problema do Ethereum de baixo desempenho e alto custo. Milhões de blocos foram produzidos, enquanto o número de endereços ativos na cadeia já ultrapassa centenas de milhares.

**Compatibilidade EVM**&#x20;

KCC é compatível com EVM. Implemente e execute seus dApps no KCC com as suas ferramentas favoritas para Ethereum.

**Finalização Rápida**

O tempo médio de bloco do KCC é de 3 segundos. Uma transação típica pode ser incluída num bloco em menos de 6 segundos. Este bloco é finalizado se mais da metade de todos os validadores adicionarem seus blocos após este.

**Baixo Custo**

A taxa é paga em $KCS. Transfira os seus tokens em todo o mundo com uma fração de centavos.

**Seguro e Protegido**

Cada bloco é validado por validadores confiáveis com suas identidades e KCS como garantia.&#x20;

## **Staking**

Atualmente, há 15 validadores ativos (produzindo blocos e ganhando recompensas) de um máximo de 22. Os validadores são integrados manualmente. O APY da rede pode variar entre 1 e 20%, dependente principalmente da atividade da KuCoin (a exchange). Isso ocorre porque o APY de staking é alimentado por uma parte das taxas de trading da KuCoin. As recompensas de staking acumulam-se continuamente, mas NÃO são auto-compostas - você terá que reclamar e delegar manualmente. O unstake leva 3 dias, durante os quais você NÃO ganhará recompensas.

### **Segurança**

Os seus tokens permanecerão sob sua custódia ao fazer staking de $KCS com um validador. Isso significa que pode, a qualquer momento, desdelegar, mesmo quando um validador estiver offline ou inativo. O pior que pode acontecer é  não receber novas recompensas, por isso escolher o validador adequado é essencial. Não há "slashing" ativo no KCC.

## **Links Úteis**

### **Exploradores**

[KCC Explorer](https://explorer.kcc.io/en) | [KCC Scan](https://scan.kcc.io/)

### **Carteiras**

[**UniPass**](https://unipass.id/) **|** [**Changex**](https://changex.io/) **|** [**Halo Wallet**](https://halo.social/) **|** [**MetaMask**](https://metamask.io/) **|** [**TrustWallet**](https://trustwallet.com/) **|** [**TokenPocket**](https://www.tokenpocket.pro/) **|** [**BitGet Wallet**](https://web3.bitget.com/en/) **|** [**Coin98**](https://coin98.com/) **|** [**MathWallet**](https://mathwallet.org/) **|** [**Rabby Wallet**](https://rabby.io/) **|** [**Ledger**](https://www.ledger.com/) **|** [**Infinity Wallet**](https://infinitywallet.io/asset/kucointoken) **|** [**Nabox**](https://nabox.io/) **|** [**SafePal**](https://www.safepal.com/) **|** [**Ambire Wallet**](https://www.ambire.com/) **|** [**Astrone**](http://astrone.io/) **|** [**Shield Protocol**](https://shieldprotocol.org/) **|** [**Fox Wallet**](https://foxwallet.com/) **|** [**ONTO Wallet**](https://onto.app/)

### **Recursos Oficiais KCC**

[**Website**](https://www.kcc.io/) **|** [**Documentation**](https://docs.kcc.io/) **|** [**Ecosystem**](https://www.kcc.io/apps) **|** [**GitHub**](https://github.com/kcc-community) **|** [**Staking Website**](https://staking.kcc.io/)

**Mídía Sociais**

[Twitter](https://twitter.com/KCCOfficialTW) | [Medium ](https://kccofficial.medium.com/)| [Discord](https://discord.com/invite/H5ucJydSyd) | [Telegram](https://t.me/KCCOfficialEnglishCommunity)


# MetaMask - Guia de Staking $KCS&#x20;

## **Parte 1 – Receber $KCS na sua carteira MetaMask**

**Passo 1:** Instale e configure uma carteira MetaMask, se ainda não tiver feito isso. [**CLICK HERE**](https://metamask.io/download/)

<figure><img src="https://1664556276-files.gitbook.io/~/files/v0/b/gitbook-x-prod.appspot.com/o/spaces%2FT9giP5rmW2oFnVxj0Rgo%2Fuploads%2FuMUfwVVN0HJw2nYNql99%2Freceive1.png?alt=media&amp;token=7d098077-c546-426a-b867-87a3c0823fc3" alt=""><figcaption></figcaption></figure>

**Passo 2:** Copie o endereço da sua carteira. Você irá retirar os seus $KCS para este endereço quando, por exemplo, retirar da exchange KuCoin.

## **Parte 2 – Delegar os seu $KCS**

<figure><img src="https://1664556276-files.gitbook.io/~/files/v0/b/gitbook-x-prod.appspot.com/o/spaces%2FT9giP5rmW2oFnVxj0Rgo%2Fuploads%2FfB2YX0Wr80OORa4tTXO4%2Fstake1.png?alt=media&amp;token=20b29737-1967-472c-89b1-2f6b842eda7a" alt=""><figcaption></figcaption></figure>

**Passo 1:** Navegue para a página de staking da KCC [**HERE**](https://staking.kcc.io/staking) e clique '**Connect Wallet**'.

<figure><img src="https://1664556276-files.gitbook.io/~/files/v0/b/gitbook-x-prod.appspot.com/o/spaces%2FT9giP5rmW2oFnVxj0Rgo%2Fuploads%2FoppeXIGqa6javo0uQ33s%2Fstake2.png?alt=media&amp;token=1069fbc5-78eb-4c15-add2-985bf380a025" alt=""><figcaption></figcaption></figure>

**Passo 2:** Clique em '**MetaMask**'.

<figure><img src="https://1664556276-files.gitbook.io/~/files/v0/b/gitbook-x-prod.appspot.com/o/spaces%2FT9giP5rmW2oFnVxj0Rgo%2Fuploads%2FngWUmjCEeLdk6LUfcoLy%2Fstake3.png?alt=media&amp;token=fbb07ebe-9c05-4ff0-90d7-8034e846516b" alt=""><figcaption></figcaption></figure>

**Passo 3:** Selecione a conta que você deseja conectar e clique em '**Next**' na extensão MetaMask.

<figure><img src="https://1664556276-files.gitbook.io/~/files/v0/b/gitbook-x-prod.appspot.com/o/spaces%2FT9giP5rmW2oFnVxj0Rgo%2Fuploads%2FEgydYwrCCz2Nc4NhbrWi%2Fstake4.png?alt=media&amp;token=86c731c7-cc1a-4d7d-8d8b-7cf177b68316" alt=""><figcaption></figcaption></figure>

**Passo 4:** Clique em '**Connect**'.

<figure><img src="https://1664556276-files.gitbook.io/~/files/v0/b/gitbook-x-prod.appspot.com/o/spaces%2FT9giP5rmW2oFnVxj0Rgo%2Fuploads%2FovEG6thcL3RQpFsLMRIr%2Fstake5.png?alt=media&amp;token=dda5f50f-444e-4475-bcad-ac5fe4cd4ab0" alt=""><figcaption></figcaption></figure>

**Passo 5:** Clique em '**Delegate**' ao lado do validador com o qual você deseja apostar **(Por exemplo, Speedy Staking)**

<figure><img src="https://1664556276-files.gitbook.io/~/files/v0/b/gitbook-x-prod.appspot.com/o/spaces%2FT9giP5rmW2oFnVxj0Rgo%2Fuploads%2F1hFmy65xW3ogIUqWagTr%2Fstake6.png?alt=media&amp;token=8d3a7ba3-dabe-4831-bcf9-9bb382ea2b89" alt=""><figcaption></figcaption></figure>

**Passo 6:** Insira a quantidade de $KCS que você deseja colocar em stake em '**Delegate**' e clique em '**Delegate**'.

{% hint style="warning" %}
**IMPORTANTE: Não coloque em stake todos os seus $KCS, pois precisará de alguns $KCS restantes para retirar de stake os seus tokens no futuro.**
{% endhint %}

<figure><img src="https://1664556276-files.gitbook.io/~/files/v0/b/gitbook-x-prod.appspot.com/o/spaces%2FT9giP5rmW2oFnVxj0Rgo%2Fuploads%2FgAQBt6W1ZLK4axJ5tpUt%2Fstake7.png?alt=media&amp;token=cb24304b-7919-421f-9e1b-9be7a63e2021" alt=""><figcaption></figcaption></figure>

**Passo 7:** Clique em '**Confirm**'‌ na extensão MetaMask.

<figure><img src="https://1664556276-files.gitbook.io/~/files/v0/b/gitbook-x-prod.appspot.com/o/spaces%2FT9giP5rmW2oFnVxj0Rgo%2Fuploads%2FnXvWAyyha5s5kqO8bRdu%2Fstake8.png?alt=media&amp;token=b1d7ea97-4fe2-4654-b4d2-66471c42e40d" alt=""><figcaption></figcaption></figure>

**Passo 8:** Parabéns! Efetuou o staking com sucesso! Clique em '**Check My Delegate**'.

<figure><img src="https://1664556276-files.gitbook.io/~/files/v0/b/gitbook-x-prod.appspot.com/o/spaces%2FT9giP5rmW2oFnVxj0Rgo%2Fuploads%2FonWXWGp8lo0bGnp40a08%2Fstake9.png?alt=media&amp;token=d9c73cc5-8b77-41b0-a752-a23ad62b15cc" alt=""><figcaption></figcaption></figure>

**Passo 9:** Encontrará todas as informações sobre sua participação aqui. Você verá o seu $KCS atual em stake e poderá reclamar as suas recompensas aqui.


# O Básico

<figure><img src="https://content.gitbook.com/content/T9giP5rmW2oFnVxj0Rgo/blobs/Cw773PBnwB8moLMsDki9/gitbook-haqq.png" alt=""><figcaption></figcaption></figure>

## **Introdução**

**CASA DO WEB3 ÉTICO**

Rede ética que acolhe desenvolvedores focados em sustentabilidade, validadores e contribuidores de código aberto, bem como inovadores muçulmanos em finanças sustentáveis.

&#x20;Islamic Coin ($ISLM) é a moeda nativa da HAQQ Network.&#x20;

**ACERCA DE HAQQ**\
HAQQ reúne os atores mais conceituados em finanças éticas para promover tecnologias descentralizadas voltadas para a comunidade em todo o mundo.

\
HAQQ é uma rede EVM-equivalente baseada na Cosmos SDK. A tecnologia por trás do HAQQ possibilita que qualquer contrato inteligente criado em outras redes EVM seja implantado na nova rede sem necessidade de alterações.

**MISSÃO**

> O mundo Crypto perdeu seu rumo – práticas orientadas por grade na cripto impedem a adoção em massa. A missão da HAQQ é tornar os projetos Web3 acessíveis para todos.

**VISÃO**

> HAQQ está equilibrando a filosofia Shariah-compliant e a tecnologia de ponta para criar um sistema financeiro mais justo e sustentável. Muçulmanos e mudanças impulsionadas por ESG em todo o mundo, e HAQQ está liderando isso.

## **Staking**

Atualmente, existe 95 validadores ativos (produzindo blocos e ganhando recompensas). A APR (taxa percentual anual) da rede pode flutuar e está atualmente em torno de 7.8%. As recompensas de staking acumulam continuamente, mas NÃO se recompõem automaticamente - você terá que reclamar e delegar manualmente. Desfazer o staking leva 21 dias, durante os quais você NÃO ganhará recompensas.

### **Segurança**

Os seus tokens permanecerão sob sua custódia ao fazer staking de $ISLM com um validador. Isso significa que pode, a qualquer momento, desfazer a delegação, mesmo quando um validador estiver offline ou inativo. O pior que pode acontecer é você não receber novas recompensas, por isso é essencial escolher o validador adequado. Não há "slashing" ativo no Haqq.

## **Links Úteis**

### **Exploradores**

[HAQQ Mainnet Explorer](https://explorer.haqq.network/) | [NodeStake](https://explorer.nodestake.org/haqq) | [Nodes.Guru](https://haqq.explorers.guru/)

### **Carteiras**

[**MetaMask**](https://metamask.io/) **|** [**TokenPocket**](https://www.tokenpocket.pro/) **|** [**Ledger**](https://www.ledger.com/) **|** [**Keystone**](https://keyst.one/) **|** [**Safe**](https://safe.global/)

### **Recursos Oficiais**

**Haqq Network**

[**Haqq Website**](https://haqq.network/) **|** [**Documentation**](https://docs.haqq.network/) **|** [**Ecosystem**](https://haqq.network/ecosystem) **|** [**GitHub**](https://github.com/haqq-network) **|** [**Staking Website**](https://shell.haqq.network/) **|** [**Haqq Wallet**](https://haqq.network/wallet)

**Islamic Coin**

[**IslamicCoin Website**](https://islamiccoin.net/)

**Mídía Social**

**Haqq Network**

[Twitter](https://twitter.com/The_HaqqNetwork) | [Discord](https://discord.gg/CDtXuQG3Vd)

**Islamic Coin**

[**Twitter**](https://twitter.com/Islamic_coin) **|** [**Medium**](https://medium.com/islamic-coin) **|** [**Discord**](https://discord.gg/islamiccoin) **|** [**Telegram**](https://t.me/islamiccoin_int) **|** [**LinkedIn**](https://www.linkedin.com/company/islamiccoin) **|** [**Youtube**](https://www.youtube.com/channel/UCTjvOCTDeO9H67y_6btF1NA)


# Welkom

<figure><picture><source srcset="/files/1xeJDRCP1G66OnNFEjcP" media="(prefers-color-scheme: dark)"><img src="https://417746289-files.gitbook.io/~/files/v0/b/gitbook-x-prod.appspot.com/o/spaces%2FfcGyJ1C47hcV3dV9rYfW%2Fuploads%2FUvcrz2aYlkYw8W1KACRK%2F%5BPNG%5D%20Speedy%20Staking%20-%20dark.png?alt=media&amp;token=30d396d8-805d-4a57-a0c4-c92b977eb254" alt=""></picture><figcaption></figcaption></figure>

<figure><picture><source srcset="/files/ZqBgPaKj5tsal4laMtDl" media="(prefers-color-scheme: dark)"><img src="https://content.gitbook.com/content/fcGyJ1C47hcV3dV9rYfW/blobs/aL3WbWbEF9P3rMkPdbzB/VSP%20staking%20rewards2.png" alt=""></picture><figcaption></figcaption></figure>

Welkom bij de Kennisbank van Speedy Staking - voor al uw staking-tutorials en informatie.

Als je nog vragen hebt over staking of iets anders wilt vragen, kun je onze Telegram-groep joinen, ons e-mailen, deelnemen aan de live chat op onze website, of ons een DM op Twitter sturen!

* [Website (Livechat)](https://speedystaking.io)
* [Email Ons](mailto:info@speedystaking.io)
* [Twitter](https://twitter.com/speedystaking)
* [Telegram Groep](https://https://t.me/speedystaking)
* [Staking Rewards profiel](https://www.stakingrewards.com/provider/speedy-staking)


# Staking - De Basics

## Wat is staken?

In een Proof-of-Stake (PoS) blockchain kunnen gebruikers hun munten "inzetten" om een deel van de beloningen van het netwerk te verdienen. Deze beloningen komen meestal uit een deel van de transactiekosten van het netwerk en nieuwe munten die bij elk nieuw blok worden gecreëerd. Door te staken, kunnen gebruikers rente verdienen op hun bezit en helpen het netwerk te beveiligen. Staken is een energie-efficiëntere manier om een blockchainnetwerk te beveiligen dan het energie-intensieve mijnproces dat wordt gebruikt in een Proof-of-Work blockchain (PoW).

## **Hoe kan ik staken?**

Gedecentraliseerd staken (aangeboden door Speedy Staking via hun validator services) vereist dat je een wallet gebruikt die kan communiceren met het netwerk waarop je wilt staken, evenals de tokens van dat netwerk. Het netwerk vereist mogelijk een minimumbedrag om te staken en je zult transactiekosten moeten betalen om te staken en te unstaken. Het is belangrijk om nooit al je tokens te staken, omdat je anders niet genoeg overhoudt om later te unstaken. Netwerken vereisen meestal dat er een bepaalde tijd verstrijkt voordat je tokens worden vrijgegeven; dit varieert van 14 uur op sommige netwerken tot 28 dagen op andere. Het is van belang om hier rekening mee te houden voordat je begint met staken en ontstaken. Over het algemeen worden er geen beloningen verdiend tijdens deze periode. Wij vermelden deze informatie altijd in onze netwerkspecifieke 'Basics' in deze kennisbank.

## **Is het veilig?**

In tegenstelling tot CEXen (Centrale Exchanges) en andere platformen, biedt Speedy Staking alleen gedecentraliseerde validator diensten aan. Wij zullen nooit de controle over je tokens overnemen wanneer je op onze nodes staked, en je zult altijd zelf beslissen wat en wanneer je staked en unstaked. Wij vinden het van fundamenteel belang dat gebruikers zelfbeheer hebben over hun tokens, aangezien deze tokens aan hen toebehoren en aan niemand anders. En we moeten de beroemde crypto-uitspraak onthouden, "Not Your Keys, Not Your Crypto".

Sommige netwerken hanteren een slashing-mechanisme, waarbij validators (en daarmee ook de stakers) hun inzet (of tokens) kunnen verliezen als zij zich niet correct gedragen, wat tot gevolg kan hebben dat je tokens verliest. Verzekering voor validators tegen dit risico is mogelijk en gangbaar op netwerken waar slashing actief is. Speedy Staking is momenteel niet actief als validator op netwerken waar slashing van toepassing is.

Het laatste aspect heeft te maken met self-custody. Vanwege de gedecentraliseerde aard van self-custody is er meestal geen manier om toegang te krijgen tot een wallet anders dan de privésleutel (of seed phrase). Mocht je deze verliezen, dan heb je GEEN toegang meer tot je tokens. Hetzelfde geldt voor wanneer iemand anders toegang krijgt tot je privésleutel; diegene heeft dan VOLLEDIGE controle over jouw wallet. Een privésleutel kan niet worden veranderd, dus je moet een nieuwe wallet aanmaken zodra deze is blootgesteld. Het is essentieel om je privésleutel veilig op te bergen, deze niet met anderen te delen en te weten voor welke transacties je tekent.

## **Waarom zou ik voor Speedy Staking kiezen?**

Speedy Staking's team bestaat uit zeer ervaren team met jarenlange ervaring op het gebied van Blockchain en DevOps. Onze validator nodes draaien op hardware die aan alle mogelijke vereisten voldoen, maken gebruik van 100% groene energie, en we ondersteunen Gold Standard projecten. Wij bieden 24/7 ondersteuning in onze Telegram-groep en steunen de stakinggemeenschap met nuttige informatie en handleidingen. We nemen actief deel aan blockchain-evenementen en ondersteunen kleine projecten door partnerschappen en sponsoring. Staking Rewards heeft ons ook onafhankelijk [geverifieerd met een - AA - beoordeling](https://www.stakingrewards.com/provider/speedy-staking).


# De Basics

<figure><img src="https://content.gitbook.com/content/fcGyJ1C47hcV3dV9rYfW/blobs/99hNft4UwzyzP8NfSugQ/gitbook-casper.png" alt=""><figcaption></figcaption></figure>

## **Introductie**

Casper lanceerde zijn mainnet op 31 maart 2021. Casper is een proof-of-stake blockchainnetwerk geoptimaliseerd voor adoptie door bedrijven en ontwikkelaars. Het Casper Network is de eerste live blockchain gebouwd op de Correct-by-Construction (CBC) Casper-specificatie, waardoor het netwerk duurzame nieuwe markten kan creëren en waarde kan ontgrendelen door vrijwel elk asset te tokenisen zonder consessies te doen aan prestaties of veiligheid. Activiteiten op Casper worden beheerd door CSPR, de native token van het netwerk, via het binnenkort te lanceren [governance portaal](https://members-staging.casper.network/validator-selection-tool/10).

&#x20;

**Casper Labs**

> *"Casper Labs is een in Zwitserland gevestigde AG die in oktober 2018 begon met het werken aan de codebase van de Casper blockchain en gedurende 2020 en 2021 de Casper Testnet faciliteerde tot aan de lancering van het mainnet. Terwijl de engineers bij Casper Labs nieuwe functies blijven bijdragen aan de codebase voor de Casper blockchain, is Casper Labs ook een volledig bemand enterprise consultancy bedrijf dat ondersteuning en diensten biedt voor haar zakelijke klanten die bouwen op Casper."*

**Casper Association**

> *"De Casper Association is de non-profit organisatie, gevestigd in Zwitserland, die verantwoordelijk is voor het toezicht op het netwerk en de ondersteuning van de organische ontwikkeling en voortdurende decentralisatie. Het lidmaatschap van de vereniging bestaat uit de onafhankelijke validators die nodes draaien op Casper."*

## **Tokenomics**

Casper begon met een Genesis-supply van 10.000.000.000 (of 10 miljard) tokens. Er is momenteel 8% inflatie per jaar, wat betekent dat de totale supply met hetzelfde percentage groeit. Dit aantal kan in de toekomst veranderen. De inflatie wordt uitsluitend gebruikt om validators & delegators te belonen. Transactiekosten gaan naar de validator die het blok heeft voorgesteld, en deze vergoedingen worden niet gedeeld met delegators. De huidige totale supply zweeft rond de 12 miljard CSPR.

### **Token Sale**

De token sale van Casper werd gehouden op CoinList van 23 maart 2021 tot en met 28 maart 2021, met een extra community sale op 7 april 2021. Alle tokens van deze sales zijn inmiddels vrij in omloop.

### **Staking**

Op het Casper Network zijn er momenteel 100 actieve validators die blokken produceren en beloningen verdienen. Er zijn echter plannen om dit aantal in de toekomst te verhogen tot mogelijk 200 of 250 validators. De netwerkbrede APY (Annual Percentage Yield) is afhankelijk van het percentage van de totale CSPR-voorraad dat is gestaked; als 100% van de totale voorraad gestaked is, zou de APY 8% zijn. Gewoonlijk schommelt de APY rond de \~10%. Je eerste staking rewards verschijnen na ongeveer 4 uur. Het proces van unstaken duurt 7-8 ERA's, of 14-16 uur, tijdens het onstaken ontvang je geen verdere staking rewards.

&#x20;

### **Veiligheid**

Wanneer je CSPR staked bij een validator, blijven je tokens in jouw bezit. Dit betekent dat je op elk moment kunt undelegaten, zelfs wanneer een validator offline gaat of inactief wordt. Het ergste dat zou kunnen gebeuren is dat je geen nieuwe staking rewards ontvangt, dus het kiezen van de juiste validator is nog steeds essentieel. Er is geen slashing actief op Casper.

&#x20;

### **Zaken om in acht te nemen als je een validator selecteert:**

* **Commissie** – Hoeveel commissie rekent de validator? Hoe hoger dit getal, hoe minder rewards jij overhoudt.&#x20;
* **Node Uptime** – Is de uptime van de validator dicht bij 100%? Uptime heeft impact op de hoeveelheid rewards die je ontvangt.&#x20;
* **Vertrouwen** – Is de validator transparant? Weet ik wie de personen achter de validator zijn? Weet ik waar ze voor staan? Zijn ze onafhankelijk geverifieerd? Het is belangrijk dat de validator lange tijd actief zal zijn en toegewijd is aan betrouwbaarheid en veiligheid. Je wilt natuurlijk niet dat een node offline gaat zonder dat je het merkt; je zult dan geen staking rewards hebben ontvangen.&#x20;
* **Contact** – Hoe makkelijk is het om de validator te bereiken? Hebben ze een support groep? In het geval je hulp nodig hebt bij het staken, wil je de validator snel en makkelijk kunnen bereiken.
* **Communicatie** – Communiceren ze problemen, belangrijke updates en veranderingen op tijd?
* **Extras** – Wat bieden ze nog meer? Ondersteunen ze projecten in het ecosysteem van Casper door middel van partnerships en sponsoring? Bieden ze educationeel materiaal aan zoals tutorials? Organiseren ze events en giveaways? Extras kunnen het verschil maken tussen een goede en fantastische validator.

## **Handige Links**

### **Explorers**

[CSPR.live](http://cspr.live/) | [scansper.com](https://speedystaking.io/docs/casper-network/scansper.com) | [div3.in](http://div3.in/) | [Casperstats](http://casperstats.io/)

&#x20;

### **Wallets**

[Ledger](https://docs.casperlabs.io/workflow/users/ledger-setup/) – Hardware wallet; dient gebruikt te worden in combinatie met, bijvoorbeeld, CSPR.live.

[Casper Wallet](http://casperwallet.io/) – Officiële Casper wallet; kan gebruikt worden in combinatie met CSPR.live of op zichzelf, zowel als browser-extensie als op mobiel.

[CasperDash](https://casperdash.io/) – Gedecentraliseerde wallet beschikbaar als browser-extensie en als app op Android en iOS

[Torus Wallet](http://casper.tor.us/) – Wallet die social logins ondersteunt

[Burrito Wallet](https://burritowallet.com/en) – Mobiele wallet voornamelijk gericht op de Koreaanse markt

&#x20;

### **Validators**

[Overzicht](http://cspr.live/validators) – Overzicht van alle actieve validators op CSPR.live

Speedy Staking – [Node 1](https://cspr.live/validator/0111b3519efa63942e57a9470f55b62d9c4a59ff44df7c65eaefbd1489b7a93a5b) | [Node 2](https://cspr.live/validator/01541af7c1a41912be691fd76849b59c6ea3af38bdcff4db8cad633be4294cc38d)

&#x20;

### **Officiële Casper resources**

[Casper Network](https://casper.network/) | [CasperLabs](https://casperlabs.io/) | [Casper Twitter](https://twitter.com/Casper_Network) | [CasperLabs Twitter](https://twitter.com/Casper_Labs) |  [Casper Documentation](https://docs.casperlabs.io/) | [Casper Governance Portal](https://members-staging.casper.network/) | [Casper Telegram](http://t.me/casperblockchain) | [Casper Announcements Telegram](https://t.me/casperofficialann) | [Casper Staking Telegram](https://t.me/casperblockchainstaking) | [Casper Discord](http://discord.gg/casperblockchain) | [Casper Youtube](https://www.youtube.com/c/CasperNetwork) | [Casper Ecosystem](https://casperecosystem.io/) | [Casper GitHub](https://github.com/casper-network)

&#x20;

### **Casper taal-specifieke groepen**

[India](https://t.me/casperblockchainindia) | [Spain](https://t.me/casperblockchainspanish) | [Russia](https://t.me/casperblockchainrussia) | [Poland](https://t.me/casperblockchainpoland) | [Turkey](https://t.me/casperblockchainturkey) | [France](https://t.me/casperblockchainfrench) | [Vietnam](https://t.me/casperblockchainvietnam) | [South Korea](https://t.me/casperblockchainkorea) | [The Netherlands](https://t.me/casperblockchainnetherlands) | [Italy](https://t.me/casperblockchainitaly) | [Germany](https://t.me/casperblockchaindeutsch) | [China](https://t.me/casperblockchainchinese)


# Casper Wallet

<figure><img src="https://content.gitbook.com/content/fcGyJ1C47hcV3dV9rYfW/blobs/pgsDWkGFVNvvAiv474RY/gitbook-cw.png" alt=""><figcaption></figcaption></figure>

* [Officiële Website](https://casperwallet.io)
* Download voor [Chrome](https://chrome.google.com/webstore/detail/casper-wallet/abkahkcbhngaebpcgfmhkoioedceoigp) | [Firefox](https://addons.mozilla.org/en-US/firefox/addon/casper-wallet/) | [Safari](https://apps.apple.com/us/app/casper-wallet/id6446363274)
* Download voor [iOS](https://apps.apple.com/app/apple-store/id6446363274?pt=125226123\&ct=Website\&mt=8) | [Android](https://play.google.com/store/apps/details?id=io.casperwallet.app\&hl=en\&gl=US)
* [Officiële guides](https://www.casperwallet.io/user-guide)
* [Twitter](https://twitter.com/Casper_Wallet)
* [Telegram groep](https://t.me/CSPRhub)


# Casper Wallet - Volledige Guide

## **Hoofdstuk 1 – Installeer Casper Wallet en Setup Wallet**

<figure><img src="https://417746289-files.gitbook.io/~/files/v0/b/gitbook-x-prod.appspot.com/o/spaces%2FfcGyJ1C47hcV3dV9rYfW%2Fuploads%2FQ7SYgVZTI05Q8CiFwH3p%2FStep1.png?alt=media&amp;token=13d34f34-5396-4fdd-89e1-9e62ec93e04d" alt=""><figcaption></figcaption></figure>

**Stap 1:** Navigeer naar de [Casper Wallet website](https://casperwallet.io) en klik op '**Download**'.

<figure><img src="https://417746289-files.gitbook.io/~/files/v0/b/gitbook-x-prod.appspot.com/o/spaces%2FfcGyJ1C47hcV3dV9rYfW%2Fuploads%2FiGnyn0KdLivFppPhZTj7%2FStep2.png?alt=media&amp;token=c63f44f0-7aea-4d20-b8d7-3cef47500028" alt=""><figcaption></figcaption></figure>

**Stap 2:** Dit brengt je naar de Chrome Store (or het equivalent op andere browsers); klik '**Add to Chrome**' (or het equivalent op andere browsers).

<figure><img src="https://417746289-files.gitbook.io/~/files/v0/b/gitbook-x-prod.appspot.com/o/spaces%2FfcGyJ1C47hcV3dV9rYfW%2Fuploads%2FZM6UuqkvpRKdRrtEIC1Z%2FStep3.png?alt=media&amp;token=2f2e63f5-4fea-4f94-9d5f-74f5aab2b81d" alt=""><figcaption></figcaption></figure>

**Stap 3:** Klik op '**Add extension**'.

<figure><img src="https://417746289-files.gitbook.io/~/files/v0/b/gitbook-x-prod.appspot.com/o/spaces%2FfcGyJ1C47hcV3dV9rYfW%2Fuploads%2FQ9cyX4gVdOPG7TjGTQel%2FStep4.png?alt=media&amp;token=031876f5-d854-4520-af2f-0582147466ac" alt=""><figcaption></figcaption></figure>

**Stap 4:** Na het toevoegen van de Casper Wallet extension zal een nieuwe browser tab openen voor de setup; klik op '**Get started**'.

<figure><img src="https://417746289-files.gitbook.io/~/files/v0/b/gitbook-x-prod.appspot.com/o/spaces%2FfcGyJ1C47hcV3dV9rYfW%2Fuploads%2FCDa9YE69rBogPpovyDXf%2FStep5.png?alt=media&amp;token=06ad9175-2c1e-4f57-a97d-a48aadee7ec9" alt=""><figcaption></figcaption></figure>

**Stap 5:** Bedenkt een veilig wachtwoord, vul deze 2x in, plaats een vinkje, en klik op '**Create password**'.

<figure><img src="https://417746289-files.gitbook.io/~/files/v0/b/gitbook-x-prod.appspot.com/o/spaces%2FfcGyJ1C47hcV3dV9rYfW%2Fuploads%2FM5OjprnfE9mj6faUobtt%2FStep6.png?alt=media&amp;token=4720b40a-341f-4dc9-a120-2bf960f50896" alt=""><figcaption></figcaption></figure>

**Stap 6:** Klik op '**Create my secret recovery phrase**'.

<figure><img src="https://417746289-files.gitbook.io/~/files/v0/b/gitbook-x-prod.appspot.com/o/spaces%2FfcGyJ1C47hcV3dV9rYfW%2Fuploads%2FmRPyl2IT789WSfvDXbwp%2FStep7.png?alt=media&amp;token=6e7b49d1-2fb2-437f-b288-ffd5cbd24ad1" alt=""><figcaption></figcaption></figure>

**Stap 7:** Plaats een vinkje en klik op '**Next**'.

<figure><img src="https://417746289-files.gitbook.io/~/files/v0/b/gitbook-x-prod.appspot.com/o/spaces%2FfcGyJ1C47hcV3dV9rYfW%2Fuploads%2F8XejVeHWYKo4pbhcVpN8%2FStep8.png?alt=media&amp;token=59211d4d-9506-4d6a-aede-19d9314e2139" alt=""><figcaption></figcaption></figure>

**Stap 8:** Sla je secret recovery phrase veilig op, plaats een vinkje en klik op '**Next**'.

<figure><img src="https://417746289-files.gitbook.io/~/files/v0/b/gitbook-x-prod.appspot.com/o/spaces%2FfcGyJ1C47hcV3dV9rYfW%2Fuploads%2FfPT0n7JRHnE3bsBYrViP%2FStep9.png?alt=media&amp;token=ed0764c4-09fe-435d-a072-964ac1ef746d" alt=""><figcaption></figcaption></figure>

**Stap 9:** Vul de missende woorden uit je secret recovery phrase in op de juiste plek en klik op '**Confirm**'.

<figure><img src="https://417746289-files.gitbook.io/~/files/v0/b/gitbook-x-prod.appspot.com/o/spaces%2FfcGyJ1C47hcV3dV9rYfW%2Fuploads%2FPJGaybnUBgGS1T22DG2a%2FStep10.png?alt=media&amp;token=566679bf-35b1-4484-a00c-e98d9a5c0610" alt=""><figcaption></figcaption></figure>

**Stap 10:** Klik op '**Done**'.

<figure><img src="https://417746289-files.gitbook.io/~/files/v0/b/gitbook-x-prod.appspot.com/o/spaces%2FfcGyJ1C47hcV3dV9rYfW%2Fuploads%2FcTP0pTen6wMmOuuoRosq%2FStep11.png?alt=media&amp;token=45f5ca4f-2ea2-4721-bd6c-309d37f0f260" alt=""><figcaption></figcaption></figure>

**Stap 11:** Klik op '**Got it**'.

<figure><img src="https://417746289-files.gitbook.io/~/files/v0/b/gitbook-x-prod.appspot.com/o/spaces%2FfcGyJ1C47hcV3dV9rYfW%2Fuploads%2FgdnP0oy3DO5OR6tDyGL1%2FStep12.png?alt=media&amp;token=c808f401-2110-441f-b818-8435d04d121b" alt=""><figcaption></figcaption></figure>

**Stap 12 (aanrader):** Ga naar de extensies (rechterbovenkant van je scherm) en klik op het pinnetje naast de Casper Wallet. Op deze manier heb je altijd makkelijk toegang tot de Casper Wallet extensie.

## **Hoofdstuk 2 – Verbind Casper Wallet met CSPR.live Blockchain Explorer**

<figure><img src="https://417746289-files.gitbook.io/~/files/v0/b/gitbook-x-prod.appspot.com/o/spaces%2FfcGyJ1C47hcV3dV9rYfW%2Fuploads%2FNocGYpt8RQ5l3ZhLBVqy%2FStep13.png?alt=media&amp;token=445ef81f-b727-4d24-ab68-38e5ac3703fa" alt=""><figcaption></figcaption></figure>

**Stap 1:** Ga naar CSPR.live en klik op '**Sign in**' aan de rechterbovenkant van het scherm.&#x20;

<figure><img src="https://417746289-files.gitbook.io/~/files/v0/b/gitbook-x-prod.appspot.com/o/spaces%2FfcGyJ1C47hcV3dV9rYfW%2Fuploads%2FcYrVu0OlRmqtaMtIBy6f%2FStep14.png?alt=media&amp;token=4e7f6ea2-444a-4a6d-8661-23c6fb03100e" alt=""><figcaption></figcaption></figure>

**Stap 2:** Klik op '**Casper Wallet**'.

<figure><img src="https://417746289-files.gitbook.io/~/files/v0/b/gitbook-x-prod.appspot.com/o/spaces%2FfcGyJ1C47hcV3dV9rYfW%2Fuploads%2F9JlxLxusC3qZ88S88Ies%2FStep15.png?alt=media&amp;token=8fdf96ae-8d00-4c38-9029-91a74ec5ac48" alt=""><figcaption></figcaption></figure>

**Stap 3:** Zet een vinkje bij het account dat je wilt verbinden en klik op '**Next**'.

<figure><img src="https://417746289-files.gitbook.io/~/files/v0/b/gitbook-x-prod.appspot.com/o/spaces%2FfcGyJ1C47hcV3dV9rYfW%2Fuploads%2FKhROF8pMQ5RCOsGoRTnJ%2FStep16.png?alt=media&amp;token=c9ea2bf3-c7e8-4e2c-9509-6bafe1db0bd0" alt=""><figcaption></figcaption></figure>

**Stap 4:** Klik op '**Connect to 1 account**'.

## **Hoofdstuk 3 – Ontvang $CSPR op je Casper Wallet Public Key**&#x20;

<figure><img src="https://417746289-files.gitbook.io/~/files/v0/b/gitbook-x-prod.appspot.com/o/spaces%2FfcGyJ1C47hcV3dV9rYfW%2Fuploads%2FmRYyghquPMri2z9NAOVe%2FStep17.png?alt=media&amp;token=8a5b8e31-25ec-45ea-8dc2-b846c60598db" alt=""><figcaption></figcaption></figure>

**Stap 1:** Beweeg je muis over je public key aan de rechterbovenkant van je scherm en selecteer '**View Account**'.

<figure><img src="https://417746289-files.gitbook.io/~/files/v0/b/gitbook-x-prod.appspot.com/o/spaces%2FfcGyJ1C47hcV3dV9rYfW%2Fuploads%2Fy1ZRrrXe09tCYfSTswq7%2FStep18.png?alt=media&amp;token=146a0df2-2862-4c7f-b7f1-cdbed3603488" alt=""><figcaption></figcaption></figure>

**Stap 2:** Je Public Key (wallet address) staat bovenaan. Dit is het adres waar je je $CSPR naar toe stuurt.&#x20;

## **Hoofdstuk 4a – Verstuur $CSPR met gebruik van Casper Wallet en CSPR.Live**

<figure><img src="https://417746289-files.gitbook.io/~/files/v0/b/gitbook-x-prod.appspot.com/o/spaces%2FfcGyJ1C47hcV3dV9rYfW%2Fuploads%2FULbUWhpNbfuCLDBpxd9c%2FStep19.png?alt=media&amp;token=139e6999-b69f-4502-a00e-bc121dfe42f3" alt=""><figcaption></figcaption></figure>

**Stap 1:** Beweeg je muis over '**Wallet**' aan de rechterbovenkant van je scherm en selecteer '**Transfer CSPR**'.

<figure><img src="https://417746289-files.gitbook.io/~/files/v0/b/gitbook-x-prod.appspot.com/o/spaces%2FfcGyJ1C47hcV3dV9rYfW%2Fuploads%2F7KWrtP1UbfXdehAyNqrE%2FStep20.png?alt=media&amp;token=08730ae1-6ce3-4642-9612-5930b621a5aa" alt=""><figcaption></figcaption></figure>

**Stap 2:** Vul de public key in waar je $CSPR naar toe wilt sturen onder '**Recipient**', de hoeveelheid $CSPR onder '**Amount**' en vul een specifieke Transfer ID in als dat nodig is onder '**Transfer ID (Memo)**'. Dit laatste is soms nodig als je $CSPR naar een exchange stuurt. Als dit niet nodig is kun je '**0**' invullen. Klik hierna op '**Next**'.

<figure><img src="https://417746289-files.gitbook.io/~/files/v0/b/gitbook-x-prod.appspot.com/o/spaces%2FfcGyJ1C47hcV3dV9rYfW%2Fuploads%2FoVCiSNZni27244I5dpnm%2FStep21.png?alt=media&amp;token=dcee48cf-5704-42d7-99de-b1f48f0afc37" alt=""><figcaption></figcaption></figure>

**Stap 3:** Controleer of de informatie correct is en klik op '**Confirm and transfer**'.

<figure><img src="https://417746289-files.gitbook.io/~/files/v0/b/gitbook-x-prod.appspot.com/o/spaces%2FfcGyJ1C47hcV3dV9rYfW%2Fuploads%2FHQvf0XdFCJW7vPQiDZaR%2FStep22-1.png?alt=media&amp;token=b7345774-9c28-483c-b696-6ea9c43dd802" alt=""><figcaption></figcaption></figure>

**Stap 4:** Je zult nu alle informatie over je transactie zien en je kunt op '**Sign with Casper Wallet**' klikken.

<figure><img src="https://417746289-files.gitbook.io/~/files/v0/b/gitbook-x-prod.appspot.com/o/spaces%2FfcGyJ1C47hcV3dV9rYfW%2Fuploads%2F4lH840VGc6XVWuDJgVzE%2FStep22.png?alt=media&amp;token=43c9ff1e-9aa0-47e5-9dd3-e3fc5f05ae1c" alt=""><figcaption></figcaption></figure>

**Stap 5:** Klik op '**Sign**' in de Casper Wallet extensie popup.

<figure><img src="https://417746289-files.gitbook.io/~/files/v0/b/gitbook-x-prod.appspot.com/o/spaces%2FfcGyJ1C47hcV3dV9rYfW%2Fuploads%2FqVK55nx3oFC1es3MnTRU%2FStep23.png?alt=media&amp;token=4c1830e3-4313-49d3-92b9-be325fd75af0" alt=""><figcaption></figcaption></figure>

**Stap 6:** Je ziet nu de details van je succesvolle transactie.

## **Hoofdstuk 4b – Verstuur $CSPR met gebruik van Casper Wallet**

<figure><img src="https://417746289-files.gitbook.io/~/files/v0/b/gitbook-x-prod.appspot.com/o/spaces%2FfcGyJ1C47hcV3dV9rYfW%2Fuploads%2Fw0epRvKmoqHfpZuSlsOe%2FSend1.png?alt=media&amp;token=9a9f49e4-7ea1-4f15-bac0-55906b4c656a" alt=""><figcaption></figcaption></figure>

**Stap 1:** Klik op '**Send**' in de Casper Wallet extensie.

<figure><img src="https://417746289-files.gitbook.io/~/files/v0/b/gitbook-x-prod.appspot.com/o/spaces%2FfcGyJ1C47hcV3dV9rYfW%2Fuploads%2FGuG6SK97Wksk5qHi9eBQ%2FSend2.png?alt=media&amp;token=a0439604-5a22-4e11-b4f4-fc5c60a62831" alt=""><figcaption></figcaption></figure>

**Stap 2:** Vul de public key in waar je $CSPR naar toe wilt sturen onder '**To** **recipient**' en klik op '**Next**'.

<figure><img src="https://417746289-files.gitbook.io/~/files/v0/b/gitbook-x-prod.appspot.com/o/spaces%2FfcGyJ1C47hcV3dV9rYfW%2Fuploads%2F0ABkLNSMoVhsik2hUB3n%2FSend3.png?alt=media&amp;token=bcc872de-79fc-410d-9a9c-15cb3d4470f3" alt=""><figcaption></figcaption></figure>

**Stap 3:** Vul de hoeveelheid $CSPR in onder '**Amount**' en vul wanneer nodig een specifieke Tansfer ID in onder '**Transfer ID (memo)**'. Dit laatste is soms nodig als je $CSPR naar een exchange stuurt. Als dit niet nodig is kun je '**0**' invullen. Klik hierna op **'Next'**.

<figure><img src="https://417746289-files.gitbook.io/~/files/v0/b/gitbook-x-prod.appspot.com/o/spaces%2FfcGyJ1C47hcV3dV9rYfW%2Fuploads%2FqhJEHhqIcYwwtliOVwYx%2FSend4.png?alt=media&amp;token=0f64acf3-81a3-4a5f-a621-7ae1e1951dde" alt=""><figcaption></figcaption></figure>

**Stap 4:** Klik op '**Send**'.

<figure><img src="https://417746289-files.gitbook.io/~/files/v0/b/gitbook-x-prod.appspot.com/o/spaces%2FfcGyJ1C47hcV3dV9rYfW%2Fuploads%2F6awhf7Kx7uud5cLxXYKt%2FSend5.png?alt=media&amp;token=0714a0a0-276c-4ba5-b707-8fe13857bdd0" alt=""><figcaption></figcaption></figure>

**Stap 5:** Je hebt succesvol je $CSPR verstuurd. Klik op '**Done**'.

## **Hoofdstuk 5a – Stake $CSPR met gebruik van Casper Wallet en CSPR.Live**

<figure><img src="https://417746289-files.gitbook.io/~/files/v0/b/gitbook-x-prod.appspot.com/o/spaces%2FfcGyJ1C47hcV3dV9rYfW%2Fuploads%2F6RAyBJofrDyihrhcPNao%2FStep24.png?alt=media&amp;token=bc19f887-3112-4878-9eba-dfb103f1d0f6" alt=""><figcaption></figcaption></figure>

**Stap 1:** Beweeg je muis over '**Wallet**' aan de rechterbovenkant van je scherm en selecteer '**Delegate Stake**'.

<figure><img src="https://417746289-files.gitbook.io/~/files/v0/b/gitbook-x-prod.appspot.com/o/spaces%2FfcGyJ1C47hcV3dV9rYfW%2Fuploads%2FKaalMJK9bx1o25FklkEk%2FStep25.png?alt=media&amp;token=06245609-76ee-404c-96d2-845e14b46257" alt=""><figcaption></figcaption></figure>

**Stap 2:** Kies een validator onder '**Validator**' (**Bijvoorbeeld, Speedy Staking**) en vul de hoeveelheid $CSPR die je wilt staken in onder '**Amount**'. Klik hierna op '**Next**'.

<figure><img src="https://417746289-files.gitbook.io/~/files/v0/b/gitbook-x-prod.appspot.com/o/spaces%2FfcGyJ1C47hcV3dV9rYfW%2Fuploads%2FptUVhVSXimsdqrHRnZmM%2FStep26.png?alt=media&amp;token=076f0a1b-3739-4369-902a-2dce06408941" alt=""><figcaption></figcaption></figure>

**Stap 3:** Controleer of de informatie correct is en klik op '**Confirm and delegate stake**'.

<figure><img src="https://417746289-files.gitbook.io/~/files/v0/b/gitbook-x-prod.appspot.com/o/spaces%2FfcGyJ1C47hcV3dV9rYfW%2Fuploads%2F8aVwLXv8Hl0TdQoleQIu%2FStep27.png?alt=media&amp;token=c5080655-623d-4c36-b93e-f1d489664f15" alt=""><figcaption></figcaption></figure>

**Stap 4:** Je zult nu alle informatie zien over je stake transactie, klik op '**Sign with Casper Wallet**'.

<figure><img src="https://417746289-files.gitbook.io/~/files/v0/b/gitbook-x-prod.appspot.com/o/spaces%2FfcGyJ1C47hcV3dV9rYfW%2Fuploads%2F7SRFzZFkBP9sqmuIY3Ko%2FStep28.png?alt=media&amp;token=dd008ba0-a931-47c3-a9b1-76f491ad89de" alt=""><figcaption></figcaption></figure>

**Stap 5:** Klik op '**Sign**'.

<figure><img src="https://417746289-files.gitbook.io/~/files/v0/b/gitbook-x-prod.appspot.com/o/spaces%2FfcGyJ1C47hcV3dV9rYfW%2Fuploads%2Fkf1EFnd3neG41EJVxXDg%2FStep29.png?alt=media&amp;token=3fe27769-9fe8-45fd-9be6-a2bd714cc447" alt=""><figcaption></figcaption></figure>

**Stap 6:** Je ziet nu de details van je succesvolle stake. Je zult je eerste Staking Rewards na ongeveer 4 uur ontvangen. Daarna ontvang je elke ERA (\~2 uren) Staking Rewards.

## **Hoofdstuk 5b – Stake $CSPR met gebruik van Casper Wallet**

<figure><img src="https://417746289-files.gitbook.io/~/files/v0/b/gitbook-x-prod.appspot.com/o/spaces%2FfcGyJ1C47hcV3dV9rYfW%2Fuploads%2FtGJMUKArXd4tAxC3mELo%2FStep30.png?alt=media&amp;token=0b48e98c-1fdc-45d6-81f1-6f9d6c118bb1" alt=""><figcaption></figcaption></figure>

**Stap 1:** Klik op '**More**' in de Casper Wallet extensie.

<figure><img src="https://417746289-files.gitbook.io/~/files/v0/b/gitbook-x-prod.appspot.com/o/spaces%2FfcGyJ1C47hcV3dV9rYfW%2Fuploads%2FC4ci3NagAaq26KFxYInp%2FStep31.png?alt=media&amp;token=027d71d8-ba9e-4baa-961b-b8a7a073b274" alt=""><figcaption></figcaption></figure>

**Stap 2:** Klik op '**Delegate**'.

<figure><img src="https://417746289-files.gitbook.io/~/files/v0/b/gitbook-x-prod.appspot.com/o/spaces%2FfcGyJ1C47hcV3dV9rYfW%2Fuploads%2FhHh2UmbFDb5qogQcTBXt%2FStep32.png?alt=media&amp;token=6b5c5796-3450-4dd8-823a-5965b6a34d94" alt=""><figcaption></figcaption></figure>

**Stap 3:** Selecteer een validator onder '**To validator**' (**Bijvoorbeeld, Speedy Staking**) en klik op '**Next**'.

<figure><img src="https://417746289-files.gitbook.io/~/files/v0/b/gitbook-x-prod.appspot.com/o/spaces%2FfcGyJ1C47hcV3dV9rYfW%2Fuploads%2FFk8MyY5KIYFZgPRojLvs%2FStep33.png?alt=media&amp;token=4a39eb7f-9551-4caa-bfba-fe18a0ab5343" alt=""><figcaption></figcaption></figure>

**Stap 4:** Vul de hoeveelheid $CSPR die je wilt staken in onder '**Amount**' en klik op '**Next**'.

<figure><img src="https://417746289-files.gitbook.io/~/files/v0/b/gitbook-x-prod.appspot.com/o/spaces%2FfcGyJ1C47hcV3dV9rYfW%2Fuploads%2Fh05XM5FUG63Dh1K3k8Hj%2FStep34.png?alt=media&amp;token=9229121e-79ee-499b-9e6b-ae0260b81f25" alt=""><figcaption></figcaption></figure>

**Stap 5:** Klik op '**Confirm delegation**'.

<figure><img src="https://417746289-files.gitbook.io/~/files/v0/b/gitbook-x-prod.appspot.com/o/spaces%2FfcGyJ1C47hcV3dV9rYfW%2Fuploads%2F5qxXOWXlPBsVJnaKli3E%2FStep35.png?alt=media&amp;token=8ec21f7f-30d1-48be-a0f7-6c33c60a0f8b" alt=""><figcaption></figcaption></figure>

**Stap 6:** Je hebt succesvol gestaked. Klik op '**Done**'. Je zult je eerste Staking Rewards na ongeveer 4 uur ontvangen. Daarna ontvang je elke ERA (\~2 uren) Staking Rewards.


# Casper Wallet - Installatie en Setup

<figure><img src="https://417746289-files.gitbook.io/~/files/v0/b/gitbook-x-prod.appspot.com/o/spaces%2FfcGyJ1C47hcV3dV9rYfW%2Fuploads%2FQ7SYgVZTI05Q8CiFwH3p%2FStep1.png?alt=media&amp;token=13d34f34-5396-4fdd-89e1-9e62ec93e04d" alt=""><figcaption></figcaption></figure>

**Stap 1:** Navigeer naar de [Casper Wallet website](https://casperwallet.io) en klik op '**Download**'.

<figure><img src="https://417746289-files.gitbook.io/~/files/v0/b/gitbook-x-prod.appspot.com/o/spaces%2FfcGyJ1C47hcV3dV9rYfW%2Fuploads%2FiGnyn0KdLivFppPhZTj7%2FStep2.png?alt=media&amp;token=c63f44f0-7aea-4d20-b8d7-3cef47500028" alt=""><figcaption></figcaption></figure>

**Stap 2:** Dit brengt je naar de Chrome Store (or het equivalent op andere browsers); klik '**Add to Chrome**' (or het equivalent op andere browsers).

<figure><img src="https://417746289-files.gitbook.io/~/files/v0/b/gitbook-x-prod.appspot.com/o/spaces%2FfcGyJ1C47hcV3dV9rYfW%2Fuploads%2FZM6UuqkvpRKdRrtEIC1Z%2FStep3.png?alt=media&amp;token=2f2e63f5-4fea-4f94-9d5f-74f5aab2b81d" alt=""><figcaption></figcaption></figure>

**Stap 3:** Klik op '**Add extension**'.

<figure><img src="https://417746289-files.gitbook.io/~/files/v0/b/gitbook-x-prod.appspot.com/o/spaces%2FfcGyJ1C47hcV3dV9rYfW%2Fuploads%2FQ9cyX4gVdOPG7TjGTQel%2FStep4.png?alt=media&amp;token=031876f5-d854-4520-af2f-0582147466ac" alt=""><figcaption></figcaption></figure>

**Stap 4:** Na het toevoegen van de Casper Wallet extension zal een nieuwe browser tab openen voor de setup; klik op '**Get started**'.

<figure><img src="https://417746289-files.gitbook.io/~/files/v0/b/gitbook-x-prod.appspot.com/o/spaces%2FfcGyJ1C47hcV3dV9rYfW%2Fuploads%2FCDa9YE69rBogPpovyDXf%2FStep5.png?alt=media&amp;token=06ad9175-2c1e-4f57-a97d-a48aadee7ec9" alt=""><figcaption></figcaption></figure>

**Stap 5:** Bedenkt een veilig wachtwoord, vul deze 2x in, plaats een vinkje, en klik op '**Create password**'.

<figure><img src="https://417746289-files.gitbook.io/~/files/v0/b/gitbook-x-prod.appspot.com/o/spaces%2FfcGyJ1C47hcV3dV9rYfW%2Fuploads%2FM5OjprnfE9mj6faUobtt%2FStep6.png?alt=media&amp;token=4720b40a-341f-4dc9-a120-2bf960f50896" alt=""><figcaption></figcaption></figure>

**Stap 6:** Klik op '**Create my secret recovery phrase**'.

<figure><img src="https://417746289-files.gitbook.io/~/files/v0/b/gitbook-x-prod.appspot.com/o/spaces%2FfcGyJ1C47hcV3dV9rYfW%2Fuploads%2FmRPyl2IT789WSfvDXbwp%2FStep7.png?alt=media&amp;token=6e7b49d1-2fb2-437f-b288-ffd5cbd24ad1" alt=""><figcaption></figcaption></figure>

**Stap 7:** Plaats een vinkje en klik op '**Next**'.

<figure><img src="https://417746289-files.gitbook.io/~/files/v0/b/gitbook-x-prod.appspot.com/o/spaces%2FfcGyJ1C47hcV3dV9rYfW%2Fuploads%2F8XejVeHWYKo4pbhcVpN8%2FStep8.png?alt=media&amp;token=59211d4d-9506-4d6a-aede-19d9314e2139" alt=""><figcaption></figcaption></figure>

**Stap 8:** Sla je secret recovery phrase veilig op, plaats een vinkje en klik op '**Next**'.

<figure><img src="https://417746289-files.gitbook.io/~/files/v0/b/gitbook-x-prod.appspot.com/o/spaces%2FfcGyJ1C47hcV3dV9rYfW%2Fuploads%2FfPT0n7JRHnE3bsBYrViP%2FStep9.png?alt=media&amp;token=ed0764c4-09fe-435d-a072-964ac1ef746d" alt=""><figcaption></figcaption></figure>

**Stap 9:** Vul de missende woorden uit je secret recovery phrase in op de juiste plek en klik op '**Confirm**'.

<figure><img src="https://417746289-files.gitbook.io/~/files/v0/b/gitbook-x-prod.appspot.com/o/spaces%2FfcGyJ1C47hcV3dV9rYfW%2Fuploads%2FPJGaybnUBgGS1T22DG2a%2FStep10.png?alt=media&amp;token=566679bf-35b1-4484-a00c-e98d9a5c0610" alt=""><figcaption></figcaption></figure>

**Stap 10:** Klik op '**Done**'.

<figure><img src="https://417746289-files.gitbook.io/~/files/v0/b/gitbook-x-prod.appspot.com/o/spaces%2FfcGyJ1C47hcV3dV9rYfW%2Fuploads%2FcTP0pTen6wMmOuuoRosq%2FStep11.png?alt=media&amp;token=45f5ca4f-2ea2-4721-bd6c-309d37f0f260" alt=""><figcaption></figcaption></figure>

**Stap 11:** Klik op '**Got it**'.

<figure><img src="https://417746289-files.gitbook.io/~/files/v0/b/gitbook-x-prod.appspot.com/o/spaces%2FfcGyJ1C47hcV3dV9rYfW%2Fuploads%2FgdnP0oy3DO5OR6tDyGL1%2FStep12.png?alt=media&amp;token=c808f401-2110-441f-b818-8435d04d121b" alt=""><figcaption></figcaption></figure>

**Stap 12 (aanrader):** Ga naar de extensies (rechterbovenkant van je scherm) en klik op het pinnetje naast de Casper Wallet. Op deze manier heb je altijd makkelijk toegang tot de Casper Wallet extensie.


# Casper Wallet - Verbind Casper Wallet met CSPR.live

<figure><img src="https://417746289-files.gitbook.io/~/files/v0/b/gitbook-x-prod.appspot.com/o/spaces%2FfcGyJ1C47hcV3dV9rYfW%2Fuploads%2FNocGYpt8RQ5l3ZhLBVqy%2FStep13.png?alt=media&amp;token=445ef81f-b727-4d24-ab68-38e5ac3703fa" alt=""><figcaption></figcaption></figure>

**Stap 1:** Ga naar CSPR.live en klik op '**Sign in**' aan de rechterbovenkant van het scherm.&#x20;

<figure><img src="https://417746289-files.gitbook.io/~/files/v0/b/gitbook-x-prod.appspot.com/o/spaces%2FfcGyJ1C47hcV3dV9rYfW%2Fuploads%2FcYrVu0OlRmqtaMtIBy6f%2FStep14.png?alt=media&amp;token=4e7f6ea2-444a-4a6d-8661-23c6fb03100e" alt=""><figcaption></figcaption></figure>

**Stap 2:** Klik op '**Casper Wallet**'.

<figure><img src="https://417746289-files.gitbook.io/~/files/v0/b/gitbook-x-prod.appspot.com/o/spaces%2FfcGyJ1C47hcV3dV9rYfW%2Fuploads%2F9JlxLxusC3qZ88S88Ies%2FStep15.png?alt=media&amp;token=8fdf96ae-8d00-4c38-9029-91a74ec5ac48" alt=""><figcaption></figcaption></figure>

**Stap 3:** Zet een vinkje bij het account dat je wilt verbinden en klik op '**Next**'.

<figure><img src="https://417746289-files.gitbook.io/~/files/v0/b/gitbook-x-prod.appspot.com/o/spaces%2FfcGyJ1C47hcV3dV9rYfW%2Fuploads%2FKhROF8pMQ5RCOsGoRTnJ%2FStep16.png?alt=media&amp;token=c9ea2bf3-c7e8-4e2c-9509-6bafe1db0bd0" alt=""><figcaption></figcaption></figure>

**Stap 4:** Klik op '**Connect to 1 account**'.


# Casper Wallet - Ontvang $CSPR

<figure><img src="https://417746289-files.gitbook.io/~/files/v0/b/gitbook-x-prod.appspot.com/o/spaces%2FfcGyJ1C47hcV3dV9rYfW%2Fuploads%2FmRYyghquPMri2z9NAOVe%2FStep17.png?alt=media&amp;token=8a5b8e31-25ec-45ea-8dc2-b846c60598db" alt=""><figcaption></figcaption></figure>

**Stap 1:** Beweeg je muis over je public key aan de rechterbovenkant van je scherm en selecteer '**View Account**'.

<figure><img src="https://417746289-files.gitbook.io/~/files/v0/b/gitbook-x-prod.appspot.com/o/spaces%2FfcGyJ1C47hcV3dV9rYfW%2Fuploads%2Fy1ZRrrXe09tCYfSTswq7%2FStep18.png?alt=media&amp;token=146a0df2-2862-4c7f-b7f1-cdbed3603488" alt=""><figcaption></figcaption></figure>

**Stap 2:** Je Public Key (wallet address) staat bovenaan. Dit is het adres waar je je $CSPR naar toe stuurt.&#x20;


# Casper Wallet - Verstuur $CSPR (CSPR.live)

<figure><img src="https://417746289-files.gitbook.io/~/files/v0/b/gitbook-x-prod.appspot.com/o/spaces%2FfcGyJ1C47hcV3dV9rYfW%2Fuploads%2FULbUWhpNbfuCLDBpxd9c%2FStep19.png?alt=media&amp;token=139e6999-b69f-4502-a00e-bc121dfe42f3" alt=""><figcaption></figcaption></figure>

**Stap 1:** Beweeg je muis over '**Wallet**' aan de rechterbovenkant van je scherm en selecteer '**Transfer CSPR**'.

<figure><img src="https://417746289-files.gitbook.io/~/files/v0/b/gitbook-x-prod.appspot.com/o/spaces%2FfcGyJ1C47hcV3dV9rYfW%2Fuploads%2F7KWrtP1UbfXdehAyNqrE%2FStep20.png?alt=media&amp;token=08730ae1-6ce3-4642-9612-5930b621a5aa" alt=""><figcaption></figcaption></figure>

**Stap 2:** Vul de public key in waar je $CSPR naar toe wilt sturen onder '**Recipient**', de hoeveelheid $CSPR onder '**Amount**' en vul een specifieke Transfer ID in als dat nodig is onder '**Transfer ID (Memo)**'. Dit laatste is soms nodig als je $CSPR naar een exchange stuurt. Als dit niet nodig is kun je '**0**' invullen. Klik hierna op '**Next**'.

<figure><img src="https://417746289-files.gitbook.io/~/files/v0/b/gitbook-x-prod.appspot.com/o/spaces%2FfcGyJ1C47hcV3dV9rYfW%2Fuploads%2FoVCiSNZni27244I5dpnm%2FStep21.png?alt=media&amp;token=dcee48cf-5704-42d7-99de-b1f48f0afc37" alt=""><figcaption></figcaption></figure>

**Stap 3:** Controleer of de informatie correct is en klik op '**Confirm and transfer**'.

<figure><img src="https://417746289-files.gitbook.io/~/files/v0/b/gitbook-x-prod.appspot.com/o/spaces%2FfcGyJ1C47hcV3dV9rYfW%2Fuploads%2FHQvf0XdFCJW7vPQiDZaR%2FStep22-1.png?alt=media&amp;token=b7345774-9c28-483c-b696-6ea9c43dd802" alt=""><figcaption></figcaption></figure>

**Stap 4:** Je zult nu alle informatie over je transactie zien en je kunt op '**Sign with Casper Wallet**' klikken.

<figure><img src="https://417746289-files.gitbook.io/~/files/v0/b/gitbook-x-prod.appspot.com/o/spaces%2FfcGyJ1C47hcV3dV9rYfW%2Fuploads%2F4lH840VGc6XVWuDJgVzE%2FStep22.png?alt=media&amp;token=43c9ff1e-9aa0-47e5-9dd3-e3fc5f05ae1c" alt=""><figcaption></figcaption></figure>

**Stap 5:** Klik op '**Sign**' in de Casper Wallet extensie popup.

<figure><img src="https://417746289-files.gitbook.io/~/files/v0/b/gitbook-x-prod.appspot.com/o/spaces%2FfcGyJ1C47hcV3dV9rYfW%2Fuploads%2FqVK55nx3oFC1es3MnTRU%2FStep23.png?alt=media&amp;token=4c1830e3-4313-49d3-92b9-be325fd75af0" alt=""><figcaption></figcaption></figure>

**Stap 6:** Je ziet nu de details van je succesvolle transactie.


# Casper Wallet - Verstuur $CSPR (In-App)

<figure><img src="https://417746289-files.gitbook.io/~/files/v0/b/gitbook-x-prod.appspot.com/o/spaces%2FfcGyJ1C47hcV3dV9rYfW%2Fuploads%2Fw0epRvKmoqHfpZuSlsOe%2FSend1.png?alt=media&amp;token=9a9f49e4-7ea1-4f15-bac0-55906b4c656a" alt=""><figcaption></figcaption></figure>

**Stap 1:** Klik op '**Send**' in de Casper Wallet extensie.

<figure><img src="https://417746289-files.gitbook.io/~/files/v0/b/gitbook-x-prod.appspot.com/o/spaces%2FfcGyJ1C47hcV3dV9rYfW%2Fuploads%2FGuG6SK97Wksk5qHi9eBQ%2FSend2.png?alt=media&amp;token=a0439604-5a22-4e11-b4f4-fc5c60a62831" alt=""><figcaption></figcaption></figure>

**Stap 2:** Vul de public key in waar je $CSPR naar toe wilt sturen onder '**To** **recipient**' en klik op '**Next**'.

<figure><img src="https://417746289-files.gitbook.io/~/files/v0/b/gitbook-x-prod.appspot.com/o/spaces%2FfcGyJ1C47hcV3dV9rYfW%2Fuploads%2F0ABkLNSMoVhsik2hUB3n%2FSend3.png?alt=media&amp;token=bcc872de-79fc-410d-9a9c-15cb3d4470f3" alt=""><figcaption></figcaption></figure>

**Stap 3:** Vul de hoeveelheid $CSPR in onder '**Amount**' en vul wanneer nodig een specifieke Tansfer ID in onder '**Transfer ID (memo)**'. Dit laatste is soms nodig als je $CSPR naar een exchange stuurt. Als dit niet nodig is kun je '**0**' invullen. Klik hierna op **'Next'**.

<figure><img src="https://417746289-files.gitbook.io/~/files/v0/b/gitbook-x-prod.appspot.com/o/spaces%2FfcGyJ1C47hcV3dV9rYfW%2Fuploads%2FqhJEHhqIcYwwtliOVwYx%2FSend4.png?alt=media&amp;token=0f64acf3-81a3-4a5f-a621-7ae1e1951dde" alt=""><figcaption></figcaption></figure>

**Stap 4:** Klik op '**Send**'.

<figure><img src="https://417746289-files.gitbook.io/~/files/v0/b/gitbook-x-prod.appspot.com/o/spaces%2FfcGyJ1C47hcV3dV9rYfW%2Fuploads%2F6awhf7Kx7uud5cLxXYKt%2FSend5.png?alt=media&amp;token=0714a0a0-276c-4ba5-b707-8fe13857bdd0" alt=""><figcaption></figcaption></figure>

**Stap 5:** Je hebt succesvol je $CSPR verstuurd. Klik op '**Done**'.


# Casper Wallet - Stake $CSPR (CSPR.live)

## **Hoofdstuk 5a – Stake $CSPR met gebruik van Casper Wallet en CSPR.Live**

<figure><img src="https://417746289-files.gitbook.io/~/files/v0/b/gitbook-x-prod.appspot.com/o/spaces%2FfcGyJ1C47hcV3dV9rYfW%2Fuploads%2F6RAyBJofrDyihrhcPNao%2FStep24.png?alt=media&amp;token=bc19f887-3112-4878-9eba-dfb103f1d0f6" alt=""><figcaption></figcaption></figure>

**Stap 1:** Beweeg je muis over '**Wallet**' aan de rechterbovenkant van je scherm en selecteer '**Delegate Stake**'.

<figure><img src="https://417746289-files.gitbook.io/~/files/v0/b/gitbook-x-prod.appspot.com/o/spaces%2FfcGyJ1C47hcV3dV9rYfW%2Fuploads%2FKaalMJK9bx1o25FklkEk%2FStep25.png?alt=media&amp;token=06245609-76ee-404c-96d2-845e14b46257" alt=""><figcaption></figcaption></figure>

**Stap 2:** Kies een validator onder '**Validator**' (**Bijvoorbeeld, Speedy Staking**) en vul de hoeveelheid $CSPR die je wilt staken in onder '**Amount**'. Klik hierna op '**Next**'.

<figure><img src="https://417746289-files.gitbook.io/~/files/v0/b/gitbook-x-prod.appspot.com/o/spaces%2FfcGyJ1C47hcV3dV9rYfW%2Fuploads%2FptUVhVSXimsdqrHRnZmM%2FStep26.png?alt=media&amp;token=076f0a1b-3739-4369-902a-2dce06408941" alt=""><figcaption></figcaption></figure>

**Stap 3:** Controleer of de informatie correct is en klik op '**Confirm and delegate stake**'.

<figure><img src="https://417746289-files.gitbook.io/~/files/v0/b/gitbook-x-prod.appspot.com/o/spaces%2FfcGyJ1C47hcV3dV9rYfW%2Fuploads%2F8aVwLXv8Hl0TdQoleQIu%2FStep27.png?alt=media&amp;token=c5080655-623d-4c36-b93e-f1d489664f15" alt=""><figcaption></figcaption></figure>

**Stap 4:** Je zult nu alle informatie zien over je stake transactie, klik op '**Sign with Casper Wallet**'.

<figure><img src="https://417746289-files.gitbook.io/~/files/v0/b/gitbook-x-prod.appspot.com/o/spaces%2FfcGyJ1C47hcV3dV9rYfW%2Fuploads%2F7SRFzZFkBP9sqmuIY3Ko%2FStep28.png?alt=media&amp;token=dd008ba0-a931-47c3-a9b1-76f491ad89de" alt=""><figcaption></figcaption></figure>

**Stap 5:** Klik op '**Sign**'.

<figure><img src="https://417746289-files.gitbook.io/~/files/v0/b/gitbook-x-prod.appspot.com/o/spaces%2FfcGyJ1C47hcV3dV9rYfW%2Fuploads%2Fkf1EFnd3neG41EJVxXDg%2FStep29.png?alt=media&amp;token=3fe27769-9fe8-45fd-9be6-a2bd714cc447" alt=""><figcaption></figcaption></figure>

**Stap 6:** Je ziet nu de details van je succesvolle stake. Je zult je eerste Staking Rewards na ongeveer 4 uur ontvangen. Daarna ontvang je elke ERA (\~2 uren) Staking Rewards.


# Casper Wallet - Stake $CSPR (In-App)

## **Hoofdstuk 5b – Stake $CSPR met gebruik van Casper Wallet**

<figure><img src="https://417746289-files.gitbook.io/~/files/v0/b/gitbook-x-prod.appspot.com/o/spaces%2FfcGyJ1C47hcV3dV9rYfW%2Fuploads%2FtGJMUKArXd4tAxC3mELo%2FStep30.png?alt=media&amp;token=0b48e98c-1fdc-45d6-81f1-6f9d6c118bb1" alt=""><figcaption></figcaption></figure>

**Stap 1:** Klik op '**More**' in de Casper Wallet extensie.

<figure><img src="https://417746289-files.gitbook.io/~/files/v0/b/gitbook-x-prod.appspot.com/o/spaces%2FfcGyJ1C47hcV3dV9rYfW%2Fuploads%2FC4ci3NagAaq26KFxYInp%2FStep31.png?alt=media&amp;token=027d71d8-ba9e-4baa-961b-b8a7a073b274" alt=""><figcaption></figcaption></figure>

**Stap 2:** Klik op '**Delegate**'.

<figure><img src="https://417746289-files.gitbook.io/~/files/v0/b/gitbook-x-prod.appspot.com/o/spaces%2FfcGyJ1C47hcV3dV9rYfW%2Fuploads%2FhHh2UmbFDb5qogQcTBXt%2FStep32.png?alt=media&amp;token=6b5c5796-3450-4dd8-823a-5965b6a34d94" alt=""><figcaption></figcaption></figure>

**Stap 3:** Selecteer een validator onder '**To validator**' (**Bijvoorbeeld, Speedy Staking**) en klik op '**Next**'.

<figure><img src="https://417746289-files.gitbook.io/~/files/v0/b/gitbook-x-prod.appspot.com/o/spaces%2FfcGyJ1C47hcV3dV9rYfW%2Fuploads%2FFk8MyY5KIYFZgPRojLvs%2FStep33.png?alt=media&amp;token=4a39eb7f-9551-4caa-bfba-fe18a0ab5343" alt=""><figcaption></figcaption></figure>

**Stap 4:** Vul de hoeveelheid $CSPR die je wilt staken in onder '**Amount**' en klik op '**Next**'.

<figure><img src="https://417746289-files.gitbook.io/~/files/v0/b/gitbook-x-prod.appspot.com/o/spaces%2FfcGyJ1C47hcV3dV9rYfW%2Fuploads%2Fh05XM5FUG63Dh1K3k8Hj%2FStep34.png?alt=media&amp;token=9229121e-79ee-499b-9e6b-ae0260b81f25" alt=""><figcaption></figcaption></figure>

**Stap 5:** Klik op '**Confirm delegation**'.

<figure><img src="https://417746289-files.gitbook.io/~/files/v0/b/gitbook-x-prod.appspot.com/o/spaces%2FfcGyJ1C47hcV3dV9rYfW%2Fuploads%2F5qxXOWXlPBsVJnaKli3E%2FStep35.png?alt=media&amp;token=8ec21f7f-30d1-48be-a0f7-6c33c60a0f8b" alt=""><figcaption></figcaption></figure>

**Stap 6:** Je hebt succesvol gestaked. Klik op '**Done**'. Je zult je eerste Staking Rewards na ongeveer 4 uur ontvangen. Daarna ontvang je elke ERA (\~2 uren) Staking Rewards.


# MetaMask

<figure><img src="https://content.gitbook.com/content/fcGyJ1C47hcV3dV9rYfW/blobs/xlNXOBJvZkjwr6eFBkiv/gitbook-mm.png" alt=""><figcaption></figcaption></figure>

* [Officiële Website](https://metamask.io/)
* [Download Casper Snap](https://snaps.metamask.io/snap/npm/casper-manager/)
* [Twitter](https://twitter.com/MetaMask)


# MetaMask - Volledige Guide

## **Hoofdstuk 1 – Setup MetaMask voor gebruik met Casper**

**Stap 1:** Installeer en maak je MetaMask wallet aan als je dat nog niet hebt gedaan: [**KLIK HIER**](https://metamask.io/download/)

<figure><img src="https://417746289-files.gitbook.io/~/files/v0/b/gitbook-x-prod.appspot.com/o/spaces%2FfcGyJ1C47hcV3dV9rYfW%2Fuploads%2F2NGzaCu6mbMehaigZIeD%2FStep1.png?alt=media&amp;token=98db9e0f-b655-42e7-bc76-33d04d731dd6" alt=""><figcaption></figcaption></figure>

**Stap 2:** Installer de Casper MetaMask Snap door op '**Add to MetaMask**' te klikken: [**KLIK HIER**](https://snaps.metamask.io/snap/npm/casper-manager/)

<figure><img src="https://417746289-files.gitbook.io/~/files/v0/b/gitbook-x-prod.appspot.com/o/spaces%2FfcGyJ1C47hcV3dV9rYfW%2Fuploads%2Fva7tTjkh5kV0Bp15LD1D%2FStep2.png?alt=media&amp;token=bce6ca9d-5aca-4acf-b58b-16aa8abdfd7b" alt=""><figcaption></figcaption></figure>

**Stap 3:** Klik op '**Accept**' in de MetaMask extensie popup.

<figure><img src="https://417746289-files.gitbook.io/~/files/v0/b/gitbook-x-prod.appspot.com/o/spaces%2FfcGyJ1C47hcV3dV9rYfW%2Fuploads%2Fou75VSWsLC1QzR5OwLbp%2FStep3.png?alt=media&amp;token=02092e51-42cc-4f25-981b-76574aa1ff72" alt=""><figcaption></figcaption></figure>

**Stap 4:** Klik op '**Connect**'.

<figure><img src="https://417746289-files.gitbook.io/~/files/v0/b/gitbook-x-prod.appspot.com/o/spaces%2FfcGyJ1C47hcV3dV9rYfW%2Fuploads%2FmF5bUd8DnlsD7JCkeMEH%2FStep4.png?alt=media&amp;token=f162b9c6-a453-4710-b40a-94ab1bb561d5" alt=""><figcaption></figcaption></figure>

**Stap 5:** Klik op '**Install'**.

<figure><img src="https://417746289-files.gitbook.io/~/files/v0/b/gitbook-x-prod.appspot.com/o/spaces%2FfcGyJ1C47hcV3dV9rYfW%2Fuploads%2FQqfkul6fws0VF9VQ90IB%2FStep5.png?alt=media&amp;token=deb2888e-631c-4657-b56e-f3ae75203b77" alt=""><figcaption></figcaption></figure>

**Stap 6:** Zet het vinkje en klik op '**Confirm**'.

<figure><img src="https://417746289-files.gitbook.io/~/files/v0/b/gitbook-x-prod.appspot.com/o/spaces%2FfcGyJ1C47hcV3dV9rYfW%2Fuploads%2F6R6mttsLIfPQ9EuvEuAH%2FStep6.png?alt=media&amp;token=fc5b872a-e2f7-469f-afe7-012ce8a958c0" alt=""><figcaption></figcaption></figure>

**Stap 7:** Klik op '**OK**' nadat de installatie voltooid is.

## **Hoofdstuk 2 – Verbind MetaMask met CSPR.Live**

<figure><img src="https://417746289-files.gitbook.io/~/files/v0/b/gitbook-x-prod.appspot.com/o/spaces%2FfcGyJ1C47hcV3dV9rYfW%2Fuploads%2FsOHtg0McczBy864PNXhG%2FStep7.png?alt=media&amp;token=620bcb59-5f62-4cc6-a365-5b3425522d25" alt=""><figcaption></figcaption></figure>

**Stap 1:** Ga naar [CSPR.live](https://cspr.live/) en klik op '**Sign in**' aan de rechterbovenkant van het scherm.

<figure><img src="https://417746289-files.gitbook.io/~/files/v0/b/gitbook-x-prod.appspot.com/o/spaces%2FfcGyJ1C47hcV3dV9rYfW%2Fuploads%2FosqsJPs7YJ0xJLMPu5Cj%2FStep8.png?alt=media&amp;token=e2936e83-a254-40c2-9d93-426e3d28cb87" alt=""><figcaption></figcaption></figure>

**Stap 2:** Klik op '**Metamask**'.

<figure><img src="https://417746289-files.gitbook.io/~/files/v0/b/gitbook-x-prod.appspot.com/o/spaces%2FfcGyJ1C47hcV3dV9rYfW%2Fuploads%2FpPYYjhmiLV1GKdek47X6%2FStep9.png?alt=media&amp;token=69fa841a-a457-4aea-84c7-11a86beb06ab" alt=""><figcaption></figcaption></figure>

**Stap 3:** Klik op '**Connect**' in de MetaMask extensie popup.

<figure><img src="https://417746289-files.gitbook.io/~/files/v0/b/gitbook-x-prod.appspot.com/o/spaces%2FfcGyJ1C47hcV3dV9rYfW%2Fuploads%2FCDuwUBYItDBVjjhBsT3L%2FStep10.png?alt=media&amp;token=3204d360-38e1-4a6b-8647-e35f52122993" alt=""><figcaption></figcaption></figure>

**Stap 4:** Selecteer 1 van de addressen die CSPR.live je laat zien; je kunt het eerste adres gebruiken.

## **Hoofdstuk 3 – Ontvang $CSPR in je MetaMask wallet**

<figure><img src="https://417746289-files.gitbook.io/~/files/v0/b/gitbook-x-prod.appspot.com/o/spaces%2FfcGyJ1C47hcV3dV9rYfW%2Fuploads%2F9HAehQjE1Kos1bCuBjaN%2FStep11.png?alt=media&amp;token=eb2728a2-0bb2-4503-b83f-ac71c1e8b082" alt=""><figcaption></figcaption></figure>

**Stap 1:** Beweeg je muis over je public key aan de rechterbovenkant van je scherm en klik op '**View Account**'.

<figure><img src="https://417746289-files.gitbook.io/~/files/v0/b/gitbook-x-prod.appspot.com/o/spaces%2FfcGyJ1C47hcV3dV9rYfW%2Fuploads%2FZaU1e3TJk5LepwsFGkOj%2FStep12.png?alt=media&amp;token=73e7cf93-e784-4012-bdab-8291d8c700f3" alt=""><figcaption></figcaption></figure>

**Stap 2:** Je ziet nu je Public Key (ook wel wallet address genoemd) bovenaan staan. Dit is het adres waar je $CSPR naar toestuurt.

## **Hoofdstuk 4 – Verstuur $CSPR met MetaMask en CSPR.Live**

<figure><img src="https://417746289-files.gitbook.io/~/files/v0/b/gitbook-x-prod.appspot.com/o/spaces%2FfcGyJ1C47hcV3dV9rYfW%2Fuploads%2FXThlTCaLU8xn6892TBjr%2FStep13.png?alt=media&amp;token=f25b98a3-ee69-40d6-b253-7f35bca64db8" alt=""><figcaption></figcaption></figure>

**Stap 1:** Beweeg je muis over '**Wallet**' aan de rechterbovenkant van je scherm en klik op '**Transfer CSPR**'.

<figure><img src="https://417746289-files.gitbook.io/~/files/v0/b/gitbook-x-prod.appspot.com/o/spaces%2FfcGyJ1C47hcV3dV9rYfW%2Fuploads%2FGbwMmHbWpozzGRrr1Rw6%2FStep14.png?alt=media&amp;token=b07637e5-ed5d-4074-bd56-e003a146a604" alt=""><figcaption></figcaption></figure>

**Stap 2:** Vul de public key in waar je $CSPR naar toe wilt sturen onder '**Recipient**', de hoeveelheid $CSPR onder '**Amount**' en vul een specifieke Transfer ID in als dat nodig is onder '**Transfer ID (Memo)**'. Dit laatste is soms nodig als je $CSPR naar een exchange stuurt. Als dit niet nodig is kun je '**0**' invullen. Klik hierna op '**Next**'.

<figure><img src="https://417746289-files.gitbook.io/~/files/v0/b/gitbook-x-prod.appspot.com/o/spaces%2FfcGyJ1C47hcV3dV9rYfW%2Fuploads%2FKxa87g0XZVhpVtDwMbvQ%2FStep15.png?alt=media&amp;token=cf2e10a5-fe6f-4706-8ecc-20133cd95871" alt=""><figcaption></figcaption></figure>

**Stap 3:** Controleer of de informatie juist is en klik op '**Confirm and transfer**'.

<figure><img src="https://417746289-files.gitbook.io/~/files/v0/b/gitbook-x-prod.appspot.com/o/spaces%2FfcGyJ1C47hcV3dV9rYfW%2Fuploads%2FtDXMCPT4Mn1JQ1oToqt0%2FStep16.png?alt=media&amp;token=ff5db943-c4d2-47bf-bd19-24e7db3dae81" alt=""><figcaption></figcaption></figure>

**Stap 4:** Je zult nu alle informatie over je transactie zien en je kunt op '**Sign with Metamask**' klikken.

<figure><img src="https://417746289-files.gitbook.io/~/files/v0/b/gitbook-x-prod.appspot.com/o/spaces%2FfcGyJ1C47hcV3dV9rYfW%2Fuploads%2FT774pnOSDasoK4Jw7Txf%2FStep17.png?alt=media&amp;token=ca5c74f7-a6bc-4352-a323-e6d28599bf06" alt=""><figcaption></figcaption></figure>

**Stap 5:** Scroll naar beneden en klik op '**Approve**' in de MetaMask extensie popup.

<figure><img src="https://417746289-files.gitbook.io/~/files/v0/b/gitbook-x-prod.appspot.com/o/spaces%2FfcGyJ1C47hcV3dV9rYfW%2Fuploads%2FPbqGJG4VTXfsXM6BUEXB%2FStep18.png?alt=media&amp;token=8f2f9c7b-e6ba-403c-a527-15ea02a28a20" alt=""><figcaption></figcaption></figure>

**Stap 6:** Je ziet nu de details van je succesvolle transactie.

## **Hoofdstuk 5 – Stake $CSPR met MetaMask**

<figure><img src="https://417746289-files.gitbook.io/~/files/v0/b/gitbook-x-prod.appspot.com/o/spaces%2FfcGyJ1C47hcV3dV9rYfW%2Fuploads%2F6Fvh7fKiFX42i4ICevSr%2FStep19.png?alt=media&amp;token=a7935c6d-8c5d-4465-9b87-45d7f3925b30" alt=""><figcaption></figcaption></figure>

**Stap 1:** Beweeg je muis over '**Wallet**' aan de rechterbovenkant van je scherm en klik op '**Delegate Stake**'.

<figure><img src="https://417746289-files.gitbook.io/~/files/v0/b/gitbook-x-prod.appspot.com/o/spaces%2FfcGyJ1C47hcV3dV9rYfW%2Fuploads%2F7tGUhw6tGXd8M8mw0CCU%2FStep20.png?alt=media&amp;token=afe0ee97-ccd2-47de-a587-e0a19a414e4a" alt=""><figcaption></figcaption></figure>

**Stap 2:** Kies een validator onder '**Validator**' (**bijvoorbeeld, Speedy Staking**) en vul de hoeveelheid $CSPR die je wilt staken in onder '**Amount**'. Klik hierna op '**Next**'.

{% hint style="warning" %}
**BELANGRIJK: Stake niet all je $CSPR, je zult in ieder geval 2.5 CSPR nodig hebben om later je tokens te unstaken.**
{% endhint %}

<figure><img src="https://417746289-files.gitbook.io/~/files/v0/b/gitbook-x-prod.appspot.com/o/spaces%2FfcGyJ1C47hcV3dV9rYfW%2Fuploads%2F1VVbUbIgtZIY51DpL9kt%2FStep21.png?alt=media&amp;token=0ee2acf3-9e7d-4799-8a69-6ed637776cc1" alt=""><figcaption></figcaption></figure>

**Stap 3:** Controleer of de informatie juist is en klik op '**Confirm and delegate stake**'.

<figure><img src="https://417746289-files.gitbook.io/~/files/v0/b/gitbook-x-prod.appspot.com/o/spaces%2FfcGyJ1C47hcV3dV9rYfW%2Fuploads%2FkloeAzgb0FSQEVpsNRZZ%2FStep22.png?alt=media&amp;token=1f982b1d-1c81-4385-9324-4f9b95aef48b" alt=""><figcaption></figcaption></figure>

**Stap 4:** Je zult nu alle informatie over je transactie zien en je kunt op '**Sign with Metamask**' klikken.

<figure><img src="https://417746289-files.gitbook.io/~/files/v0/b/gitbook-x-prod.appspot.com/o/spaces%2FfcGyJ1C47hcV3dV9rYfW%2Fuploads%2FlswisxH6fk7IKncjSA7P%2FStep23.png?alt=media&amp;token=df8b8684-15de-4fc2-9afd-cf1cc8175ae7" alt=""><figcaption></figcaption></figure>

**Stap 5:** Scroll naar beneden en klik op '**Approve**' in de MetaMask extensie popup.

<figure><img src="https://417746289-files.gitbook.io/~/files/v0/b/gitbook-x-prod.appspot.com/o/spaces%2FfcGyJ1C47hcV3dV9rYfW%2Fuploads%2FtWdnk65fc7PVMNk0XHMC%2FStep24.png?alt=media&amp;token=20d8e8bd-7a68-4275-981d-6c8e9990d171" alt=""><figcaption></figcaption></figure>

**Stap 6:** Je ziet nu de details van je succesvolle stake transactie. Je zult je eerste staking rewards na ongeveer 4 uren ontvangen. Daarna ontvan je elke ERA (\~2 uren) staking rewards.


# MetaMask - Setup

**Stap 1:** Installeer en maak je MetaMask wallet aan als je dat nog niet hebt gedaan: [**KLIK HIER**](https://metamask.io/download/)

<figure><img src="https://417746289-files.gitbook.io/~/files/v0/b/gitbook-x-prod.appspot.com/o/spaces%2FfcGyJ1C47hcV3dV9rYfW%2Fuploads%2F2NGzaCu6mbMehaigZIeD%2FStep1.png?alt=media&amp;token=98db9e0f-b655-42e7-bc76-33d04d731dd6" alt=""><figcaption></figcaption></figure>

**Stap 2:** Installer de Casper MetaMask Snap door op '**Add to MetaMask**' te klikken: [**KLIK HIER**](https://snaps.metamask.io/snap/npm/casper-manager/)

<figure><img src="https://417746289-files.gitbook.io/~/files/v0/b/gitbook-x-prod.appspot.com/o/spaces%2FfcGyJ1C47hcV3dV9rYfW%2Fuploads%2Fva7tTjkh5kV0Bp15LD1D%2FStep2.png?alt=media&amp;token=bce6ca9d-5aca-4acf-b58b-16aa8abdfd7b" alt=""><figcaption></figcaption></figure>

**Stap 3:** Klik op '**Accept**' in de MetaMask extensie popup.

<figure><img src="https://417746289-files.gitbook.io/~/files/v0/b/gitbook-x-prod.appspot.com/o/spaces%2FfcGyJ1C47hcV3dV9rYfW%2Fuploads%2Fou75VSWsLC1QzR5OwLbp%2FStep3.png?alt=media&amp;token=02092e51-42cc-4f25-981b-76574aa1ff72" alt=""><figcaption></figcaption></figure>

**Stap 4:** Klik op '**Connect**'.

<figure><img src="https://417746289-files.gitbook.io/~/files/v0/b/gitbook-x-prod.appspot.com/o/spaces%2FfcGyJ1C47hcV3dV9rYfW%2Fuploads%2FmF5bUd8DnlsD7JCkeMEH%2FStep4.png?alt=media&amp;token=f162b9c6-a453-4710-b40a-94ab1bb561d5" alt=""><figcaption></figcaption></figure>

**Stap 5:** Klik op '**Install'**.

<figure><img src="https://417746289-files.gitbook.io/~/files/v0/b/gitbook-x-prod.appspot.com/o/spaces%2FfcGyJ1C47hcV3dV9rYfW%2Fuploads%2FQqfkul6fws0VF9VQ90IB%2FStep5.png?alt=media&amp;token=deb2888e-631c-4657-b56e-f3ae75203b77" alt=""><figcaption></figcaption></figure>

**Stap 6:** Zet het vinkje en klik op '**Confirm**'.

<figure><img src="https://417746289-files.gitbook.io/~/files/v0/b/gitbook-x-prod.appspot.com/o/spaces%2FfcGyJ1C47hcV3dV9rYfW%2Fuploads%2F6R6mttsLIfPQ9EuvEuAH%2FStep6.png?alt=media&amp;token=fc5b872a-e2f7-469f-afe7-012ce8a958c0" alt=""><figcaption></figcaption></figure>

**Stap 7:** Klik op '**OK**' nadat de installatie voltooid is.


# MetaMask - Verbind MetaMask met CSPR.live

<figure><img src="https://417746289-files.gitbook.io/~/files/v0/b/gitbook-x-prod.appspot.com/o/spaces%2FfcGyJ1C47hcV3dV9rYfW%2Fuploads%2FsOHtg0McczBy864PNXhG%2FStep7.png?alt=media&amp;token=620bcb59-5f62-4cc6-a365-5b3425522d25" alt=""><figcaption></figcaption></figure>

**Stap 1:** Ga naar [CSPR.live](https://cspr.live/) en klik op '**Sign in**' aan de rechterbovenkant van het scherm.

<figure><img src="https://417746289-files.gitbook.io/~/files/v0/b/gitbook-x-prod.appspot.com/o/spaces%2FfcGyJ1C47hcV3dV9rYfW%2Fuploads%2FosqsJPs7YJ0xJLMPu5Cj%2FStep8.png?alt=media&amp;token=e2936e83-a254-40c2-9d93-426e3d28cb87" alt=""><figcaption></figcaption></figure>

**Stap 2:** Klik op '**Metamask**'.

<figure><img src="https://417746289-files.gitbook.io/~/files/v0/b/gitbook-x-prod.appspot.com/o/spaces%2FfcGyJ1C47hcV3dV9rYfW%2Fuploads%2FpPYYjhmiLV1GKdek47X6%2FStep9.png?alt=media&amp;token=69fa841a-a457-4aea-84c7-11a86beb06ab" alt=""><figcaption></figcaption></figure>

**Stap 3:** Klik op '**Connect**' in de MetaMask extensie popup.

<figure><img src="https://417746289-files.gitbook.io/~/files/v0/b/gitbook-x-prod.appspot.com/o/spaces%2FfcGyJ1C47hcV3dV9rYfW%2Fuploads%2FCDuwUBYItDBVjjhBsT3L%2FStep10.png?alt=media&amp;token=3204d360-38e1-4a6b-8647-e35f52122993" alt=""><figcaption></figcaption></figure>

**Stap 4:** Selecteer 1 van de addressen die CSPR.live je laat zien; je kunt het eerste adres gebruiken.


# MetaMask - Ontvang $CSPR

<figure><img src="https://417746289-files.gitbook.io/~/files/v0/b/gitbook-x-prod.appspot.com/o/spaces%2FfcGyJ1C47hcV3dV9rYfW%2Fuploads%2F9HAehQjE1Kos1bCuBjaN%2FStep11.png?alt=media&amp;token=eb2728a2-0bb2-4503-b83f-ac71c1e8b082" alt=""><figcaption></figcaption></figure>

**Stap 1:** Beweeg je muis over je public key aan de rechterbovenkant van je scherm en klik op '**View Account**'.

<figure><img src="https://417746289-files.gitbook.io/~/files/v0/b/gitbook-x-prod.appspot.com/o/spaces%2FfcGyJ1C47hcV3dV9rYfW%2Fuploads%2FZaU1e3TJk5LepwsFGkOj%2FStep12.png?alt=media&amp;token=73e7cf93-e784-4012-bdab-8291d8c700f3" alt=""><figcaption></figcaption></figure>

**Stap 2:** Je ziet nu je Public Key (ook wel wallet address genoemd) bovenaan staan. Dit is het adres waar je $CSPR naar toestuurt.


# MetaMask - Verstuur $CSPR

<figure><img src="https://417746289-files.gitbook.io/~/files/v0/b/gitbook-x-prod.appspot.com/o/spaces%2FfcGyJ1C47hcV3dV9rYfW%2Fuploads%2FXThlTCaLU8xn6892TBjr%2FStep13.png?alt=media&amp;token=f25b98a3-ee69-40d6-b253-7f35bca64db8" alt=""><figcaption></figcaption></figure>

**Stap 1:** Beweeg je muis over '**Wallet**' aan de rechterbovenkant van je scherm en klik op '**Transfer CSPR**'.

<figure><img src="https://417746289-files.gitbook.io/~/files/v0/b/gitbook-x-prod.appspot.com/o/spaces%2FfcGyJ1C47hcV3dV9rYfW%2Fuploads%2FGbwMmHbWpozzGRrr1Rw6%2FStep14.png?alt=media&amp;token=b07637e5-ed5d-4074-bd56-e003a146a604" alt=""><figcaption></figcaption></figure>

**Stap 2:** Vul de public key in waar je $CSPR naar toe wilt sturen onder '**Recipient**', de hoeveelheid $CSPR onder '**Amount**' en vul een specifieke Transfer ID in als dat nodig is onder '**Transfer ID (Memo)**'. Dit laatste is soms nodig als je $CSPR naar een exchange stuurt. Als dit niet nodig is kun je '**0**' invullen. Klik hierna op '**Next**'.

<figure><img src="https://417746289-files.gitbook.io/~/files/v0/b/gitbook-x-prod.appspot.com/o/spaces%2FfcGyJ1C47hcV3dV9rYfW%2Fuploads%2FKxa87g0XZVhpVtDwMbvQ%2FStep15.png?alt=media&amp;token=cf2e10a5-fe6f-4706-8ecc-20133cd95871" alt=""><figcaption></figcaption></figure>

**Stap 3:** Controleer of de informatie juist is en klik op '**Confirm and transfer**'.

<figure><img src="https://417746289-files.gitbook.io/~/files/v0/b/gitbook-x-prod.appspot.com/o/spaces%2FfcGyJ1C47hcV3dV9rYfW%2Fuploads%2FtDXMCPT4Mn1JQ1oToqt0%2FStep16.png?alt=media&amp;token=ff5db943-c4d2-47bf-bd19-24e7db3dae81" alt=""><figcaption></figcaption></figure>

**Stap 4:** Je zult nu alle informatie over je transactie zien en je kunt op '**Sign with Metamask**' klikken.

<figure><img src="https://417746289-files.gitbook.io/~/files/v0/b/gitbook-x-prod.appspot.com/o/spaces%2FfcGyJ1C47hcV3dV9rYfW%2Fuploads%2FT774pnOSDasoK4Jw7Txf%2FStep17.png?alt=media&amp;token=ca5c74f7-a6bc-4352-a323-e6d28599bf06" alt=""><figcaption></figcaption></figure>

**Stap 5:** Scroll naar beneden en klik op '**Approve**' in de MetaMask extensie popup.

<figure><img src="https://417746289-files.gitbook.io/~/files/v0/b/gitbook-x-prod.appspot.com/o/spaces%2FfcGyJ1C47hcV3dV9rYfW%2Fuploads%2FPbqGJG4VTXfsXM6BUEXB%2FStep18.png?alt=media&amp;token=8f2f9c7b-e6ba-403c-a527-15ea02a28a20" alt=""><figcaption></figcaption></figure>

**Stap 6:** Je ziet nu de details van je succesvolle transactie.


# MetaMask - Stake $CSPR

<figure><img src="https://417746289-files.gitbook.io/~/files/v0/b/gitbook-x-prod.appspot.com/o/spaces%2FfcGyJ1C47hcV3dV9rYfW%2Fuploads%2F6Fvh7fKiFX42i4ICevSr%2FStep19.png?alt=media&amp;token=a7935c6d-8c5d-4465-9b87-45d7f3925b30" alt=""><figcaption></figcaption></figure>

**Stap 1:** Beweeg je muis over '**Wallet**' aan de rechterbovenkant van je scherm en klik op '**Delegate Stake**'.

<figure><img src="https://417746289-files.gitbook.io/~/files/v0/b/gitbook-x-prod.appspot.com/o/spaces%2FfcGyJ1C47hcV3dV9rYfW%2Fuploads%2F7tGUhw6tGXd8M8mw0CCU%2FStep20.png?alt=media&amp;token=afe0ee97-ccd2-47de-a587-e0a19a414e4a" alt=""><figcaption></figcaption></figure>

**Stap 2:** Kies een validator onder '**Validator**' (**bijvoorbeeld, Speedy Staking**) en vul de hoeveelheid $CSPR die je wilt staken in onder '**Amount**'. Klik hierna op '**Next**'.

{% hint style="warning" %}
**BELANGRIJK: Stake niet all je $CSPR, je zult in ieder geval 2.5 CSPR nodig hebben om later je tokens te unstaken.**
{% endhint %}

<figure><img src="https://417746289-files.gitbook.io/~/files/v0/b/gitbook-x-prod.appspot.com/o/spaces%2FfcGyJ1C47hcV3dV9rYfW%2Fuploads%2F1VVbUbIgtZIY51DpL9kt%2FStep21.png?alt=media&amp;token=0ee2acf3-9e7d-4799-8a69-6ed637776cc1" alt=""><figcaption></figcaption></figure>

**Stap 3:** Controleer of de informatie juist is en klik op '**Confirm and delegate stake**'.

<figure><img src="https://417746289-files.gitbook.io/~/files/v0/b/gitbook-x-prod.appspot.com/o/spaces%2FfcGyJ1C47hcV3dV9rYfW%2Fuploads%2FkloeAzgb0FSQEVpsNRZZ%2FStep22.png?alt=media&amp;token=1f982b1d-1c81-4385-9324-4f9b95aef48b" alt=""><figcaption></figcaption></figure>

**Stap 4:** Je zult nu alle informatie over je transactie zien en je kunt op '**Sign with Metamask**' klikken.

<figure><img src="https://417746289-files.gitbook.io/~/files/v0/b/gitbook-x-prod.appspot.com/o/spaces%2FfcGyJ1C47hcV3dV9rYfW%2Fuploads%2FlswisxH6fk7IKncjSA7P%2FStep23.png?alt=media&amp;token=df8b8684-15de-4fc2-9afd-cf1cc8175ae7" alt=""><figcaption></figcaption></figure>

**Stap 5:** Scroll naar beneden en klik op '**Approve**' in de MetaMask extensie popup.

<figure><img src="https://417746289-files.gitbook.io/~/files/v0/b/gitbook-x-prod.appspot.com/o/spaces%2FfcGyJ1C47hcV3dV9rYfW%2Fuploads%2FtWdnk65fc7PVMNk0XHMC%2FStep24.png?alt=media&amp;token=20d8e8bd-7a68-4275-981d-6c8e9990d171" alt=""><figcaption></figcaption></figure>

**Stap 6:** Je ziet nu de details van je succesvolle stake transactie. Je zult je eerste staking rewards na ongeveer 4 uren ontvangen. Daarna ontvan je elke ERA (\~2 uren) staking rewards.


# De Basics

<figure><img src="https://417746289-files.gitbook.io/~/files/v0/b/gitbook-x-prod.appspot.com/o/spaces%2FfcGyJ1C47hcV3dV9rYfW%2Fuploads%2FRqHCw0GIaujviPXliSyP%2Fgitbook-avail.png?alt=media&amp;token=bc8c91ea-0605-4702-8ec0-12fca9abc78b" alt=""><figcaption></figcaption></figure>

## **Introduction**

Avail’s ecosysteem is ontworpen om zowel gebruikers als ontwikkelaars een betere ervaring te bieden, waarbij de essentiële elementen van schaalbaarheid, interoperabiliteit en veiligheid zonder compromissen worden gebalanceerd. De structuur van het platform is verankerd in de:

1. **Data Availability (DA) Layer**: Een fundamentele laag die puur gericht is op DA en de basis vormt voor schaalbare, modulaire blockchains. De DA laag is hyper-geoptimaliseerd die de minimale functionaliteit biedt die nodig is om hier bovenop ecosysteem overstijgende interoperabiliteit te bouwen. Avail DA gebruikt geldigheidsbewijzen om ervoor te zorgen dat ontwikkelaars de beschikbaarheid van hun gegevens kunnen verifiëren zonder te vertrouwen op de claims van Avail.
2. **Nexus Layer**: Nexus is een licht maar krachtig bewijsaggregatie- en sequencerselectie zk-rollup bovenop Avail DA. Avail Nexus fungeert als een permissieloos verificatieplatform dat rollups zal verenigen (niet alleen die binnen het Avail-ecosysteem zijn gebouwd), gebruikmakend van Avail DA als de basis van vertrouwen.
3. **Fusion Security Layer**: Versterkt de algehele beveiliging van het Avail-netwerk door verschillende tokens te bundelen, inclusief gevestigde tokens en opkomende tokens. Fusie zal ook helpen om meer liquiditeit van andere blockchains naar het Avail-ecosysteem te brengen en vast te zetten. Deze aanpak zal geleidelijk de crypto-economische veiligheid van Avail versterken en markeert een van de eerste gevallen waarin non-native tokens zoals ETH en BTC worden gebruikt om consensus op een andere blockchain mogelijk te maken.

Deze lagen streven er gezamenlijk naar de fragmentatie van de markt op te lossen door een verenigd platform te bieden voor gebruikers en ontwikkelaars uit verschillende ecosystemen.

<figure><img src="https://files.gitbook.com/v0/b/gitbook-x-prod.appspot.com/o/spaces%2F0mRE72CK4C3BU2yX3xxe%2Fuploads%2FjMmGceifmDIVOzcryXx1%2Funification-layer-graphic-updated.png?alt=media&#x26;token=d708a0d4-740f-4f4f-a44b-8845f7cd9aaa" alt=""><figcaption></figcaption></figure>

## **Staking/Nominating**

Er zijn momenteel minder dan 100 actieve validators (die blokken produceren en beloningen verdienen). De netwerkbrede APR kan fluctueren, maar is momenteel ongeveer 15%. Staking rewards worden elke ERA (1 dag) opgebouwd, en je kunt ervoor kiezen om de beloningen automatisch te compunden, naar je liquide accountbalans te sturen of naar de liquide accountbalans van een geheel ander account. Het unstaken duurt 28 dagen, waarin je GEEN staking rewards ontvangt.

### **Safety/Security** <a href="#safety-security" id="safety-security"></a>

Je tokens blijven in jouw bezit wanneer je $AVAIL nomineert bij een validator. Dit betekent dat je op elk moment kunt undelegaten. Slashing is actief op Avail. Slashing kan onder de volgende omstandigheden voorkomen:

* Equivocatie - Het produceren van twee blokken in dezelfde slot. In GRANDPA betekent dit het versturen van pre-vote of pre-commit berichten voor twee ketens die met elkaar conflicteren in dezelfde ronde. Dit zal de **validator en nominators** slashen.
* Als meer dan 10% van de validators tegelijkertijd offline gaat en bevroren worden in een epoch, zullen al die **validators (niet nominators)** worden geslashed.

Dit betekent dat het belangrijk is om validators te nomineren die je kunt vertrouwen!

## **Useful Links** <a href="#useful-links" id="useful-links"></a>

### **Explorers** <a href="#explorers" id="explorers"></a>

​[**Avail Explorer**](https://explorer.avail.so/) **|** [**Subscan**](https://avail.subscan.io/)​​

### **Wallets** <a href="#wallets" id="wallets"></a>

​[**Talisman**](https://talisman.xyz/) **|** [**Avail Space**](https://www.availspace.app/) **|** [**Nova Wallet**](https://novawallet.io/) **|** [**Bitget Wallet**](https://web3.bitget.com/en) **|** [**dWallet**](https://dwallet.io/) **|** [**SubWallet**](https://www.subwallet.app/) **|** [**Klever**](https://klever.io/) **|** [**Ledger**](https://www.ledger.com/)​​

### **Official Resources** <a href="#official-resources" id="official-resources"></a>

​[**Website**](https://availproject.org/) **|** [**Documentation**](https://docs.availproject.org/) **|** [**Ecosystem**](https://www.availproject.org/ecosystem) **|** [**GitHub**](https://github.com/availproject) **|** [**Staking Website**](https://staking.availproject.org/)

​​

**Social Media**

​[**Twitter**](https://x.com/AvailProject) **|** [**Discord**](https://discord.gg/y6fHnxZQX8) **|** [**Blog**](https://blog.availproject.org/) **|** [**Telegram**](https://t.me/AvailCommunity) **|** [**LinkedIn**](https://www.linkedin.com/company/availproject/)


# Talisman

<figure><img src="https://417746289-files.gitbook.io/~/files/v0/b/gitbook-x-prod.appspot.com/o/spaces%2FfcGyJ1C47hcV3dV9rYfW%2Fuploads%2Fozvozp8SqTfWQCKyY8UH%2Fgitbook-talisman.png?alt=media&amp;token=42e92191-4fbe-4b24-a867-903604db0d67" alt=""><figcaption></figcaption></figure>

* [Officiële Website](https://talisman.xyz)
* Download op [Chrome](https://chromewebstore.google.com/detail/talisman-ethereum-and-pol/fijngjgcjhjmmpcmkeiomlglpeiijkld) | [Firefox](https://addons.mozilla.org/en-US/firefox/addon/talisman-wallet-extension/)
* [Officiële documentatie](https://docs.talisman.xyz/talisman)
* [Twitter](https://twitter.com/wearetalisman)
* [Discord](http://discord.gg/talisman)


# Talisman - Volledige Guide

## **Hoofdstuk 1 – Installeer Talisman**

<figure><img src="https://417746289-files.gitbook.io/~/files/v0/b/gitbook-x-prod.appspot.com/o/spaces%2FfcGyJ1C47hcV3dV9rYfW%2Fuploads%2FFFcyJZVSYNF6H56lPc7b%2FInstall1.png?alt=media&amp;token=1b278f56-18b4-4520-917e-42bcd8bcf277" alt=""><figcaption></figcaption></figure>

**Stap 1:** Ga naar de [Talisman website](https://talisman.xyz) en klik op '**Get Started**'.

<figure><img src="https://417746289-files.gitbook.io/~/files/v0/b/gitbook-x-prod.appspot.com/o/spaces%2FfcGyJ1C47hcV3dV9rYfW%2Fuploads%2FHX97bLoHW9CcdDNqkqx3%2FInstall2.png?alt=media&amp;token=5a977d00-c3be-438a-b3ed-6fabf136f298" alt=""><figcaption></figcaption></figure>

**Stap 2:** Klik op **'Add to Chrome'**.

<figure><img src="https://417746289-files.gitbook.io/~/files/v0/b/gitbook-x-prod.appspot.com/o/spaces%2FfcGyJ1C47hcV3dV9rYfW%2Fuploads%2FgPY03XYndlO811bdODFi%2FInstall3.png?alt=media&amp;token=a16756ab-9810-4b71-97cd-9beab26b9e80" alt=""><figcaption></figcaption></figure>

**Stap 3:** Klik op **'Add extension'**.

## **Hoofdstuk 2 – Wallet aanmaken**

<figure><img src="https://417746289-files.gitbook.io/~/files/v0/b/gitbook-x-prod.appspot.com/o/spaces%2FfcGyJ1C47hcV3dV9rYfW%2Fuploads%2FxQeKmOrFrSSpBKlaH9ws%2FCreate1.png?alt=media&amp;token=2c5c7aec-6a0a-4cfa-bb7a-6c1367ddb6bd" alt=""><figcaption></figcaption></figure>

**Stap 1:** Na het installeren van de extensie wordt je doorgestuurd naar de landingspagina. Klik op **'Get Started'**.

<figure><img src="https://417746289-files.gitbook.io/~/files/v0/b/gitbook-x-prod.appspot.com/o/spaces%2FfcGyJ1C47hcV3dV9rYfW%2Fuploads%2FzB3LashtJBIqReVwCEX0%2FCreate2.png?alt=media&amp;token=9063537e-1cab-4d58-932e-b1f73bdd6bd5" alt=""><figcaption></figcaption></figure>

**Stap 2:** Kies een sterk wachtwoord, vul deze twee keer in en klik op **'Continue'**.

<figure><img src="https://417746289-files.gitbook.io/~/files/v0/b/gitbook-x-prod.appspot.com/o/spaces%2FfcGyJ1C47hcV3dV9rYfW%2Fuploads%2FGNIxbTx3M05Bz6zUu9EN%2FCreate3.png?alt=media&amp;token=165dc0c5-520e-4dfc-8eef-d5eb097ef6f0" alt=""><figcaption></figcaption></figure>

**Stap 3:** Kies of je anonieme gebruiksdata wilt delen met Talisman en klik daarna op **'No thanks'** of **'I agree'**.

<figure><img src="https://417746289-files.gitbook.io/~/files/v0/b/gitbook-x-prod.appspot.com/o/spaces%2FfcGyJ1C47hcV3dV9rYfW%2Fuploads%2Fu6c2Vztng1CNQBokekWN%2FCreate4.png?alt=media&amp;token=43a34435-406d-49a9-9b27-5f381fcc583b" alt=""><figcaption></figcaption></figure>

**Stap 4:** Zorg ervoor dat **'New'** is geselecteerd en klik op **'New Polkadot Account'**.

<figure><img src="https://417746289-files.gitbook.io/~/files/v0/b/gitbook-x-prod.appspot.com/o/spaces%2FfcGyJ1C47hcV3dV9rYfW%2Fuploads%2F2hvoXHL5YKByzDzP7WEs%2FCreate5.png?alt=media&amp;token=a845be89-dcb5-43af-aa64-6645347157c3" alt=""><figcaption></figcaption></figure>

**Stap 5:** Zorg ervoor dat **'Polkadot'** is geselecteerd, vul een naam in voor je account onder **'Account name'** en klik op **'Create'**.

<figure><img src="https://417746289-files.gitbook.io/~/files/v0/b/gitbook-x-prod.appspot.com/o/spaces%2FfcGyJ1C47hcV3dV9rYfW%2Fuploads%2FQ8F36mExIiRXughZj8sT%2FCreate6.png?alt=media&amp;token=9474038f-c145-42a5-998c-f904ef08daeb" alt=""><figcaption></figcaption></figure>

**Stap 6:** Klik op **'Acknowledge and Continue'**.

<figure><img src="https://417746289-files.gitbook.io/~/files/v0/b/gitbook-x-prod.appspot.com/o/spaces%2FfcGyJ1C47hcV3dV9rYfW%2Fuploads%2FSuaJWWSXEvDtTPj90m7O%2FCreate7.png?alt=media&amp;token=43839b0a-f8c6-4ae2-a68d-bd4d94705817" alt=""><figcaption></figcaption></figure>

**Stap 7:** Selecteer **'12-word'** of **'24-word'**, *sla de recovery zin die je ziet veilig op*, zet een vinkje en klik op **'Verify recovery phrase'**.

<figure><img src="https://417746289-files.gitbook.io/~/files/v0/b/gitbook-x-prod.appspot.com/o/spaces%2FfcGyJ1C47hcV3dV9rYfW%2Fuploads%2FmwXvUIri76kVhEzrH9kY%2FCreate8.png?alt=media&amp;token=be50d6d4-60c1-4192-8c9d-80663065e819" alt=""><figcaption></figcaption></figure>

**Stap 8:** Klik op de woorden van je recovery zin in de juiste volgorde net zolang tot alle vakjes gevuld zijn en klik daarna op **'Complete Verification'**.

<figure><img src="https://417746289-files.gitbook.io/~/files/v0/b/gitbook-x-prod.appspot.com/o/spaces%2FfcGyJ1C47hcV3dV9rYfW%2Fuploads%2FVvqpD334UptyHS9vfBl0%2FCreate9.png?alt=media&amp;token=171a5fcd-9c96-4599-8ba1-22236437155f" alt=""><figcaption></figcaption></figure>

**Stap 9:** Klik op **'Done'**.

<figure><img src="https://417746289-files.gitbook.io/~/files/v0/b/gitbook-x-prod.appspot.com/o/spaces%2FfcGyJ1C47hcV3dV9rYfW%2Fuploads%2FbJwQa9wSXG4bZSZ3nANx%2FCreate10.png?alt=media&amp;token=6312b206-d580-4540-9dac-3478d3864aac" alt=""><figcaption></figcaption></figure>

**Stap 10:** Klik op **'Enter Talisman'**.

<figure><img src="https://417746289-files.gitbook.io/~/files/v0/b/gitbook-x-prod.appspot.com/o/spaces%2FfcGyJ1C47hcV3dV9rYfW%2Fuploads%2FNVxreIXA9CjorUiUuhV5%2FCreate11.png?alt=media&amp;token=4adbcb7b-d8e3-41dc-93e6-abdf4576c24e" alt=""><figcaption></figcaption></figure>

**Stap 11 (aangeraden):** Klik op het extensie icoontje aan de rechterbovenkant van Google Chrome.

<figure><img src="https://417746289-files.gitbook.io/~/files/v0/b/gitbook-x-prod.appspot.com/o/spaces%2FfcGyJ1C47hcV3dV9rYfW%2Fuploads%2F7p9GV0HRS69xKPkx1uJX%2FCreate12.png?alt=media&amp;token=25ec7c0f-2247-4401-aadb-13aafa77048f" alt=""><figcaption></figcaption></figure>

**Stap 12:** Klik op het pinnetje naast Talisman. Dit zorgt ervoor dat je altijd makkelijk toegang hebt tot de Talisman extensie.

## **Hoofdstuk 3 – Ontvang $AVAIL**

<figure><img src="https://417746289-files.gitbook.io/~/files/v0/b/gitbook-x-prod.appspot.com/o/spaces%2FfcGyJ1C47hcV3dV9rYfW%2Fuploads%2F0pQg1X31UjOYZYgMBwzc%2FReceive1.png?alt=media&amp;token=ea48b4af-5b33-416f-99df-0d49845af826" alt=""><figcaption></figcaption></figure>

**Stap 1:** Klik op **'Receive' o**p de overzichtspagina van Talisman.

<figure><img src="https://417746289-files.gitbook.io/~/files/v0/b/gitbook-x-prod.appspot.com/o/spaces%2FfcGyJ1C47hcV3dV9rYfW%2Fuploads%2Fyek8Iptj9wcKVUjh6gtX%2FReceive2.png?alt=media&amp;token=6b117892-cd55-4531-9f36-d45ff2ff3254" alt=""><figcaption></figcaption></figure>

**Stap 2:** Klik op het account waarop je de $AVAIL wilt ontvangen.

<figure><img src="https://417746289-files.gitbook.io/~/files/v0/b/gitbook-x-prod.appspot.com/o/spaces%2FfcGyJ1C47hcV3dV9rYfW%2Fuploads%2FevpfZ4j0EPjja8FsWqUu%2FReceive3.png?alt=media&amp;token=6512cbf1-205f-4670-8833-e5e01f1c873c" alt=""><figcaption></figcaption></figure>

**Stap 3:** Type AVAIL in het zoekveld en klik op de kopieerknop.

<figure><img src="https://417746289-files.gitbook.io/~/files/v0/b/gitbook-x-prod.appspot.com/o/spaces%2FfcGyJ1C47hcV3dV9rYfW%2Fuploads%2F162n9ol4cotLSjKenRrX%2FReceive4.png?alt=media&amp;token=15adfea8-54df-41c5-a143-6a91baa550b6" alt=""><figcaption></figcaption></figure>

**Stap 4:** Nadat je je $AVAIL naar het adres hebt verzonden zul je het na een paar minuten op je overzichtspagina gereflecteerd zien.

## **Hoofdstuk 4 – Verbind met de Avail staking pagina**

<figure><img src="https://417746289-files.gitbook.io/~/files/v0/b/gitbook-x-prod.appspot.com/o/spaces%2FfcGyJ1C47hcV3dV9rYfW%2Fuploads%2Ft991DkSpg5yua0gA0bqo%2FNominate1.png?alt=media&amp;token=cf39916a-39ca-4657-a3c1-e109367d927c" alt=""><figcaption></figcaption></figure>

**Stap 1:** Ga naar de [Avail staking pagina](https://staking.availproject.org/) en klik op **'Connect'** aan de rechterbovenkant van de pagina.

<figure><img src="https://417746289-files.gitbook.io/~/files/v0/b/gitbook-x-prod.appspot.com/o/spaces%2FfcGyJ1C47hcV3dV9rYfW%2Fuploads%2FRzx8m8zWPcg8WKbPuv7c%2FNominate2.png?alt=media&amp;token=515089ef-4683-428f-881f-4fca5be53d29" alt=""><figcaption></figcaption></figure>

**Stap 2:** Klik op **'Talisman'**.

<figure><img src="https://417746289-files.gitbook.io/~/files/v0/b/gitbook-x-prod.appspot.com/o/spaces%2FfcGyJ1C47hcV3dV9rYfW%2Fuploads%2FEzCpEB9jDz5XmapwoCMg%2FNominate3.png?alt=media&amp;token=6b5a3b8b-8f79-4518-bbf1-56a8d3fa2037" alt=""><figcaption></figcaption></figure>

**Stap 3:** Selecteer een account in de Talisman prompt en klik op **'Connect 1'**.

<figure><img src="https://417746289-files.gitbook.io/~/files/v0/b/gitbook-x-prod.appspot.com/o/spaces%2FfcGyJ1C47hcV3dV9rYfW%2Fuploads%2FDluqnO69y9WH1oyy7mwh%2FNominate4.png?alt=media&amp;token=dd7817b4-8f41-4009-bbdd-c11e2998c90b" alt=""><figcaption></figcaption></figure>

**Stap 4:** Klik op **'Go To Accounts'**.

<figure><img src="https://417746289-files.gitbook.io/~/files/v0/b/gitbook-x-prod.appspot.com/o/spaces%2FfcGyJ1C47hcV3dV9rYfW%2Fuploads%2FtB1wPEbU0i2ppMCRSozs%2FNominate5.png?alt=media&amp;token=05c46c92-a01c-46e7-92c8-351300a1cf22" alt=""><figcaption></figcaption></figure>

**Stap 5:** Klik op je account.

<figure><img src="https://417746289-files.gitbook.io/~/files/v0/b/gitbook-x-prod.appspot.com/o/spaces%2FfcGyJ1C47hcV3dV9rYfW%2Fuploads%2FlXbfvPNXxvC4kAzfgVSB%2FNominate6.png?alt=media&amp;token=36280504-34db-457e-9558-c012f0e83938" alt=""><figcaption></figcaption></figure>

**Stap 6:** Je bent nu verbonden met de staking pagina. Je ziet hier o.a. je adres, je balans, of je aan het nomineren bent en meer.

## **Hoofdstuk 5 - Stake/Nominate je $AVAIL**

<figure><img src="https://417746289-files.gitbook.io/~/files/v0/b/gitbook-x-prod.appspot.com/o/spaces%2FfcGyJ1C47hcV3dV9rYfW%2Fuploads%2FAsaGWtwoXsXUoJABBWZR%2FNominate7.png?alt=media&amp;token=08c11a92-35ec-4b0a-83b8-9c1c479ca4bc" alt=""><figcaption></figcaption></figure>

**Stap 1:** Klik op **'Validators'** aan de linkerkant van de pagina.

<figure><img src="https://417746289-files.gitbook.io/~/files/v0/b/gitbook-x-prod.appspot.com/o/spaces%2FfcGyJ1C47hcV3dV9rYfW%2Fuploads%2F7Eeh9tkKy8rNNgA9mYwQ%2FNominate8.png?alt=media&amp;token=ca498ce1-5bbf-4336-b2c4-49784451a983" alt=""><figcaption></figcaption></figure>

**Stap 2:** Klik op **'Clear'**.

<figure><img src="https://417746289-files.gitbook.io/~/files/v0/b/gitbook-x-prod.appspot.com/o/spaces%2FfcGyJ1C47hcV3dV9rYfW%2Fuploads%2FMYVmECeTnxIAhpRM7Q1u%2FNominate9.png?alt=media&amp;token=c6f16a17-d914-4636-9130-31b08a117cee" alt=""><figcaption></figcaption></figure>

**Stap 3:** Zoek op **'speedy'** en klik op het hartje om onze validator toe te voegen aan je favorieten.

<figure><img src="https://417746289-files.gitbook.io/~/files/v0/b/gitbook-x-prod.appspot.com/o/spaces%2FfcGyJ1C47hcV3dV9rYfW%2Fuploads%2FWeDk3ykOdcuHGtfN5E1k%2FNominate10.png?alt=media&amp;token=09d14708-d04e-4a17-803e-b8d346c20671" alt=""><figcaption></figcaption></figure>

**Stap 4:** Klik op **'Nominate'** aan de linkerkant van de pagina.

<figure><img src="https://417746289-files.gitbook.io/~/files/v0/b/gitbook-x-prod.appspot.com/o/spaces%2FfcGyJ1C47hcV3dV9rYfW%2Fuploads%2FtcjTKBp9RhuOgBa7fEEd%2FNominate11.png?alt=media&amp;token=ec841fb6-54b3-47d3-9677-e39a59872fd6" alt=""><figcaption></figcaption></figure>

**Stap 5: Klik op 'Start nominating'**.

<figure><img src="https://417746289-files.gitbook.io/~/files/v0/b/gitbook-x-prod.appspot.com/o/spaces%2FfcGyJ1C47hcV3dV9rYfW%2Fuploads%2FYi2wpbd0RxG80jJDPWIq%2FNominate12.png?alt=media&amp;token=2db545e4-8c28-4736-a382-b73c7a183139" alt=""><figcaption></figcaption></figure>

**Stap 6:** Selecteer wat je wilt doen met je rewards; compound, aan je liquide accountbalans toevoegen of toevoegen aan de liquide accountbalans van een ander account. Klik daarna op **'Continue'**.

<figure><img src="https://417746289-files.gitbook.io/~/files/v0/b/gitbook-x-prod.appspot.com/o/spaces%2FfcGyJ1C47hcV3dV9rYfW%2Fuploads%2FeDJkEMnHMLVhS8ODRrLB%2FNominate13.png?alt=media&amp;token=700032ec-8fdd-4111-a028-e456366cab6e" alt=""><figcaption></figcaption></figure>

**Stap 7:** Klik op **'From Favorites'**.

<figure><img src="https://417746289-files.gitbook.io/~/files/v0/b/gitbook-x-prod.appspot.com/o/spaces%2FfcGyJ1C47hcV3dV9rYfW%2Fuploads%2FeA6HPtU3XQv4K5eSVUl4%2FNominate14.png?alt=media&amp;token=d00de3f7-a872-40ac-898b-18c6521df9b6" alt=""><figcaption></figcaption></figure>

**Stap 8:** Onze node zal dan toegevoegd worden als nominatie. Om er zeker van te zijn dat je in alle ERAs rewards krijgt, kies je daarna een aantal **'High performance'** of **'Active'** validators. In dit voorbeeld voegen we 4 toe.

<figure><img src="https://417746289-files.gitbook.io/~/files/v0/b/gitbook-x-prod.appspot.com/o/spaces%2FfcGyJ1C47hcV3dV9rYfW%2Fuploads%2FltFtxAWz0CZKxNzV1zaM%2FNominate15.png?alt=media&amp;token=656b3992-f6b1-4569-8b71-966cd8ca286e" alt=""><figcaption></figcaption></figure>

**Stap 9:** Klik op **'Continue'**.

<figure><img src="https://417746289-files.gitbook.io/~/files/v0/b/gitbook-x-prod.appspot.com/o/spaces%2FfcGyJ1C47hcV3dV9rYfW%2Fuploads%2FTi5kQwWFmRDI4ugS3Btn%2FNominate16.png?alt=media&amp;token=05931811-6ecf-4fe4-9193-d8e7dc398b7c" alt=""><figcaption></figcaption></figure>

**Stap 10:** Vul de hoeveelheid $AVAIL die je wilt nomineren in (minimaal 1000) en klik op **'Continue'**.

<figure><img src="https://417746289-files.gitbook.io/~/files/v0/b/gitbook-x-prod.appspot.com/o/spaces%2FfcGyJ1C47hcV3dV9rYfW%2Fuploads%2F9z0t1H48mMYcQnQ0J20U%2FNominate17.png?alt=media&amp;token=c92564cd-f0b3-45ed-8e81-0317ab88eaab" alt=""><figcaption></figcaption></figure>

**Stap 11:** Controleer of alle details correct zijn onder **'Summary'** en klik op **'Start Nominating'**.

<figure><img src="https://417746289-files.gitbook.io/~/files/v0/b/gitbook-x-prod.appspot.com/o/spaces%2FfcGyJ1C47hcV3dV9rYfW%2Fuploads%2FWslCq3ckcYERcIm3otB0%2FNominate18.png?alt=media&amp;token=245587b6-c651-4be3-a198-3bdb5e1d9479" alt=""><figcaption></figcaption></figure>

**Stap 12:** Klik op '**Approve'** in de Talisman prompt.

<figure><img src="https://417746289-files.gitbook.io/~/files/v0/b/gitbook-x-prod.appspot.com/o/spaces%2FfcGyJ1C47hcV3dV9rYfW%2Fuploads%2F95FV1sia52xwai6Sbhzz%2FNominate19.png?alt=media&amp;token=bbc51c7e-1ab9-4919-8ba9-2c39909479be" alt=""><figcaption></figcaption></figure>

**Stap 13:** Je hebt nu succesvol je $AVAIL genomineerd. Je zult je eerste rewards na 1-2 ERAs ontvangen en daarna na elke ERA.


# Talisman - Installatie

<figure><img src="https://417746289-files.gitbook.io/~/files/v0/b/gitbook-x-prod.appspot.com/o/spaces%2FfcGyJ1C47hcV3dV9rYfW%2Fuploads%2FFFcyJZVSYNF6H56lPc7b%2FInstall1.png?alt=media&amp;token=1b278f56-18b4-4520-917e-42bcd8bcf277" alt=""><figcaption></figcaption></figure>

**Stap 1:** Ga naar de [Talisman website](https://talisman.xyz) en klik op '**Get Started**'.

<figure><img src="https://417746289-files.gitbook.io/~/files/v0/b/gitbook-x-prod.appspot.com/o/spaces%2FfcGyJ1C47hcV3dV9rYfW%2Fuploads%2FHX97bLoHW9CcdDNqkqx3%2FInstall2.png?alt=media&amp;token=5a977d00-c3be-438a-b3ed-6fabf136f298" alt=""><figcaption></figcaption></figure>

**Stap 2:** Klik op **'Add to Chrome'**.

<figure><img src="https://417746289-files.gitbook.io/~/files/v0/b/gitbook-x-prod.appspot.com/o/spaces%2FfcGyJ1C47hcV3dV9rYfW%2Fuploads%2FgPY03XYndlO811bdODFi%2FInstall3.png?alt=media&amp;token=a16756ab-9810-4b71-97cd-9beab26b9e80" alt=""><figcaption></figcaption></figure>

**Stap 3:** Klik op **'Add extension'**.


# Talisman - Wallet aanmaken

<figure><img src="https://417746289-files.gitbook.io/~/files/v0/b/gitbook-x-prod.appspot.com/o/spaces%2FfcGyJ1C47hcV3dV9rYfW%2Fuploads%2FxQeKmOrFrSSpBKlaH9ws%2FCreate1.png?alt=media&amp;token=2c5c7aec-6a0a-4cfa-bb7a-6c1367ddb6bd" alt=""><figcaption></figcaption></figure>

**Stap 1:** Na het installeren van de extensie wordt je doorgestuurd naar de landingspagina. Klik op **'Get Started'**.

<figure><img src="https://417746289-files.gitbook.io/~/files/v0/b/gitbook-x-prod.appspot.com/o/spaces%2FfcGyJ1C47hcV3dV9rYfW%2Fuploads%2FzB3LashtJBIqReVwCEX0%2FCreate2.png?alt=media&amp;token=9063537e-1cab-4d58-932e-b1f73bdd6bd5" alt=""><figcaption></figcaption></figure>

**Stap 2:** Kies een sterk wachtwoord, vul deze twee keer in en klik op **'Continue'**.

<figure><img src="https://417746289-files.gitbook.io/~/files/v0/b/gitbook-x-prod.appspot.com/o/spaces%2FfcGyJ1C47hcV3dV9rYfW%2Fuploads%2FGNIxbTx3M05Bz6zUu9EN%2FCreate3.png?alt=media&amp;token=165dc0c5-520e-4dfc-8eef-d5eb097ef6f0" alt=""><figcaption></figcaption></figure>

**Stap 3:** Kies of je anonieme gebruiksdata wilt delen met Talisman en klik daarna op **'No thanks'** of **'I agree'**.

<figure><img src="https://417746289-files.gitbook.io/~/files/v0/b/gitbook-x-prod.appspot.com/o/spaces%2FfcGyJ1C47hcV3dV9rYfW%2Fuploads%2Fu6c2Vztng1CNQBokekWN%2FCreate4.png?alt=media&amp;token=43a34435-406d-49a9-9b27-5f381fcc583b" alt=""><figcaption></figcaption></figure>

**Stap 4:** Zorg ervoor dat **'New'** is geselecteerd en klik op **'New Polkadot Account'**.

<figure><img src="https://417746289-files.gitbook.io/~/files/v0/b/gitbook-x-prod.appspot.com/o/spaces%2FfcGyJ1C47hcV3dV9rYfW%2Fuploads%2F2hvoXHL5YKByzDzP7WEs%2FCreate5.png?alt=media&amp;token=a845be89-dcb5-43af-aa64-6645347157c3" alt=""><figcaption></figcaption></figure>

**Stap 5:** Zorg ervoor dat **'Polkadot'** is geselecteerd, vul een naam in voor je account onder **'Account name'** en klik op **'Create'**.

<figure><img src="https://417746289-files.gitbook.io/~/files/v0/b/gitbook-x-prod.appspot.com/o/spaces%2FfcGyJ1C47hcV3dV9rYfW%2Fuploads%2FQ8F36mExIiRXughZj8sT%2FCreate6.png?alt=media&amp;token=9474038f-c145-42a5-998c-f904ef08daeb" alt=""><figcaption></figcaption></figure>

**Stap 6:** Klik op **'Acknowledge and Continue'**.

<figure><img src="https://417746289-files.gitbook.io/~/files/v0/b/gitbook-x-prod.appspot.com/o/spaces%2FfcGyJ1C47hcV3dV9rYfW%2Fuploads%2FSuaJWWSXEvDtTPj90m7O%2FCreate7.png?alt=media&amp;token=43839b0a-f8c6-4ae2-a68d-bd4d94705817" alt=""><figcaption></figcaption></figure>

**Stap 7:** Selecteer **'12-word'** of **'24-word'**, *sla de recovery zin die je ziet veilig op*, zet een vinkje en klik op **'Verify recovery phrase'**.

<figure><img src="https://417746289-files.gitbook.io/~/files/v0/b/gitbook-x-prod.appspot.com/o/spaces%2FfcGyJ1C47hcV3dV9rYfW%2Fuploads%2FmwXvUIri76kVhEzrH9kY%2FCreate8.png?alt=media&amp;token=be50d6d4-60c1-4192-8c9d-80663065e819" alt=""><figcaption></figcaption></figure>

**Stap 8:** Klik op de woorden van je recovery zin in de juiste volgorde net zolang tot alle vakjes gevuld zijn en klik daarna op **'Complete Verification'**.

<figure><img src="https://417746289-files.gitbook.io/~/files/v0/b/gitbook-x-prod.appspot.com/o/spaces%2FfcGyJ1C47hcV3dV9rYfW%2Fuploads%2FVvqpD334UptyHS9vfBl0%2FCreate9.png?alt=media&amp;token=171a5fcd-9c96-4599-8ba1-22236437155f" alt=""><figcaption></figcaption></figure>

**Stap 9:** Klik op **'Done'**.

<figure><img src="https://417746289-files.gitbook.io/~/files/v0/b/gitbook-x-prod.appspot.com/o/spaces%2FfcGyJ1C47hcV3dV9rYfW%2Fuploads%2FbJwQa9wSXG4bZSZ3nANx%2FCreate10.png?alt=media&amp;token=6312b206-d580-4540-9dac-3478d3864aac" alt=""><figcaption></figcaption></figure>

**Stap 10:** Klik op **'Enter Talisman'**.

<figure><img src="https://417746289-files.gitbook.io/~/files/v0/b/gitbook-x-prod.appspot.com/o/spaces%2FfcGyJ1C47hcV3dV9rYfW%2Fuploads%2FNVxreIXA9CjorUiUuhV5%2FCreate11.png?alt=media&amp;token=4adbcb7b-d8e3-41dc-93e6-abdf4576c24e" alt=""><figcaption></figcaption></figure>

**Stap 11 (aangeraden):** Klik op het extensie icoontje aan de rechterbovenkant van Google Chrome.

<figure><img src="https://417746289-files.gitbook.io/~/files/v0/b/gitbook-x-prod.appspot.com/o/spaces%2FfcGyJ1C47hcV3dV9rYfW%2Fuploads%2F7p9GV0HRS69xKPkx1uJX%2FCreate12.png?alt=media&amp;token=25ec7c0f-2247-4401-aadb-13aafa77048f" alt=""><figcaption></figcaption></figure>

**Stap 12:** Klik op het pinnetje naast Talisman. Dit zorgt ervoor dat je altijd makkelijk toegang hebt tot de Talisman extensie.


# Talisman - Ontvang $AVAIL

<figure><img src="https://417746289-files.gitbook.io/~/files/v0/b/gitbook-x-prod.appspot.com/o/spaces%2FfcGyJ1C47hcV3dV9rYfW%2Fuploads%2F0pQg1X31UjOYZYgMBwzc%2FReceive1.png?alt=media&amp;token=ea48b4af-5b33-416f-99df-0d49845af826" alt=""><figcaption></figcaption></figure>

**Stap 1:** Klik op **'Receive' o**p de overzichtspagina van Talisman.

<figure><img src="https://417746289-files.gitbook.io/~/files/v0/b/gitbook-x-prod.appspot.com/o/spaces%2FfcGyJ1C47hcV3dV9rYfW%2Fuploads%2Fyek8Iptj9wcKVUjh6gtX%2FReceive2.png?alt=media&amp;token=6b117892-cd55-4531-9f36-d45ff2ff3254" alt=""><figcaption></figcaption></figure>

**Stap 2:** Klik op het account waarop je de $AVAIL wilt ontvangen.

<figure><img src="https://417746289-files.gitbook.io/~/files/v0/b/gitbook-x-prod.appspot.com/o/spaces%2FfcGyJ1C47hcV3dV9rYfW%2Fuploads%2FevpfZ4j0EPjja8FsWqUu%2FReceive3.png?alt=media&amp;token=6512cbf1-205f-4670-8833-e5e01f1c873c" alt=""><figcaption></figcaption></figure>

**Stap 3:** Type AVAIL in het zoekveld en klik op de kopieerknop.

<figure><img src="https://417746289-files.gitbook.io/~/files/v0/b/gitbook-x-prod.appspot.com/o/spaces%2FfcGyJ1C47hcV3dV9rYfW%2Fuploads%2F162n9ol4cotLSjKenRrX%2FReceive4.png?alt=media&amp;token=15adfea8-54df-41c5-a143-6a91baa550b6" alt=""><figcaption></figcaption></figure>

**Stap 4:** Nadat je je $AVAIL naar het adres hebt verzonden zul je het na een paar minuten op je overzichtspagina gereflecteerd zien.


# Talisman - Verbind met de Avail staking pagina

<figure><img src="https://417746289-files.gitbook.io/~/files/v0/b/gitbook-x-prod.appspot.com/o/spaces%2FfcGyJ1C47hcV3dV9rYfW%2Fuploads%2Ft991DkSpg5yua0gA0bqo%2FNominate1.png?alt=media&amp;token=cf39916a-39ca-4657-a3c1-e109367d927c" alt=""><figcaption></figcaption></figure>

**Stap 1:** Ga naar de [Avail staking pagina](https://staking.availproject.org/) en klik op **'Connect'** aan de rechterbovenkant van de pagina.

<figure><img src="https://417746289-files.gitbook.io/~/files/v0/b/gitbook-x-prod.appspot.com/o/spaces%2FfcGyJ1C47hcV3dV9rYfW%2Fuploads%2FRzx8m8zWPcg8WKbPuv7c%2FNominate2.png?alt=media&amp;token=515089ef-4683-428f-881f-4fca5be53d29" alt=""><figcaption></figcaption></figure>

**Stap 2:** Klik op **'Talisman'**.

<figure><img src="https://417746289-files.gitbook.io/~/files/v0/b/gitbook-x-prod.appspot.com/o/spaces%2FfcGyJ1C47hcV3dV9rYfW%2Fuploads%2FEzCpEB9jDz5XmapwoCMg%2FNominate3.png?alt=media&amp;token=6b5a3b8b-8f79-4518-bbf1-56a8d3fa2037" alt=""><figcaption></figcaption></figure>

**Stap 3:** Selecteer een account in de Talisman prompt en klik op **'Connect 1'**.

<figure><img src="https://417746289-files.gitbook.io/~/files/v0/b/gitbook-x-prod.appspot.com/o/spaces%2FfcGyJ1C47hcV3dV9rYfW%2Fuploads%2FDluqnO69y9WH1oyy7mwh%2FNominate4.png?alt=media&amp;token=dd7817b4-8f41-4009-bbdd-c11e2998c90b" alt=""><figcaption></figcaption></figure>

**Stap 4:** Klik op **'Go To Accounts'**.

<figure><img src="https://417746289-files.gitbook.io/~/files/v0/b/gitbook-x-prod.appspot.com/o/spaces%2FfcGyJ1C47hcV3dV9rYfW%2Fuploads%2FtB1wPEbU0i2ppMCRSozs%2FNominate5.png?alt=media&amp;token=05c46c92-a01c-46e7-92c8-351300a1cf22" alt=""><figcaption></figcaption></figure>

**Stap 5:** Klik op je account.

<figure><img src="https://417746289-files.gitbook.io/~/files/v0/b/gitbook-x-prod.appspot.com/o/spaces%2FfcGyJ1C47hcV3dV9rYfW%2Fuploads%2FlXbfvPNXxvC4kAzfgVSB%2FNominate6.png?alt=media&amp;token=36280504-34db-457e-9558-c012f0e83938" alt=""><figcaption></figcaption></figure>

**Stap 6:** Je bent nu verbonden met de staking pagina. Je ziet hier o.a. je adres, je balans, of je aan het nomineren bent en meer.


# Talisman - Stake/Nominate je $AVAIL

<figure><img src="https://417746289-files.gitbook.io/~/files/v0/b/gitbook-x-prod.appspot.com/o/spaces%2FfcGyJ1C47hcV3dV9rYfW%2Fuploads%2FAsaGWtwoXsXUoJABBWZR%2FNominate7.png?alt=media&amp;token=08c11a92-35ec-4b0a-83b8-9c1c479ca4bc" alt=""><figcaption></figcaption></figure>

**Stap 1:** Klik op **'Validators'** aan de linkerkant van de pagina.

<figure><img src="https://417746289-files.gitbook.io/~/files/v0/b/gitbook-x-prod.appspot.com/o/spaces%2FfcGyJ1C47hcV3dV9rYfW%2Fuploads%2F7Eeh9tkKy8rNNgA9mYwQ%2FNominate8.png?alt=media&amp;token=ca498ce1-5bbf-4336-b2c4-49784451a983" alt=""><figcaption></figcaption></figure>

**Stap 2:** Klik op **'Clear'**.

<figure><img src="https://417746289-files.gitbook.io/~/files/v0/b/gitbook-x-prod.appspot.com/o/spaces%2FfcGyJ1C47hcV3dV9rYfW%2Fuploads%2FMYVmECeTnxIAhpRM7Q1u%2FNominate9.png?alt=media&amp;token=c6f16a17-d914-4636-9130-31b08a117cee" alt=""><figcaption></figcaption></figure>

**Stap 3:** Zoek op **'speedy'** en klik op het hartje om onze validator toe te voegen aan je favorieten.

<figure><img src="https://417746289-files.gitbook.io/~/files/v0/b/gitbook-x-prod.appspot.com/o/spaces%2FfcGyJ1C47hcV3dV9rYfW%2Fuploads%2FWeDk3ykOdcuHGtfN5E1k%2FNominate10.png?alt=media&amp;token=09d14708-d04e-4a17-803e-b8d346c20671" alt=""><figcaption></figcaption></figure>

**Stap 4:** Klik op **'Nominate'** aan de linkerkant van de pagina.

<figure><img src="https://417746289-files.gitbook.io/~/files/v0/b/gitbook-x-prod.appspot.com/o/spaces%2FfcGyJ1C47hcV3dV9rYfW%2Fuploads%2FtcjTKBp9RhuOgBa7fEEd%2FNominate11.png?alt=media&amp;token=ec841fb6-54b3-47d3-9677-e39a59872fd6" alt=""><figcaption></figcaption></figure>

**Stap 5: Klik op 'Start nominating'**.

<figure><img src="https://417746289-files.gitbook.io/~/files/v0/b/gitbook-x-prod.appspot.com/o/spaces%2FfcGyJ1C47hcV3dV9rYfW%2Fuploads%2FYi2wpbd0RxG80jJDPWIq%2FNominate12.png?alt=media&amp;token=2db545e4-8c28-4736-a382-b73c7a183139" alt=""><figcaption></figcaption></figure>

**Stap 6:** Selecteer wat je wilt doen met je rewards; compound, aan je liquide accountbalans toevoegen of toevoegen aan de liquide accountbalans van een ander account. Klik daarna op **'Continue'**.

<figure><img src="https://417746289-files.gitbook.io/~/files/v0/b/gitbook-x-prod.appspot.com/o/spaces%2FfcGyJ1C47hcV3dV9rYfW%2Fuploads%2FeDJkEMnHMLVhS8ODRrLB%2FNominate13.png?alt=media&amp;token=700032ec-8fdd-4111-a028-e456366cab6e" alt=""><figcaption></figcaption></figure>

**Stap 7:** Klik op **'From Favorites'**.

<figure><img src="https://417746289-files.gitbook.io/~/files/v0/b/gitbook-x-prod.appspot.com/o/spaces%2FfcGyJ1C47hcV3dV9rYfW%2Fuploads%2FeA6HPtU3XQv4K5eSVUl4%2FNominate14.png?alt=media&amp;token=d00de3f7-a872-40ac-898b-18c6521df9b6" alt=""><figcaption></figcaption></figure>

**Stap 8:** Onze node zal dan toegevoegd worden als nominatie. Om er zeker van te zijn dat je in alle ERAs rewards krijgt, kies je daarna een aantal **'High performance'** of **'Active'** validators. In dit voorbeeld voegen we 4 toe.

<figure><img src="https://417746289-files.gitbook.io/~/files/v0/b/gitbook-x-prod.appspot.com/o/spaces%2FfcGyJ1C47hcV3dV9rYfW%2Fuploads%2FltFtxAWz0CZKxNzV1zaM%2FNominate15.png?alt=media&amp;token=656b3992-f6b1-4569-8b71-966cd8ca286e" alt=""><figcaption></figcaption></figure>

**Stap 9:** Klik op **'Continue'**.

<figure><img src="https://417746289-files.gitbook.io/~/files/v0/b/gitbook-x-prod.appspot.com/o/spaces%2FfcGyJ1C47hcV3dV9rYfW%2Fuploads%2FTi5kQwWFmRDI4ugS3Btn%2FNominate16.png?alt=media&amp;token=05931811-6ecf-4fe4-9193-d8e7dc398b7c" alt=""><figcaption></figcaption></figure>

**Stap 10:** Vul de hoeveelheid $AVAIL die je wilt nomineren in (minimaal 1000) en klik op **'Continue'**.

<figure><img src="https://417746289-files.gitbook.io/~/files/v0/b/gitbook-x-prod.appspot.com/o/spaces%2FfcGyJ1C47hcV3dV9rYfW%2Fuploads%2F9z0t1H48mMYcQnQ0J20U%2FNominate17.png?alt=media&amp;token=c92564cd-f0b3-45ed-8e81-0317ab88eaab" alt=""><figcaption></figcaption></figure>

**Stap 11:** Controleer of alle details correct zijn onder **'Summary'** en klik op **'Start Nominating'**.

<figure><img src="https://417746289-files.gitbook.io/~/files/v0/b/gitbook-x-prod.appspot.com/o/spaces%2FfcGyJ1C47hcV3dV9rYfW%2Fuploads%2FWslCq3ckcYERcIm3otB0%2FNominate18.png?alt=media&amp;token=245587b6-c651-4be3-a198-3bdb5e1d9479" alt=""><figcaption></figcaption></figure>

**Stap 12:** Klik op '**Approve'** in de Talisman prompt.

<figure><img src="https://417746289-files.gitbook.io/~/files/v0/b/gitbook-x-prod.appspot.com/o/spaces%2FfcGyJ1C47hcV3dV9rYfW%2Fuploads%2F95FV1sia52xwai6Sbhzz%2FNominate19.png?alt=media&amp;token=bbc51c7e-1ab9-4919-8ba9-2c39909479be" alt=""><figcaption></figcaption></figure>

**Stap 13:** Je hebt nu succesvol je $AVAIL genomineerd. Je zult je eerste rewards na 1-2 ERAs ontvangen en daarna na elke ERA.


# De Basics

<figure><img src="https://content.gitbook.com/content/fcGyJ1C47hcV3dV9rYfW/blobs/WcwcIis6YkId8LcpXfcn/gitbook-kcc.png" alt=""><figcaption></figcaption></figure>

## **Introductie**

KCC 1.0 is gebaseerd op de code van Ethereum en is compatibel met EVM smart contracts. Het probeert het dubbele probleem van lage prestaties en hoge kosten van Ethereum op te lossen . Er zijn miljoenen blokken geproduceerd, terwijl het aantal actieve adressen op de blockchain de honderdduizenden heeft overschreden.

**EVM Compatibel**

KCC is EVM compatibel. Draai je dApps op KCC met je favoriete tools van Ethereum.

**Snelle Finality**

De gemmiddelde block tijd van KCC is 3 seconden. Een typische transactie wordt toegevoegd aan een blok binnen 6 seconden. Dit blok is daarna finalized als meer dan de helft van de validators blokken na dit blok toevoegen.

**Lage Kosten**

De gas fee wordt betaald in $KCS. Verstuur transacties voor een fractie van een cent.

**Veilig**

Elk blok wordt gevalideerd door betrouwbare, bekende validators die hu eigen $KCS op het spel zetten.

## **Staking**

Er zijn momenteel 15 van een maximum van 22 validators actief (deze produderen blokken en ontvangen rewards). Validators moeten handmatig toegevoegd worden aan de actieve set. De Network-brede APY kan fluctueren tussen 1 en 20% en is voornamelijk afhankelijk van KuCoin’s (de exchange) activiteit.  De staking APY is gebasseerd op een deel van KuCoin's trading fees. Staking Rewards worden continu toegekend maar worden niet automatisch geherstaked. Unstaking duurt 3 dagen, en je ontvangt gedurende deze periode geen staking rewards.

### **Veiligheid**

Wanneer je $KCS staked bij een validator, blijven je tokens in jouw bezit. Dit betekent dat je op elk moment kunt undelegaten, zelfs wanneer een validator offline gaat of inactief wordt. Het ergste dat zou kunnen gebeuren is dat je geen nieuwe staking rewards ontvangt, dus het kiezen van de juiste validator is nog steeds essentieel. Er is geen slashing actief op KCC.

## **Handige Links**

### **Explorers**

[**KCC Explorer**](https://explorer.kcc.io/en) **|** [**KCC Scan**](https://scan.kcc.io/)

### **Wallets**

[**UniPass**](https://unipass.id/) **|** [**Changex**](https://changex.io/) **|** [**Halo Wallet**](https://halo.social/) **|** [**MetaMask**](https://metamask.io/) **|** [**TrustWallet**](https://trustwallet.com/) **|** [**TokenPocket**](https://www.tokenpocket.pro/) **|** [**BitGet Wallet**](https://web3.bitget.com/en/) **|** [**Coin98**](https://coin98.com/) **|** [**MathWallet**](https://mathwallet.org/) **|** [**Rabby Wallet**](https://rabby.io/) **|** [**Ledger**](https://www.ledger.com/) **|** [**Infinity Wallet**](https://infinitywallet.io/asset/kucointoken) **|** [**Nabox**](https://nabox.io/) **|** [**SafePal**](https://www.safepal.com/) **|** [**Ambire Wallet**](https://www.ambire.com/) **|** [**Astrone**](http://astrone.io/) **|** [**Shield Protocol**](https://shieldprotocol.org/) **|** [**Fox Wallet**](https://foxwallet.com/) **|** [**ONTO Wallet**](https://onto.app/)

### **Officiële KCC resources**

[**Website**](https://www.kcc.io/) **|** [**Documentatie**](https://docs.kcc.io/) **|** [**Ecosysteem**](https://www.kcc.io/apps) **|** [**GitHub**](https://github.com/kcc-community) **|** [**Staking Website**](https://staking.kcc.io/)

**Social Media**

[**Twitter**](https://twitter.com/KCCOfficialTW) **|** [**Medium** ](https://kccofficial.medium.com/)**|** [**Discord**](https://discord.com/invite/H5ucJydSyd) **|** [**Telegram**](https://t.me/KCCOfficialEnglishCommunity)


# MetaMask - $KCS Staking Guide

## **Hoofdstuk 1 – Ontvang $KCS in je MetaMask Wallet**

**Stap 1:** Installeer en maak je MetaMask wallet aan als je dat nog niet hebt gedaan: [**KLIK HIER**](https://metamask.io/download/)

<figure><img src="https://417746289-files.gitbook.io/~/files/v0/b/gitbook-x-prod.appspot.com/o/spaces%2FfcGyJ1C47hcV3dV9rYfW%2Fuploads%2FIczk6ec8icVWXB8w2IGy%2Freceive1.png?alt=media&amp;token=a0a4244d-aba7-4a92-9e34-42ec92380670" alt=""><figcaption></figcaption></figure>

**Stap 2:** Kopieer je wallet adres. Dit is het adres waar je je $KCS naar toestuurd vanaf bijvoorbeeld KuCoin exchange.

## **Hoofdstuk 2 – Stake je $KCS**

<figure><img src="https://417746289-files.gitbook.io/~/files/v0/b/gitbook-x-prod.appspot.com/o/spaces%2FfcGyJ1C47hcV3dV9rYfW%2Fuploads%2FUJcs7bxYwVg1J0ZBZ8sN%2Fstake1.png?alt=media&amp;token=dbe04fdf-5a16-4d64-9123-1facc71c8657" alt=""><figcaption></figcaption></figure>

**Stap 1:** Ga naar de [KCC staking pagina](https://staking.kcc.io/staking) en klik op '**Connect Wallet**'.

<figure><img src="https://417746289-files.gitbook.io/~/files/v0/b/gitbook-x-prod.appspot.com/o/spaces%2FfcGyJ1C47hcV3dV9rYfW%2Fuploads%2Fi4hlzxsIR0pDoKKOWhLO%2Fstake2.png?alt=media&amp;token=f3939b71-0bda-453f-9953-9c9d6a2e7016" alt=""><figcaption></figcaption></figure>

**Stap 2:** Klik op '**MetaMask**'.

<figure><img src="https://417746289-files.gitbook.io/~/files/v0/b/gitbook-x-prod.appspot.com/o/spaces%2FfcGyJ1C47hcV3dV9rYfW%2Fuploads%2FubSS98kxGdDSedG6FAZ7%2Fstake3.png?alt=media&amp;token=1282532d-a167-4731-9417-6b13039d50a4" alt=""><figcaption></figcaption></figure>

**Stap 3:** Select het account dat je wilt verbinden en klik op '**Next**' in de MetaMask extensie popup.

<figure><img src="https://417746289-files.gitbook.io/~/files/v0/b/gitbook-x-prod.appspot.com/o/spaces%2FfcGyJ1C47hcV3dV9rYfW%2Fuploads%2FTZPCx2aLfTo0SguXSTub%2Fstake4.png?alt=media&amp;token=4acbc962-60c4-4edd-ae83-3358e9643cb5" alt=""><figcaption></figcaption></figure>

**Stap 4:** Klik op '**Connect**'.

<figure><img src="https://417746289-files.gitbook.io/~/files/v0/b/gitbook-x-prod.appspot.com/o/spaces%2FfcGyJ1C47hcV3dV9rYfW%2Fuploads%2F8PFshHxL0wmEP9lGiHh3%2Fstake5.png?alt=media&amp;token=4ced192e-bafc-41d6-9ab0-6031f4a22e5d" alt=""><figcaption></figcaption></figure>

**Stap 5:** Klik op '**Delegate**' naast de validator waarbij je wilt staken (**bijvoorbeeld, Speedy Staking**).

<figure><img src="https://417746289-files.gitbook.io/~/files/v0/b/gitbook-x-prod.appspot.com/o/spaces%2FfcGyJ1C47hcV3dV9rYfW%2Fuploads%2F2hAv9M0DXutkHXXVBRcs%2Fstake6.png?alt=media&amp;token=624cb3dc-bf7d-4c65-b8c5-403a411a7a28" alt=""><figcaption></figcaption></figure>

**Stap 6:** Vul de hoeveelheid $KCS in die je wilt staken onder '**Delegate**' en klik op '**Delegate**'.

{% hint style="warning" %}
**BELANGRIJK: Stake niet all je $CSPR, je zult in ieder geval 2.5 CSPR nodig hebben om later je tokens te unstaken.**
{% endhint %}

<figure><img src="https://417746289-files.gitbook.io/~/files/v0/b/gitbook-x-prod.appspot.com/o/spaces%2FfcGyJ1C47hcV3dV9rYfW%2Fuploads%2FneoeFXAM38ZTYMeYm2s3%2Fstake7.png?alt=media&amp;token=c08bcdd8-d5ba-450f-a47f-efd4029ec5d9" alt=""><figcaption></figcaption></figure>

**Stap 7:** Klik op '**Confirm**' in de MetaMask extensie popup.

<figure><img src="https://417746289-files.gitbook.io/~/files/v0/b/gitbook-x-prod.appspot.com/o/spaces%2FfcGyJ1C47hcV3dV9rYfW%2Fuploads%2FtfLNIKoKhlG6QJYX0Bgk%2Fstake8.png?alt=media&amp;token=1c081599-3b80-431d-84a6-5703d17a015d" alt=""><figcaption></figcaption></figure>

**Stap 8:** Je hebt nu succesvol je $KCS gestaked. Klik op '**Check My Delegate**'.

<figure><img src="https://417746289-files.gitbook.io/~/files/v0/b/gitbook-x-prod.appspot.com/o/spaces%2FfcGyJ1C47hcV3dV9rYfW%2Fuploads%2Fegr7L8KGXCIWNQaJW0P8%2Fstake9.png?alt=media&amp;token=5d8dc666-4145-423b-accc-3ff2b53096c9" alt=""><figcaption></figcaption></figure>

**Stap 9:** Hier vind je informatie over je stake, zoals de hoevelheid die je gestaked hebt en je kunt je rewards hier claimen.


# De Basics

<figure><img src="https://content.gitbook.com/content/fcGyJ1C47hcV3dV9rYfW/blobs/KRV24hCrcwrvAbnYo4D4/gitbook-haqq.png" alt=""><figcaption></figcaption></figure>

## **Introductie**

**HOME OF ETHICAL WEB3**

Ethics-first network that welcomes sustainability-centered developers, validators and open source contributors as well as Muslim innovators in sustainable Finance.

Islamic Coin($ISLM) is the native currency of HAQQ Network.

Islamic Coin ($ISLM) is de currency van het HAQQ Network. Een netwerk met ethiek voorop dat duurzaamheidsgerichte ontwikkelaars, validators en bijdragers van open source software verwelkomt, evenals islamitische vernieuwers in duurzame finance.

&#x20;

**ABOUT HAQQ**\
HAQQ brengt de meest gerenommeerde spelers op het gebied van ethische financiering samen om gemeenschapsgestuurde gedecentraliseerde technologieën wereldwijd te promoten.

HAQQ is een EVM-equivalente blockchain gebaseerd op de Cosmos SDK. De technologie achter HAQQ maakt het mogelijk voor elke smart contract gecreëerd op andere EVM-blockchains om zonder enige wijzigingen te worden geïmplementeerd.

**MISSION**

> *"Crypto is zijn weg kwijtgeraakt - op winst gerichte praktijken in crypto voorkomen massale adoptie. HAQQ heeft als missie om Web3-projecten toegankelijk te maken voor iedereen."*

**VISION**

> *"HAQQ balanceert deShariah-compliant filosofie en geavanceerde technologie om een eerlijker en duurzamer financieel systeem te creëren. Zowel moslims als ESG-gedreven verandering over de hele wereld, en HAQQ staat aan het roer."*

## **Staking**

Er zijn momenteel ongeveer 95 actieve validators(die blokken produceren en rewards ontvangen). Network-brede APR kan flucuteren en is momenteel ongeveer 7.8%. Staking Rewards worden continu toegekend maar worden niet automatisch geherstaked. Unstaking duurt 21 dagen, en je ontvangt gedurende deze periode geen staking rewards.

### **Veiligheid**

Wanneer je $ISLM staked bij een validator, blijven je tokens in jouw bezit. Dit betekent dat je op elk moment kunt undelegaten, zelfs wanneer een validator offline gaat of inactief wordt. Het ergste dat zou kunnen gebeuren is dat je geen nieuwe staking rewards ontvangt, dus het kiezen van de juiste validator is nog steeds essentieel. Er is geen slashing actief op Haqq.

## **Handige Links**

### **Explorers**

[HAQQ Mainnet Explorer](https://explorer.haqq.network/) | [NodeStake](https://explorer.nodestake.org/haqq) | [Nodes.Guru](https://haqq.explorers.guru/)

### **Wallets**

[**MetaMask**](https://metamask.io/) **|** [**TokenPocket**](https://www.tokenpocket.pro/) **|** [**Ledger**](https://www.ledger.com/) **|** [**Keystone**](https://keyst.one/) **|** [**Safe**](https://safe.global/)

### **Officiële Resources**

**Haqq Network**

[**Haqq Website**](https://haqq.network/) **|** [**Documentatie**](https://docs.haqq.network/) **|** [**Ecosysteem**](https://haqq.network/ecosystem) **|** [**GitHub**](https://github.com/haqq-network) **|** [**Staking Website**](https://shell.haqq.network/) **|** [**Haqq Wallet**](https://haqq.network/wallet)

**Islamic Coin**

[**IslamicCoin Website**](https://islamiccoin.net/)

**Social Media**

**Haqq Network**

[**Twitter**](https://twitter.com/The_HaqqNetwork) **|** [**Discord**](https://discord.gg/CDtXuQG3Vd)

**Islamic Coin**

[**Twitter**](https://twitter.com/Islamic_coin) **|** [**Medium**](https://medium.com/islamic-coin) **|** [**Discord**](https://discord.gg/islamiccoin) **|** [**Telegram**](https://t.me/islamiccoin_int) **|** [**LinkedIn**](https://www.linkedin.com/company/islamiccoin) **|** [**Youtube**](https://www.youtube.com/channel/UCTjvOCTDeO9H67y_6btF1NA)


# Bienvenido

<figure><picture><source srcset="/files/AXKhwglFOxsSQqL052QB" media="(prefers-color-scheme: dark)"><img src="https://1416147950-files.gitbook.io/~/files/v0/b/gitbook-x-prod.appspot.com/o/spaces%2FunFX7Q97s4HrGd96lp77%2Fuploads%2FmmfCMBG6BXJrH0lutVfJ%2F%5BPNG%5D%20Speedy%20Staking%20-%20dark.png?alt=media&amp;token=40051416-2d4d-47d9-8e7e-270b81a389ed" alt=""></picture><figcaption></figcaption></figure>

<figure><picture><source srcset="/files/ZqBgPaKj5tsal4laMtDl" media="(prefers-color-scheme: dark)"><img src="https://content.gitbook.com/content/unFX7Q97s4HrGd96lp77/blobs/reoCsDD9Tn11l4FQhquB/VSP%20staking%20rewards2.png" alt=""></picture><figcaption></figcaption></figure>

Bienvenido a la Base de Dados de Speedy Staking, para todos tus tutoriales e información sobre staking!

Si aún tienes preguntas sobre staking o quieres preguntar algo más, puedes unirte a nuestro grupo de Telegram, enviarnos un correo electrónico, unirte al chat en vivo en nuestro sitio web, o enviarnos un DM en Twitter.

* [Website (Livechat)](https://speedystaking.io)
* [Envíanos un Correo Electrónico](mailto:info@speedystaking.io)
* [Twitter](https://twitter.com/speedystaking)
* [Grupo Telegram](https://https://t.me/speedystaking)
* [Perfil Staking Rewards](https://www.stakingrewards.com/provider/speedy-staking)


# Staking - Conceptos Basicos

## **¿Qué es el Staking?**

In a Proof–of–Stake (PoS) blockchain, users can “stake“ their coins to gain a share in the Network’s’ rewards. These rewards usually come from a portion of the Network’s’ transaction fees and new coins created with each new block. Through staking, users can earn interest on their holdings and help secure the network. Staking is a more energy–efficient way to secure a blockchain network than the energy-intensive mining process used in a Proof–of–Work blockchain (PoW).

En una blockchain de Proof–of–Stake (PoS), los usuarios pueden poner en "stake" sus monedas para obtener una parte de las recompensas de la red. Estas recompensas generalmente provienen de una porción de las tarifas de transacción de la red y de nuevas monedas creadas con cada nuevo bloque. A través del staking, los usuarios pueden ganar intereses sobre sus holdings y ayudar a asegurar la red. El staking es una forma más eficiente en términos de energía para asegurar una red blockchain que el proceso de minería intensivo en energía utilizado en una blockchain de Proof-of-Work (PoW).

## **How Can I Stake?**

El staking descentralizado (que Speedy Staking ofrece a través de sus servicios de validación) requiere que utilices una cartera que pueda interactuar con la red en la que deseas hacer staking y tokens de esa red. Puede necesitar que pongas en stake una cantidad mínima y debes pagar tarifas de transacción para hacer y deshacer el staking. Es crucial no poner en stake todos tus tokens porque no tendrás suficiente para deshacer el staking más tarde. Las redes generalmente requieren que pase una cierta cantidad de tiempo antes de que tus tokens sean sacados de stake; esto puede variar desde 14 horas en algunas hasta 28 días en otras. Es esencial recordar esto antes de comenzar a hacer staking y deshacerlo. Las recompensas generalmente no se obtienen durante este período de unstake. Siempre incluiremos esta información en nuestros 101 específicos de la red en nuestra Base de Conocimientos.

## ¿Es Seguro?

A diferencia de CEXs (Intercambios Centrales) y otras plataformas, Speedy Staking solo ofrece servicios de validación descentralizados. Nunca tomaremos custodia ni control sobre tus tokens cuando hagas staking en nuestros nodos, y siempre decidirás qué y cuándo hacer staking y unstaking. Creemos que es fundamental que los usuarios tengan autocustodia sobre sus tokens, ya que estos tokens les pertenecen a ellos y a nadie más. Y debemos recordar el famoso dicho cripto, “No son tus llaves, No son tus criptos”.

Algunos redes tendrán activado el slashing, donde los validadores (y, con ellos, los stakers) pueden tener su participación (o tokens) reducida si no se comportan correctamente, y en consecuencia puedes perder tokens. Es posible y común contratar un seguro para los validadores en redes donde el slashing está activo. Speedy Staking no está actualmente activo como validador en redes donde el slashing está activo.

Debido a la naturaleza descentralizada de la autocustodia, generalmente no hay forma de recuperar el acceso a una billetera aparte de la clave privada (o frase semilla). Si la pierdes, NO tendrás acceso a tus tokens. Lo mismo ocurre cuando alguien más obtiene acceso a tu clave privada; tendrán control TOTAL sobre tu billetera. Una clave privada no puede ser cambiada, por lo que debes crear una nueva billetera una vez expuesta. Es esencial mantener tu clave privada guardada de manera segura, no compartirla con otros y saber qué transacciones firmas.

## ¿Por Qué Debería Hacer Staking Con Speedy Staking?

Speedy Staking consiste en un equipo altamente capacitado y educado con años de experiencia en blockchain y DevOps. Nuestros nodos validadores operan con hardware de alta especificación utilizando energía 100% renovable, y apoyamos proyectos del Estándar Oro. Ofrecemos soporte 24/7 en nuestro grupo de Telegram y apoyamos a la comunidad de staking con información útil y guías. Participamos activamente en eventos de blockchain y ayudamos a pequeños proyectos asociándonos y patrocinándolos. Somos verificados  por el Staking Rewards también de forma independiente [ con un rating - AA - ](https://www.stakingrewards.com/provider/speedy-staking)!


# Los conceptos básicos

<figure><img src="https://content.gitbook.com/content/unFX7Q97s4HrGd96lp77/blobs/NRVVJtneCkvzKiccO4D1/gitbook-casper.png" alt=""><figcaption></figcaption></figure>

## Introducción

Casper es una red de blockchain Proof-of-Stake optimizada para la adopción empresarial y de desarrolladores. La Red Casper es la primera blockchain en vivo construida sobre la especificación Correct-by-Construction (CBC) Casper, lo que permite a la red crear nuevos mercados sostenibles y desbloquear valor mediante la tokenización de casi cualquier activo sin comprometer el rendimiento o la seguridad. La actividad en Casper está gobernada por CSPR, el token nativo de la red, a través del próximo lanzamiento [governance portal](https://members-staging.casper.network/validator-selection-tool/10). Casper lanzó su mainnet el 31 de marzo de 2021.

&#x20;

**Casper Labs**

*\_“Casper Labs es una AG con sede en Suiza que comenzó a trabajar en la base de código de Casper blockchain en octubre de 2018 y facilitó el Casper Testnet durante 2020 y 2021 hasta el lanzamiento de la mainnet. Mientras los ingenieros de Casper Labs contribuyen con nuevas características a la base de código para la blockchain de Casper, Casper Labs también es una empresa de consultoría empresarial completamente equipada que ofrece soporte y servicios a sus clientes empresariales que construyen sobre Casper.”*

&#x20;

**Casper Association**

*\_“La Asociación Casper es una organización sin fines de lucro, domiciliada en Suiza, responsable de supervisar la red y apoyar su evolución orgánica y su continua descentralización. La membresía de la Asociación comprende los validadores independientes que ejecutan nodos en la Red Casper.”*

## **Tokenomics**

Casper comenzó con un suministro Génesis de 10,000,000,000 (o 10 mil millones) de tokens. Actualmente, hay una inflación del 8% anual, lo que significa que el suministro total crece en el mismo porcentaje. Este número está sujeto a cambios en el futuro. La inflación se utiliza únicamente para recompensar a los validadores y delegadores. Las tarifas de transacción van al validador que propuso el bloque, y estas tarifas no se comparten con los delegadores. El suministro total actual ronda los 12 mil millones de CSPR.

## Venta de Tokens

La venta de tokens de Casper se llevó a cabo en CoinList del 23 de marzo de 2021 al 28 de marzo de 2021, con una venta comunitaria adicional el 7 de abril de 2021. Todos los tokens de las ventas públicas y de validadores han sido liberados y están circulando.

### **Staking**

Hay 100 validadores activos (produciendo bloques y ganando recompensas) en cualquier momento, pero hay planes para aumentar este número en el futuro (posiblemente a 200 o 250). El APY de toda la red depende de cuánto CSPR del suministro total esté en staking; el 100% del suministro total en staking significaría un APY del 8%, y usualmente se mantiene alrededor del \~10% APY. Tus primeras recompensas de staking aparecerán después de \~4 horas. Deshacer el staking toma de 7-8 ERAS o 14-16 horas, durante las cuales NO ganarás recompensas.

&#x20;

### **Seguridad**

Cuando delegas CSPR con un validador, tus tokens permanecerán bajo tu custodia. Esto significa que puedes, en cualquier momento, dejar de delegar, incluso cuando un validador se desconecta o se vuelve inactivo. Lo peor que podría pasar es que no recibirías nuevas recompensas, por lo que elegir el validador adecuado es esencial. No hay recortes activos en Casper.

&#x20;

## Cosas a considerar al seleccionar un validador

* **Extras** – ¿Qué más ofrecen? ¿Apoyan proyectos en el Ecosistema Casper mediante asociaciones y patrocinios? ¿Proporcionan material educativo como tutoriales? ¿Organizan eventos y sorteos? Los extras pueden marcar la diferencia entre un buen validador y uno excelente.
* **Comunicación** – ¿Comunican problemas, actualizaciones importantes y cambios a tiempo?
* **Contacto** – ¿Qué tan fácil es contactar al validador? ¿Tienen un grupo de soporte? En caso de necesitar ayuda con cualquier cosa relacionada con el staking, quieres poder contactar fácilmente al validador.
* **Confianza** – ¿Es un validador transparente? ¿Sé quiénes son? ¿Sé qué representan? ¿Están verificados independientemente? Es crucial que el validador esté presente a largo plazo y se comprometa con la fiabilidad y seguridad. ¡No quieres que un nodo se desconecte sin que te des cuenta; dejarás de ganar recompensas!
* **Tiempo de Actividad del Nodo** – ¿El tiempo de actividad de su nodo se acerca al 100%? El tiempo de actividad puede impactar tus recompensas.
* **Comisión** – ¿Cuánta comisión cobra el validador? Cuanto mayor sea este número, menos recompensas ganarás.

## Enlaces Útiles

### **Exploradores**

[CSPR.live](http://cspr.live/) | [scansper.com](https://speedystaking.io/docs/casper-network/scansper.com) | [div3.in](http://div3.in/) | [Casperstats](http://casperstats.io/)

&#x20;

### **Carteras**

[Ledger](https://docs.casperlabs.io/workflow/users/ledger-setup/) – Cartera de hardware; debe usarse con, por ejemplo, CSPR.live o CasperHolders.io El soporte completo para Ledger Live seguirá.

[Casper Wallet](http://casperwallet.io/) – Cartera oficial de Casper; se puede usar con CSPR.live o de forma independiente, disponible en Brave/Chrome/Edge/Firefox/Safari y en Android e iOS.

[CasperDash](https://casperdash.io/) – Billetera descentralizada ofrecida como una extensión de navegador para navegadores basados en Chromium (como Chrome, Brave y Edge) y como una aplicación para Android e iOS.

[Torus Wallet](http://casper.tor.us/) – Billetera que admite logins de sesión sociales

[Burrito Wallet](https://burritowallet.com/en) – Cartera móvil originalmente comercializado en el mercado coreano

&#x20;

### **Validadores**

[Overview](http://cspr.live/validators) – Descripción general de todos los validadores activos en CSPR.live

Speedy Staking – [Node 1](https://cspr.live/validator/0111b3519efa63942e57a9470f55b62d9c4a59ff44df7c65eaefbd1489b7a93a5b) | [Node 2](https://cspr.live/validator/01541af7c1a41912be691fd76849b59c6ea3af38bdcff4db8cad633be4294cc38d)

&#x20;

## Recursos oficiales de Casper

[Casper Network](https://casper.network/) | [CasperLabs](https://casperlabs.io/) | [Casper Twitter](https://twitter.com/Casper_Network) | [CasperLabs Twitter](https://twitter.com/Casper_Labs) |  [Casper Documentation](https://docs.casperlabs.io/) | [Casper Governance Portal](https://members-staging.casper.network/) | [Casper Telegram](http://t.me/casperblockchain) | [Casper Announcements Telegram](https://t.me/casperofficialann) | [Casper Staking Telegram](https://t.me/casperblockchainstaking) | [Casper Discord](http://discord.gg/casperblockchain) | [Casper Youtube](https://www.youtube.com/c/CasperNetwork) | [Casper Ecosystem](https://casperecosystem.io/) | [Casper GitHub](https://github.com/casper-network)

&#x20;

## Grupos de lenguajes Casper

[India](https://t.me/casperblockchainindia) | [Spain](https://t.me/casperblockchainspanish) | [Russia](https://t.me/casperblockchainrussia) | [Poland](https://t.me/casperblockchainpoland) | [Turkey](https://t.me/casperblockchainturkey) | [France](https://t.me/casperblockchainfrench) | [Vietnam](https://t.me/casperblockchainvietnam) | [South Korea](https://t.me/casperblockchainkorea) | [The Netherlands](https://t.me/casperblockchainnetherlands) | [Italy](https://t.me/casperblockchainitaly) | [Germany](https://t.me/casperblockchaindeutsch) | [China](https://t.me/casperblockchainchinese)


# Casper Wallet

<figure><img src="https://content.gitbook.com/content/unFX7Q97s4HrGd96lp77/blobs/NPYT4H9kQbdM0FcRQFVo/gitbook-cw.png" alt=""><figcaption></figcaption></figure>

* [Website Oficial](https://casperwallet.io)
* Descargar en [Chrome](https://chrome.google.com/webstore/detail/casper-wallet/abkahkcbhngaebpcgfmhkoioedceoigp) | [Firefox](https://addons.mozilla.org/en-US/firefox/addon/casper-wallet/) | [Safari](https://apps.apple.com/us/app/casper-wallet/id6446363274)
* Descargar en [iOS](https://apps.apple.com/app/apple-store/id6446363274?pt=125226123\&ct=Website\&mt=8) | [Android](https://play.google.com/store/apps/details?id=io.casperwallet.app\&hl=en\&gl=US)
* [Guias oficiales](https://www.casperwallet.io/user-guide)
* [Twitter](https://twitter.com/Casper_Wallet)
* [Grupo de telegram](https://t.me/CSPRhub)


# Casper Wallet -  Guía Completo

## Parte 1 – Instalar Casper Wallet y Configurar Wallet

<figure><img src="https://1416147950-files.gitbook.io/~/files/v0/b/gitbook-x-prod.appspot.com/o/spaces%2FunFX7Q97s4HrGd96lp77%2Fuploads%2F9QTRUvQwvQwQmKH7R9vQ%2FStep1.png?alt=media&amp;token=e64438bf-aeeb-4918-bb21-81739a46cf10" alt=""><figcaption></figcaption></figure>

**Paso 1:** Navega a la [Casper Wallet website](https://casperwallet.io) y haz clic en **"Download"**

<figure><img src="https://1416147950-files.gitbook.io/~/files/v0/b/gitbook-x-prod.appspot.com/o/spaces%2FunFX7Q97s4HrGd96lp77%2Fuploads%2FKnF5ltVRJIa6HZOKImxa%2FStep2.png?alt=media&amp;token=c00da5e5-690d-4575-9f3b-e7917cce9be5" alt=""><figcaption></figcaption></figure>

**Paso 2:** Esto te llevará a la Chrome Store (o equivalente en otros navegadores); haz clic '**Add to Chrome**' (o equivalente en otros navegadores).

<figure><img src="https://1416147950-files.gitbook.io/~/files/v0/b/gitbook-x-prod.appspot.com/o/spaces%2FunFX7Q97s4HrGd96lp77%2Fuploads%2F2QRcjvOpHG9jtttFUBfd%2FStep3.png?alt=media&amp;token=b8cea778-ebd1-427d-9750-87502eacb463" alt=""><figcaption></figcaption></figure>

**Paso 3:** Haga clic en '**Add extension**'.

<figure><img src="https://1416147950-files.gitbook.io/~/files/v0/b/gitbook-x-prod.appspot.com/o/spaces%2FunFX7Q97s4HrGd96lp77%2Fuploads%2FByDAVbaiBVi1lCCbmAsS%2FStep4.png?alt=media&amp;token=52f8e6a8-9672-440a-9c7b-abd16d1c3324" alt=""><figcaption></figcaption></figure>

**Paso 4:** Después de agregar la extensión Casper Wallet, se abrirá una nueva pestaña en tu navegador para la configuración; haz clic '**Get started**'.

<figure><img src="https://1416147950-files.gitbook.io/~/files/v0/b/gitbook-x-prod.appspot.com/o/spaces%2FunFX7Q97s4HrGd96lp77%2Fuploads%2FoqUHvTgDHoOpK5cf2v6R%2FStep5.png?alt=media&amp;token=4eeb73cf-a2dd-4c38-aeb5-d52868e186a9" alt=""><figcaption></figcaption></figure>

**Paso 5:** Piensa en una contraseña segura, complétala dos veces, marca la casilla y haz clic '**Create password**'.

<figure><img src="https://1416147950-files.gitbook.io/~/files/v0/b/gitbook-x-prod.appspot.com/o/spaces%2FunFX7Q97s4HrGd96lp77%2Fuploads%2FI5G7Be28blPx41wwtouf%2FStep6.png?alt=media&amp;token=9d4f7b5a-4c38-4bd8-bc68-4ccdea56b76f" alt=""><figcaption></figcaption></figure>

**Paso 6:** Haz clic en '**Create my secret recovery phrase**'.

<figure><img src="https://1416147950-files.gitbook.io/~/files/v0/b/gitbook-x-prod.appspot.com/o/spaces%2FunFX7Q97s4HrGd96lp77%2Fuploads%2FtmyIvduhOkulwuhxNz05%2FStep7.png?alt=media&amp;token=d8677656-91e2-4fbe-9edb-64d50b2bbfcf" alt=""><figcaption></figcaption></figure>

**Paso 7:** Marque la casilla y haga clic en '**Next**'.

<figure><img src="https://1416147950-files.gitbook.io/~/files/v0/b/gitbook-x-prod.appspot.com/o/spaces%2FunFX7Q97s4HrGd96lp77%2Fuploads%2FIyOEbVLQNDrIMqz1OBhu%2FStep8.png?alt=media&amp;token=0ccacdcd-abe5-4123-85c6-263e544d071b" alt=""><figcaption></figcaption></figure>

**Paso 8:** Guarda tu frase de recuperación secreta en un lugar seguro, marca la casilla y haz clic '**Next**'.

<figure><img src="https://1416147950-files.gitbook.io/~/files/v0/b/gitbook-x-prod.appspot.com/o/spaces%2FunFX7Q97s4HrGd96lp77%2Fuploads%2F3lhjn4FuMylf9xqnBZek%2FStep9.png?alt=media&amp;token=e7b11b8b-48ae-4801-a2f9-2e32810d3aa3" alt=""><figcaption></figcaption></figure>

**Paso 9:** Complete las palabras faltantes de su frase secreta de recuperación correctamente y haga clic '**Confirm**'.

<figure><img src="https://1416147950-files.gitbook.io/~/files/v0/b/gitbook-x-prod.appspot.com/o/spaces%2FunFX7Q97s4HrGd96lp77%2Fuploads%2Fc60ics7ue4krWhPdHOvh%2FStep10.png?alt=media&amp;token=cbbc2427-bcb2-4c7c-8eb2-387d6ef12bec" alt=""><figcaption></figcaption></figure>

**Paso 10:** Haz clic en '**Done**'.

<figure><img src="https://1416147950-files.gitbook.io/~/files/v0/b/gitbook-x-prod.appspot.com/o/spaces%2FunFX7Q97s4HrGd96lp77%2Fuploads%2FXk1OclRpNiRig89nDLeM%2FStep11.png?alt=media&amp;token=ecc6e023-69e8-44f8-924a-abc2df52eef4" alt=""><figcaption></figcaption></figure>

**Paso 11:** Haga clic en '**Got it**'.

<figure><img src="https://1416147950-files.gitbook.io/~/files/v0/b/gitbook-x-prod.appspot.com/o/spaces%2FunFX7Q97s4HrGd96lp77%2Fuploads%2FpQWbqsaMjgr1OqZRJpn4%2FStep12.png?alt=media&amp;token=431acda8-10a5-4c2d-9963-85339e3eb760" alt=""><figcaption></figcaption></figure>

**Paso 12 (recomendado):** Ve al icono de extensiones en la parte superior derecha de Google Chrome, haz clic en él y haz clic en el pin junto a Casper Wallet. De esta manera, siempre tendrás fácil acceso a tu extensión Casper Wallet.

## Parte 2 – Conectar la Casper Wallet con el Explorador Blockchain CSPR.Live

<figure><img src="https://1416147950-files.gitbook.io/~/files/v0/b/gitbook-x-prod.appspot.com/o/spaces%2FunFX7Q97s4HrGd96lp77%2Fuploads%2FGvuEbQnJ9840y66LkHiR%2FStep13.png?alt=media&amp;token=8e6bc588-bc4c-4c16-ae48-0f5a98e76d4f" alt=""><figcaption></figcaption></figure>

**Paso 1:** Ve a CSPR.live y haz clic '**Sign in**' en la parte superior derecha de la pantalla.

<figure><img src="https://1416147950-files.gitbook.io/~/files/v0/b/gitbook-x-prod.appspot.com/o/spaces%2FunFX7Q97s4HrGd96lp77%2Fuploads%2FnA2lTZKsWKSp0oXrhDQ2%2FStep14.png?alt=media&amp;token=6b5cdc76-0157-4bac-b0ff-af0045832904" alt=""><figcaption></figcaption></figure>

**Paso 2:** Haz clic en '**Casper Wallet**'.

<figure><img src="https://1416147950-files.gitbook.io/~/files/v0/b/gitbook-x-prod.appspot.com/o/spaces%2FunFX7Q97s4HrGd96lp77%2Fuploads%2FkMShP9B1TObhqP4y5wEw%2FStep15.png?alt=media&amp;token=f457997d-cb50-40a3-9b8b-44671782eae5" alt=""><figcaption></figcaption></figure>

**Paso 3:** Marca la casilla junto a la cuenta que deseas conectar y haz clic en '**Next**'.

<figure><img src="https://1416147950-files.gitbook.io/~/files/v0/b/gitbook-x-prod.appspot.com/o/spaces%2FunFX7Q97s4HrGd96lp77%2Fuploads%2Fw6QoW9dx7Nrrlv2H8boE%2FStep16.png?alt=media&amp;token=13955d6f-e864-4b25-95ad-45e5a22da856" alt=""><figcaption></figcaption></figure>

**Paso 4:** Haga clic en '**Connect to 1 account**'.

## Parte 3 – Recibir $CSPR en la Clave Pública de la Casper Wallet Creada

<figure><img src="https://1416147950-files.gitbook.io/~/files/v0/b/gitbook-x-prod.appspot.com/o/spaces%2FunFX7Q97s4HrGd96lp77%2Fuploads%2FV5wtlrsjzVhjwf7l1IyQ%2FStep17.png?alt=media&amp;token=fec86cf4-394b-4b0f-9c26-84300f8e2c46" alt=""><figcaption></figcaption></figure>

**Paso 1:** Pasa el ratón sobre tu clave pública en la esquina superior derecha y selecciona '**View Account**'.

<figure><img src="https://1416147950-files.gitbook.io/~/files/v0/b/gitbook-x-prod.appspot.com/o/spaces%2FunFX7Q97s4HrGd96lp77%2Fuploads%2FAMNR9LtEurWHhiNoF2bV%2FStep18.png?alt=media&amp;token=20369765-e59a-4db3-b1aa-0feddf29a5d9" alt=""><figcaption></figcaption></figure>

**Paso 2:** Tu clave pública (dirección de la billetera) está en la parte superior. Esta es la dirección que usarás para enviar $CSPR.

## Parte 4a – Transferir $CSPR Usando Casper Wallet Junto con CSPR.Live

<figure><img src="https://1416147950-files.gitbook.io/~/files/v0/b/gitbook-x-prod.appspot.com/o/spaces%2FunFX7Q97s4HrGd96lp77%2Fuploads%2Faxixicd1Wfs0Lk8cBK1S%2FStep19.png?alt=media&amp;token=058f34db-4278-40cf-b01f-ae281a046a65" alt=""><figcaption></figcaption></figure>

**Paso 1:** Pasa el cursor sobre '**Wallet**' en la esquina superior derecha, selecciona '**Transfer CSPR**'.

<figure><img src="https://1416147950-files.gitbook.io/~/files/v0/b/gitbook-x-prod.appspot.com/o/spaces%2FunFX7Q97s4HrGd96lp77%2Fuploads%2FGP6Yyw4d7rypfRl0bXU5%2FStep20.png?alt=media&amp;token=b9915f7d-57bd-4692-b556-b7a46102dc45" alt=""><figcaption></figcaption></figure>

**Paso 2:** Introduce la clave pública de donde quieres enviar tu $CSPR en '**Recipient**',la cantidad de $CSPR que deseas enviar bajo '**Amount**' y complete un ID de transferencia específico si lo desea/necesita bajo '**Transfer ID (Memo)**'. Esto a veces es necesario si envías $CSPR a un intercambio. Si no es necesario, puedes usar '**0**'. Después de esto, haz clic en '**Next**'.

<figure><img src="https://1416147950-files.gitbook.io/~/files/v0/b/gitbook-x-prod.appspot.com/o/spaces%2FunFX7Q97s4HrGd96lp77%2Fuploads%2FM2AjZQxqvCX9Uc7e5me0%2FStep21.png?alt=media&amp;token=f4935867-65e4-4e3c-a87e-c13e7e1ccb9c" alt=""><figcaption></figcaption></figure>

**Paso 3:** Verifica si la información es correcta y haz clic.'**Confirm and transfer**'.

<figure><img src="https://1416147950-files.gitbook.io/~/files/v0/b/gitbook-x-prod.appspot.com/o/spaces%2FunFX7Q97s4HrGd96lp77%2Fuploads%2Fl2Ddu69LU9P4oTHGvTwU%2FStep22-1.png?alt=media&amp;token=f31f5075-42a4-4726-a0f1-e88af8240950" alt=""><figcaption></figcaption></figure>

**Paso 4:** Ahora te mostrará toda la información sobre tu transacción, y puedes hacer clic '**Sign with Casper Wallet**'.

<figure><img src="https://1416147950-files.gitbook.io/~/files/v0/b/gitbook-x-prod.appspot.com/o/spaces%2FunFX7Q97s4HrGd96lp77%2Fuploads%2FixvlpVggYcPaIlbfR9IH%2FStep22.png?alt=media&amp;token=a9123a11-6bf1-4a6a-9149-33cdb8a97a29" alt=""><figcaption></figcaption></figure>

**Paso 5:** Haga clic en '**Sign**' en la extensión de Casper Wallet.

<figure><img src="https://1416147950-files.gitbook.io/~/files/v0/b/gitbook-x-prod.appspot.com/o/spaces%2FunFX7Q97s4HrGd96lp77%2Fuploads%2F0cHsExXyxtiSi30UhjzK%2FStep23.png?alt=media&amp;token=585cfc44-98ac-4f43-afa1-cc973969aa7a" alt=""><figcaption></figcaption></figure>

**Paso 6:** Verás los detalles de la transferencia exitosa.

## Parte 4b – Transferir $CSPR Usando Casper Wallet

<figure><img src="https://1416147950-files.gitbook.io/~/files/v0/b/gitbook-x-prod.appspot.com/o/spaces%2FunFX7Q97s4HrGd96lp77%2Fuploads%2F0VagVMjcV7M6ze50xIE1%2FSend1.png?alt=media&amp;token=063123a9-5333-4c04-ac30-fc34ed4547e9" alt=""><figcaption></figcaption></figure>

**Paso 1:** Haga clic en '**Send**' en la extensión del Casper Wallet.

<figure><img src="https://1416147950-files.gitbook.io/~/files/v0/b/gitbook-x-prod.appspot.com/o/spaces%2FunFX7Q97s4HrGd96lp77%2Fuploads%2FPGH0zcx9ItaLpkqb8D1V%2FSend2.png?alt=media&amp;token=e0bce662-3be7-49f9-acc3-fcbc9aa5f012" alt=""><figcaption></figcaption></figure>

**Paso 2:** Rellena la clave pública de donde deseas enviar tu $CSPR a continuación '**To** **recipient**' y haz clic '**Next**'.

<figure><img src="https://1416147950-files.gitbook.io/~/files/v0/b/gitbook-x-prod.appspot.com/o/spaces%2FunFX7Q97s4HrGd96lp77%2Fuploads%2F4MVIsCHaqX1KCxLkLE4E%2FSend3.png?alt=media&amp;token=ef9b5afa-8cf9-4547-8317-6b7f16334d91" alt=""><figcaption></figcaption></figure>

**Paso 3:** Ingresa la cantidad de $CSPR que deseas enviar bajo '**Amount**' y complete un ID de Transferencia específico si lo desea/necesita bajo'**Transfer ID (memo)**'. Esto a veces es necesario si envías $CSPR a un intercambio. Si no es necesario, puedes usar'**0**'. Después de esto, haz clic en '**Next**'.

<figure><img src="https://1416147950-files.gitbook.io/~/files/v0/b/gitbook-x-prod.appspot.com/o/spaces%2FunFX7Q97s4HrGd96lp77%2Fuploads%2FoHaoXd8wVgk9BeuVdaYi%2FSend4.png?alt=media&amp;token=97bfc86e-15d7-4624-a669-2ec403363b27" alt=""><figcaption></figcaption></figure>

**Paso 4:** Haz clic en '**Send**'.

<figure><img src="https://1416147950-files.gitbook.io/~/files/v0/b/gitbook-x-prod.appspot.com/o/spaces%2FunFX7Q97s4HrGd96lp77%2Fuploads%2FzNN1E6lTTzmQd8JRyzoA%2FSend5.png?alt=media&amp;token=7acc0f3d-fc71-4eb3-ab9e-b2a95dc0f695" alt=""><figcaption></figcaption></figure>

**Paso 5:** Has enviado correctamente la transacción de transferencia. Haz clic en '**Done**'.

## Parte 5a – Delegar $CSPR Usando Casper Wallet Y CSPR.Live

<figure><img src="https://1416147950-files.gitbook.io/~/files/v0/b/gitbook-x-prod.appspot.com/o/spaces%2FunFX7Q97s4HrGd96lp77%2Fuploads%2FTzmSSr3S2rM4Z66IkaVg%2FStep24.png?alt=media&amp;token=4dd88e06-074e-4e60-8584-f63c70ba9364" alt=""><figcaption></figcaption></figure>

**Paso 1:** Pasar el cursor sobre '**Wallet**' en la esquina superior derecha y selecciona '**Delegate Stake**'.

<figure><img src="https://1416147950-files.gitbook.io/~/files/v0/b/gitbook-x-prod.appspot.com/o/spaces%2FunFX7Q97s4HrGd96lp77%2Fuploads%2FlD3A0W3o7EGmiNO8vlWZ%2FStep25.png?alt=media&amp;token=1acd0126-d14a-442d-a811-d4b176705896" alt=""><figcaption></figcaption></figure>

**Paso 2:** Elija un validador bajo'**Validator**' (For example, Speedy Staking) y la cantidad de $CSPR que desea delegar'**Amount**'. Después de esto, haz clic en '**Next**'.

<figure><img src="https://1416147950-files.gitbook.io/~/files/v0/b/gitbook-x-prod.appspot.com/o/spaces%2FunFX7Q97s4HrGd96lp77%2Fuploads%2FFo1fBVSBDKJKDGbq3kid%2FStep26.png?alt=media&amp;token=9f0131d5-1ae7-4c65-b02c-3e6a1bfa69d6" alt=""><figcaption></figcaption></figure>

**Paso 3:** Verifica si la información es correcta y haz clic '**Confirm and delegate stake**'.

<figure><img src="https://1416147950-files.gitbook.io/~/files/v0/b/gitbook-x-prod.appspot.com/o/spaces%2FunFX7Q97s4HrGd96lp77%2Fuploads%2F8WXpHA2Y9uU3xnDGX8Qo%2FStep27.png?alt=media&amp;token=cb1b7bac-9f74-443c-ba37-66a48b3c0428" alt=""><figcaption></figcaption></figure>

**Paso 4:** Ahora te mostrará toda la información sobre tu transacción, y puedes hacer clic '**Sign with Casper Wallet**'.

<figure><img src="https://1416147950-files.gitbook.io/~/files/v0/b/gitbook-x-prod.appspot.com/o/spaces%2FunFX7Q97s4HrGd96lp77%2Fuploads%2FrBsSVVcoQOybvsrujxNK%2FStep28.png?alt=media&amp;token=37c086fc-bd00-4908-842b-d548e67c25a1" alt=""><figcaption></figcaption></figure>

**Paso 5:** Haz clic en '**Sign**'.

<figure><img src="https://1416147950-files.gitbook.io/~/files/v0/b/gitbook-x-prod.appspot.com/o/spaces%2FunFX7Q97s4HrGd96lp77%2Fuploads%2F7DrWFHUPZQot9VdHGyih%2FStep29.png?alt=media&amp;token=3731131c-d989-4aaa-88c5-05604caaf609" alt=""><figcaption></figcaption></figure>

**Paso 6:** Verás los detalles de la delegación exitosa. Comenzarás a recibir Recompensas de Staking después de \~4 horas. Luego recibirás Recompensas de Staking cada ERA (\~2 horas).

## Parte 5b – Delegar $CSPR Usando **Casper Wallet**

<figure><img src="https://1416147950-files.gitbook.io/~/files/v0/b/gitbook-x-prod.appspot.com/o/spaces%2FunFX7Q97s4HrGd96lp77%2Fuploads%2FxKpXSJZNJwVgQ9l11OFK%2FStep30.png?alt=media&amp;token=d1aa1cc8-63d1-4bda-80d2-2792d9ef098b" alt=""><figcaption></figcaption></figure>

**Paso 1:** Haz clic en '**More**' en la extensión de Casper Wallet.

<figure><img src="https://1416147950-files.gitbook.io/~/files/v0/b/gitbook-x-prod.appspot.com/o/spaces%2FunFX7Q97s4HrGd96lp77%2Fuploads%2F4WwzKqRsGo8wbzyyMuhq%2FStep31.png?alt=media&amp;token=d62afaaa-0afb-41c9-bd23-e544d75fb43d" alt=""><figcaption></figcaption></figure>

**Paso 2:** Haz clic en '**Delegate**'.

<figure><img src="https://1416147950-files.gitbook.io/~/files/v0/b/gitbook-x-prod.appspot.com/o/spaces%2FunFX7Q97s4HrGd96lp77%2Fuploads%2FynmOO5IWBTeypKShCn2U%2FStep32.png?alt=media&amp;token=3f3c624d-8b42-4855-b3c5-b7653ba79513" alt=""><figcaption></figcaption></figure>

**Paso 3:** Seleccione un validador bajo '**To validator**' (Por ejemplo, Staking Rápido) y haga clic en '**Next**'.

<figure><img src="https://1416147950-files.gitbook.io/~/files/v0/b/gitbook-x-prod.appspot.com/o/spaces%2FunFX7Q97s4HrGd96lp77%2Fuploads%2FGsFBbUoW8Dx3Q1zX5GOj%2FStep33.png?alt=media&amp;token=60ecc704-7d2a-449e-98f8-beae75b2ce0c" alt=""><figcaption></figcaption></figure>

**Paso 4:** Ingrese la cantidad de $CSPR que desea delegar bajo '**Amount**' y haga clic en '**Next**'.

<figure><img src="https://1416147950-files.gitbook.io/~/files/v0/b/gitbook-x-prod.appspot.com/o/spaces%2FunFX7Q97s4HrGd96lp77%2Fuploads%2FTeC0JPUSyfNa0NQAn1Yg%2FStep34.png?alt=media&amp;token=b2097620-f925-48bd-8af9-dcc1cee9e998" alt=""><figcaption></figcaption></figure>

**Paso 5:** Haga clic en '**Confirm delegation**'.

<figure><img src="https://1416147950-files.gitbook.io/~/files/v0/b/gitbook-x-prod.appspot.com/o/spaces%2FunFX7Q97s4HrGd96lp77%2Fuploads%2Fhd8K5AkITJjGS3U1j7SQ%2FStep35.png?alt=media&amp;token=c2f9bb0c-d48e-41cb-95c9-251dd33e2682" alt=""><figcaption></figcaption></figure>

**Paso 6:** Has enviado con éxito la transacción de delegación. Haz clic en '**Done**'. Empezarás a recibir Recompensas de Staking después de \~4 horas. Luego recibirás Recompensas de Staking cada ERA (\~2 horas).


# Casper Wallet - Instalación e Setup

<figure><img src="https://1416147950-files.gitbook.io/~/files/v0/b/gitbook-x-prod.appspot.com/o/spaces%2FunFX7Q97s4HrGd96lp77%2Fuploads%2F9QTRUvQwvQwQmKH7R9vQ%2FStep1.png?alt=media&amp;token=e64438bf-aeeb-4918-bb21-81739a46cf10" alt=""><figcaption></figcaption></figure>

**Paso 1:** Navega a la [Casper Wallet website](https://casperwallet.io) y haz clic en **"Download"**

<figure><img src="https://1416147950-files.gitbook.io/~/files/v0/b/gitbook-x-prod.appspot.com/o/spaces%2FunFX7Q97s4HrGd96lp77%2Fuploads%2FKnF5ltVRJIa6HZOKImxa%2FStep2.png?alt=media&amp;token=c00da5e5-690d-4575-9f3b-e7917cce9be5" alt=""><figcaption></figcaption></figure>

**Paso 2:** Esto te llevará a la Chrome Store (o equivalente en otros navegadores); haz clic '**Add to Chrome**' (o equivalente en otros navegadores).

<figure><img src="https://1416147950-files.gitbook.io/~/files/v0/b/gitbook-x-prod.appspot.com/o/spaces%2FunFX7Q97s4HrGd96lp77%2Fuploads%2F2QRcjvOpHG9jtttFUBfd%2FStep3.png?alt=media&amp;token=b8cea778-ebd1-427d-9750-87502eacb463" alt=""><figcaption></figcaption></figure>

**Paso 3:** Haga clic en '**Add extension**'.

<figure><img src="https://1416147950-files.gitbook.io/~/files/v0/b/gitbook-x-prod.appspot.com/o/spaces%2FunFX7Q97s4HrGd96lp77%2Fuploads%2FByDAVbaiBVi1lCCbmAsS%2FStep4.png?alt=media&amp;token=52f8e6a8-9672-440a-9c7b-abd16d1c3324" alt=""><figcaption></figcaption></figure>

**Paso 4:** Después de agregar la extensión Casper Wallet, se abrirá una nueva pestaña en tu navegador para la configuración; haz clic '**Get started**'.

<figure><img src="https://1416147950-files.gitbook.io/~/files/v0/b/gitbook-x-prod.appspot.com/o/spaces%2FunFX7Q97s4HrGd96lp77%2Fuploads%2FoqUHvTgDHoOpK5cf2v6R%2FStep5.png?alt=media&amp;token=4eeb73cf-a2dd-4c38-aeb5-d52868e186a9" alt=""><figcaption></figcaption></figure>

**Paso 5:** Piensa en una contraseña segura, complétala dos veces, marca la casilla y haz clic '**Create password**'.

<figure><img src="https://1416147950-files.gitbook.io/~/files/v0/b/gitbook-x-prod.appspot.com/o/spaces%2FunFX7Q97s4HrGd96lp77%2Fuploads%2FI5G7Be28blPx41wwtouf%2FStep6.png?alt=media&amp;token=9d4f7b5a-4c38-4bd8-bc68-4ccdea56b76f" alt=""><figcaption></figcaption></figure>

**Paso 6:** Haz clic en '**Create my secret recovery phrase**'.

<figure><img src="https://1416147950-files.gitbook.io/~/files/v0/b/gitbook-x-prod.appspot.com/o/spaces%2FunFX7Q97s4HrGd96lp77%2Fuploads%2FtmyIvduhOkulwuhxNz05%2FStep7.png?alt=media&amp;token=d8677656-91e2-4fbe-9edb-64d50b2bbfcf" alt=""><figcaption></figcaption></figure>

**Paso 7:** Marque la casilla y haga clic en '**Next**'.

<figure><img src="https://1416147950-files.gitbook.io/~/files/v0/b/gitbook-x-prod.appspot.com/o/spaces%2FunFX7Q97s4HrGd96lp77%2Fuploads%2FIyOEbVLQNDrIMqz1OBhu%2FStep8.png?alt=media&amp;token=0ccacdcd-abe5-4123-85c6-263e544d071b" alt=""><figcaption></figcaption></figure>

**Paso 8:** Guarda tu frase de recuperación secreta en un lugar seguro, marca la casilla y haz clic '**Next**'.

<figure><img src="https://1416147950-files.gitbook.io/~/files/v0/b/gitbook-x-prod.appspot.com/o/spaces%2FunFX7Q97s4HrGd96lp77%2Fuploads%2F3lhjn4FuMylf9xqnBZek%2FStep9.png?alt=media&amp;token=e7b11b8b-48ae-4801-a2f9-2e32810d3aa3" alt=""><figcaption></figcaption></figure>

**Paso 9:** Complete las palabras faltantes de su frase secreta de recuperación correctamente y haga clic '**Confirm**'.

<figure><img src="https://1416147950-files.gitbook.io/~/files/v0/b/gitbook-x-prod.appspot.com/o/spaces%2FunFX7Q97s4HrGd96lp77%2Fuploads%2Fc60ics7ue4krWhPdHOvh%2FStep10.png?alt=media&amp;token=cbbc2427-bcb2-4c7c-8eb2-387d6ef12bec" alt=""><figcaption></figcaption></figure>

**Paso 10:** Haz clic en '**Done**'.

<figure><img src="https://1416147950-files.gitbook.io/~/files/v0/b/gitbook-x-prod.appspot.com/o/spaces%2FunFX7Q97s4HrGd96lp77%2Fuploads%2FXk1OclRpNiRig89nDLeM%2FStep11.png?alt=media&amp;token=ecc6e023-69e8-44f8-924a-abc2df52eef4" alt=""><figcaption></figcaption></figure>

**Paso 11:** Haga clic en '**Got it**'.

<figure><img src="https://1416147950-files.gitbook.io/~/files/v0/b/gitbook-x-prod.appspot.com/o/spaces%2FunFX7Q97s4HrGd96lp77%2Fuploads%2FpQWbqsaMjgr1OqZRJpn4%2FStep12.png?alt=media&amp;token=431acda8-10a5-4c2d-9963-85339e3eb760" alt=""><figcaption></figcaption></figure>

**Paso 12 (recomendado):** Ve al icono de extensiones en la parte superior derecha de Google Chrome, haz clic en él y haz clic en el pin junto a Casper Wallet. De esta manera, siempre tendrás fácil acceso a tu extensión Casper Wallet.


# Casper Wallet - Conecte Casper Wallet con CSPR.live

<figure><img src="https://1416147950-files.gitbook.io/~/files/v0/b/gitbook-x-prod.appspot.com/o/spaces%2FunFX7Q97s4HrGd96lp77%2Fuploads%2FGvuEbQnJ9840y66LkHiR%2FStep13.png?alt=media&amp;token=8e6bc588-bc4c-4c16-ae48-0f5a98e76d4f" alt=""><figcaption></figcaption></figure>

**Paso 1:** Ve a CSPR.live y haz clic '**Sign in**' en la parte superior derecha de la pantalla.

<figure><img src="https://1416147950-files.gitbook.io/~/files/v0/b/gitbook-x-prod.appspot.com/o/spaces%2FunFX7Q97s4HrGd96lp77%2Fuploads%2FnA2lTZKsWKSp0oXrhDQ2%2FStep14.png?alt=media&amp;token=6b5cdc76-0157-4bac-b0ff-af0045832904" alt=""><figcaption></figcaption></figure>

**Paso 2:** Haz clic en '**Casper Wallet**'.

<figure><img src="https://1416147950-files.gitbook.io/~/files/v0/b/gitbook-x-prod.appspot.com/o/spaces%2FunFX7Q97s4HrGd96lp77%2Fuploads%2FkMShP9B1TObhqP4y5wEw%2FStep15.png?alt=media&amp;token=f457997d-cb50-40a3-9b8b-44671782eae5" alt=""><figcaption></figcaption></figure>

**Paso 3:** Marca la casilla junto a la cuenta que deseas conectar y haz clic en '**Next**'.

<figure><img src="https://1416147950-files.gitbook.io/~/files/v0/b/gitbook-x-prod.appspot.com/o/spaces%2FunFX7Q97s4HrGd96lp77%2Fuploads%2Fw6QoW9dx7Nrrlv2H8boE%2FStep16.png?alt=media&amp;token=13955d6f-e864-4b25-95ad-45e5a22da856" alt=""><figcaption></figcaption></figure>

**Paso 4:** Haga clic en '**Connect to 1 account**'.


# Casper Wallet - Recibir $CSPR

<figure><img src="https://1416147950-files.gitbook.io/~/files/v0/b/gitbook-x-prod.appspot.com/o/spaces%2FunFX7Q97s4HrGd96lp77%2Fuploads%2FV5wtlrsjzVhjwf7l1IyQ%2FStep17.png?alt=media&amp;token=fec86cf4-394b-4b0f-9c26-84300f8e2c46" alt=""><figcaption></figcaption></figure>

**Paso 1:** Pasa el ratón sobre tu clave pública en la esquina superior derecha y selecciona '**View Account**'.

<figure><img src="https://1416147950-files.gitbook.io/~/files/v0/b/gitbook-x-prod.appspot.com/o/spaces%2FunFX7Q97s4HrGd96lp77%2Fuploads%2FAMNR9LtEurWHhiNoF2bV%2FStep18.png?alt=media&amp;token=20369765-e59a-4db3-b1aa-0feddf29a5d9" alt=""><figcaption></figcaption></figure>

**Paso 2:** Tu clave pública (dirección de la billetera) está en la parte superior. Esta es la dirección que usarás para enviar $CSPR.


# Casper Wallet - Transferir $CSPR (CSPR.live)

<figure><img src="https://1416147950-files.gitbook.io/~/files/v0/b/gitbook-x-prod.appspot.com/o/spaces%2FunFX7Q97s4HrGd96lp77%2Fuploads%2Faxixicd1Wfs0Lk8cBK1S%2FStep19.png?alt=media&amp;token=058f34db-4278-40cf-b01f-ae281a046a65" alt=""><figcaption></figcaption></figure>

**Paso 1:** Pasa el cursor sobre '**Wallet**' en la esquina superior derecha, selecciona '**Transfer CSPR**'.

<figure><img src="https://1416147950-files.gitbook.io/~/files/v0/b/gitbook-x-prod.appspot.com/o/spaces%2FunFX7Q97s4HrGd96lp77%2Fuploads%2FGP6Yyw4d7rypfRl0bXU5%2FStep20.png?alt=media&amp;token=b9915f7d-57bd-4692-b556-b7a46102dc45" alt=""><figcaption></figcaption></figure>

**Paso 2:** Introduce la clave pública de donde quieres enviar tu $CSPR en '**Recipient**',la cantidad de $CSPR que deseas enviar bajo '**Amount**' y complete un ID de transferencia específico si lo desea/necesita bajo '**Transfer ID (Memo)**'. Esto a veces es necesario si envías $CSPR a un intercambio. Si no es necesario, puedes usar '**0**'. Después de esto, haz clic en '**Next**'.

<figure><img src="https://1416147950-files.gitbook.io/~/files/v0/b/gitbook-x-prod.appspot.com/o/spaces%2FunFX7Q97s4HrGd96lp77%2Fuploads%2FM2AjZQxqvCX9Uc7e5me0%2FStep21.png?alt=media&amp;token=f4935867-65e4-4e3c-a87e-c13e7e1ccb9c" alt=""><figcaption></figcaption></figure>

**Paso 3:** Verifica si la información es correcta y haz clic.'**Confirm and transfer**'.

<figure><img src="https://1416147950-files.gitbook.io/~/files/v0/b/gitbook-x-prod.appspot.com/o/spaces%2FunFX7Q97s4HrGd96lp77%2Fuploads%2Fl2Ddu69LU9P4oTHGvTwU%2FStep22-1.png?alt=media&amp;token=f31f5075-42a4-4726-a0f1-e88af8240950" alt=""><figcaption></figcaption></figure>

**Paso 4:** Ahora te mostrará toda la información sobre tu transacción, y puedes hacer clic '**Sign with Casper Wallet**'.

<figure><img src="https://1416147950-files.gitbook.io/~/files/v0/b/gitbook-x-prod.appspot.com/o/spaces%2FunFX7Q97s4HrGd96lp77%2Fuploads%2FixvlpVggYcPaIlbfR9IH%2FStep22.png?alt=media&amp;token=a9123a11-6bf1-4a6a-9149-33cdb8a97a29" alt=""><figcaption></figcaption></figure>

**Paso 5:** Haga clic en '**Sign**' en la extensión de Casper Wallet.

<figure><img src="https://1416147950-files.gitbook.io/~/files/v0/b/gitbook-x-prod.appspot.com/o/spaces%2FunFX7Q97s4HrGd96lp77%2Fuploads%2F0cHsExXyxtiSi30UhjzK%2FStep23.png?alt=media&amp;token=585cfc44-98ac-4f43-afa1-cc973969aa7a" alt=""><figcaption></figcaption></figure>

**Paso 6:** Verás los detalles de la transferencia exitosa.


# Casper Wallet - Transferir $CSPR (In-App)

<figure><img src="https://1416147950-files.gitbook.io/~/files/v0/b/gitbook-x-prod.appspot.com/o/spaces%2FunFX7Q97s4HrGd96lp77%2Fuploads%2F0VagVMjcV7M6ze50xIE1%2FSend1.png?alt=media&amp;token=063123a9-5333-4c04-ac30-fc34ed4547e9" alt=""><figcaption></figcaption></figure>

**Paso 1:** Haga clic en '**Send**' en la extensión del Casper Wallet.

<figure><img src="https://1416147950-files.gitbook.io/~/files/v0/b/gitbook-x-prod.appspot.com/o/spaces%2FunFX7Q97s4HrGd96lp77%2Fuploads%2FPGH0zcx9ItaLpkqb8D1V%2FSend2.png?alt=media&amp;token=e0bce662-3be7-49f9-acc3-fcbc9aa5f012" alt=""><figcaption></figcaption></figure>

**Paso 2:** Rellena la clave pública de donde deseas enviar tu $CSPR a continuación '**To** **recipient**' y haz clic '**Next**'.

<figure><img src="https://1416147950-files.gitbook.io/~/files/v0/b/gitbook-x-prod.appspot.com/o/spaces%2FunFX7Q97s4HrGd96lp77%2Fuploads%2F4MVIsCHaqX1KCxLkLE4E%2FSend3.png?alt=media&amp;token=ef9b5afa-8cf9-4547-8317-6b7f16334d91" alt=""><figcaption></figcaption></figure>

**Paso 3:** Ingresa la cantidad de $CSPR que deseas enviar bajo '**Amount**' y complete un ID de Transferencia específico si lo desea/necesita bajo'**Transfer ID (memo)**'. Esto a veces es necesario si envías $CSPR a un intercambio. Si no es necesario, puedes usar'**0**'. Después de esto, haz clic en '**Next**'.

<figure><img src="https://1416147950-files.gitbook.io/~/files/v0/b/gitbook-x-prod.appspot.com/o/spaces%2FunFX7Q97s4HrGd96lp77%2Fuploads%2FoHaoXd8wVgk9BeuVdaYi%2FSend4.png?alt=media&amp;token=97bfc86e-15d7-4624-a669-2ec403363b27" alt=""><figcaption></figcaption></figure>

**Paso 4:** Haz clic en '**Send**'.

<figure><img src="https://1416147950-files.gitbook.io/~/files/v0/b/gitbook-x-prod.appspot.com/o/spaces%2FunFX7Q97s4HrGd96lp77%2Fuploads%2FzNN1E6lTTzmQd8JRyzoA%2FSend5.png?alt=media&amp;token=7acc0f3d-fc71-4eb3-ab9e-b2a95dc0f695" alt=""><figcaption></figcaption></figure>

**Paso 5:** Has enviado correctamente la transacción de transferencia. Haz clic en '**Done**'.


---

[Next Page](/llms-full.txt/1)